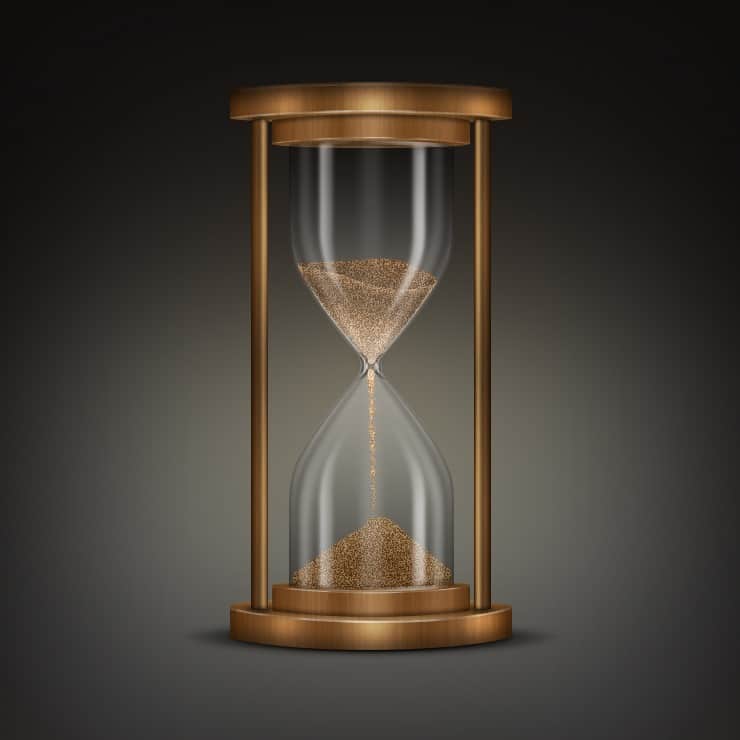
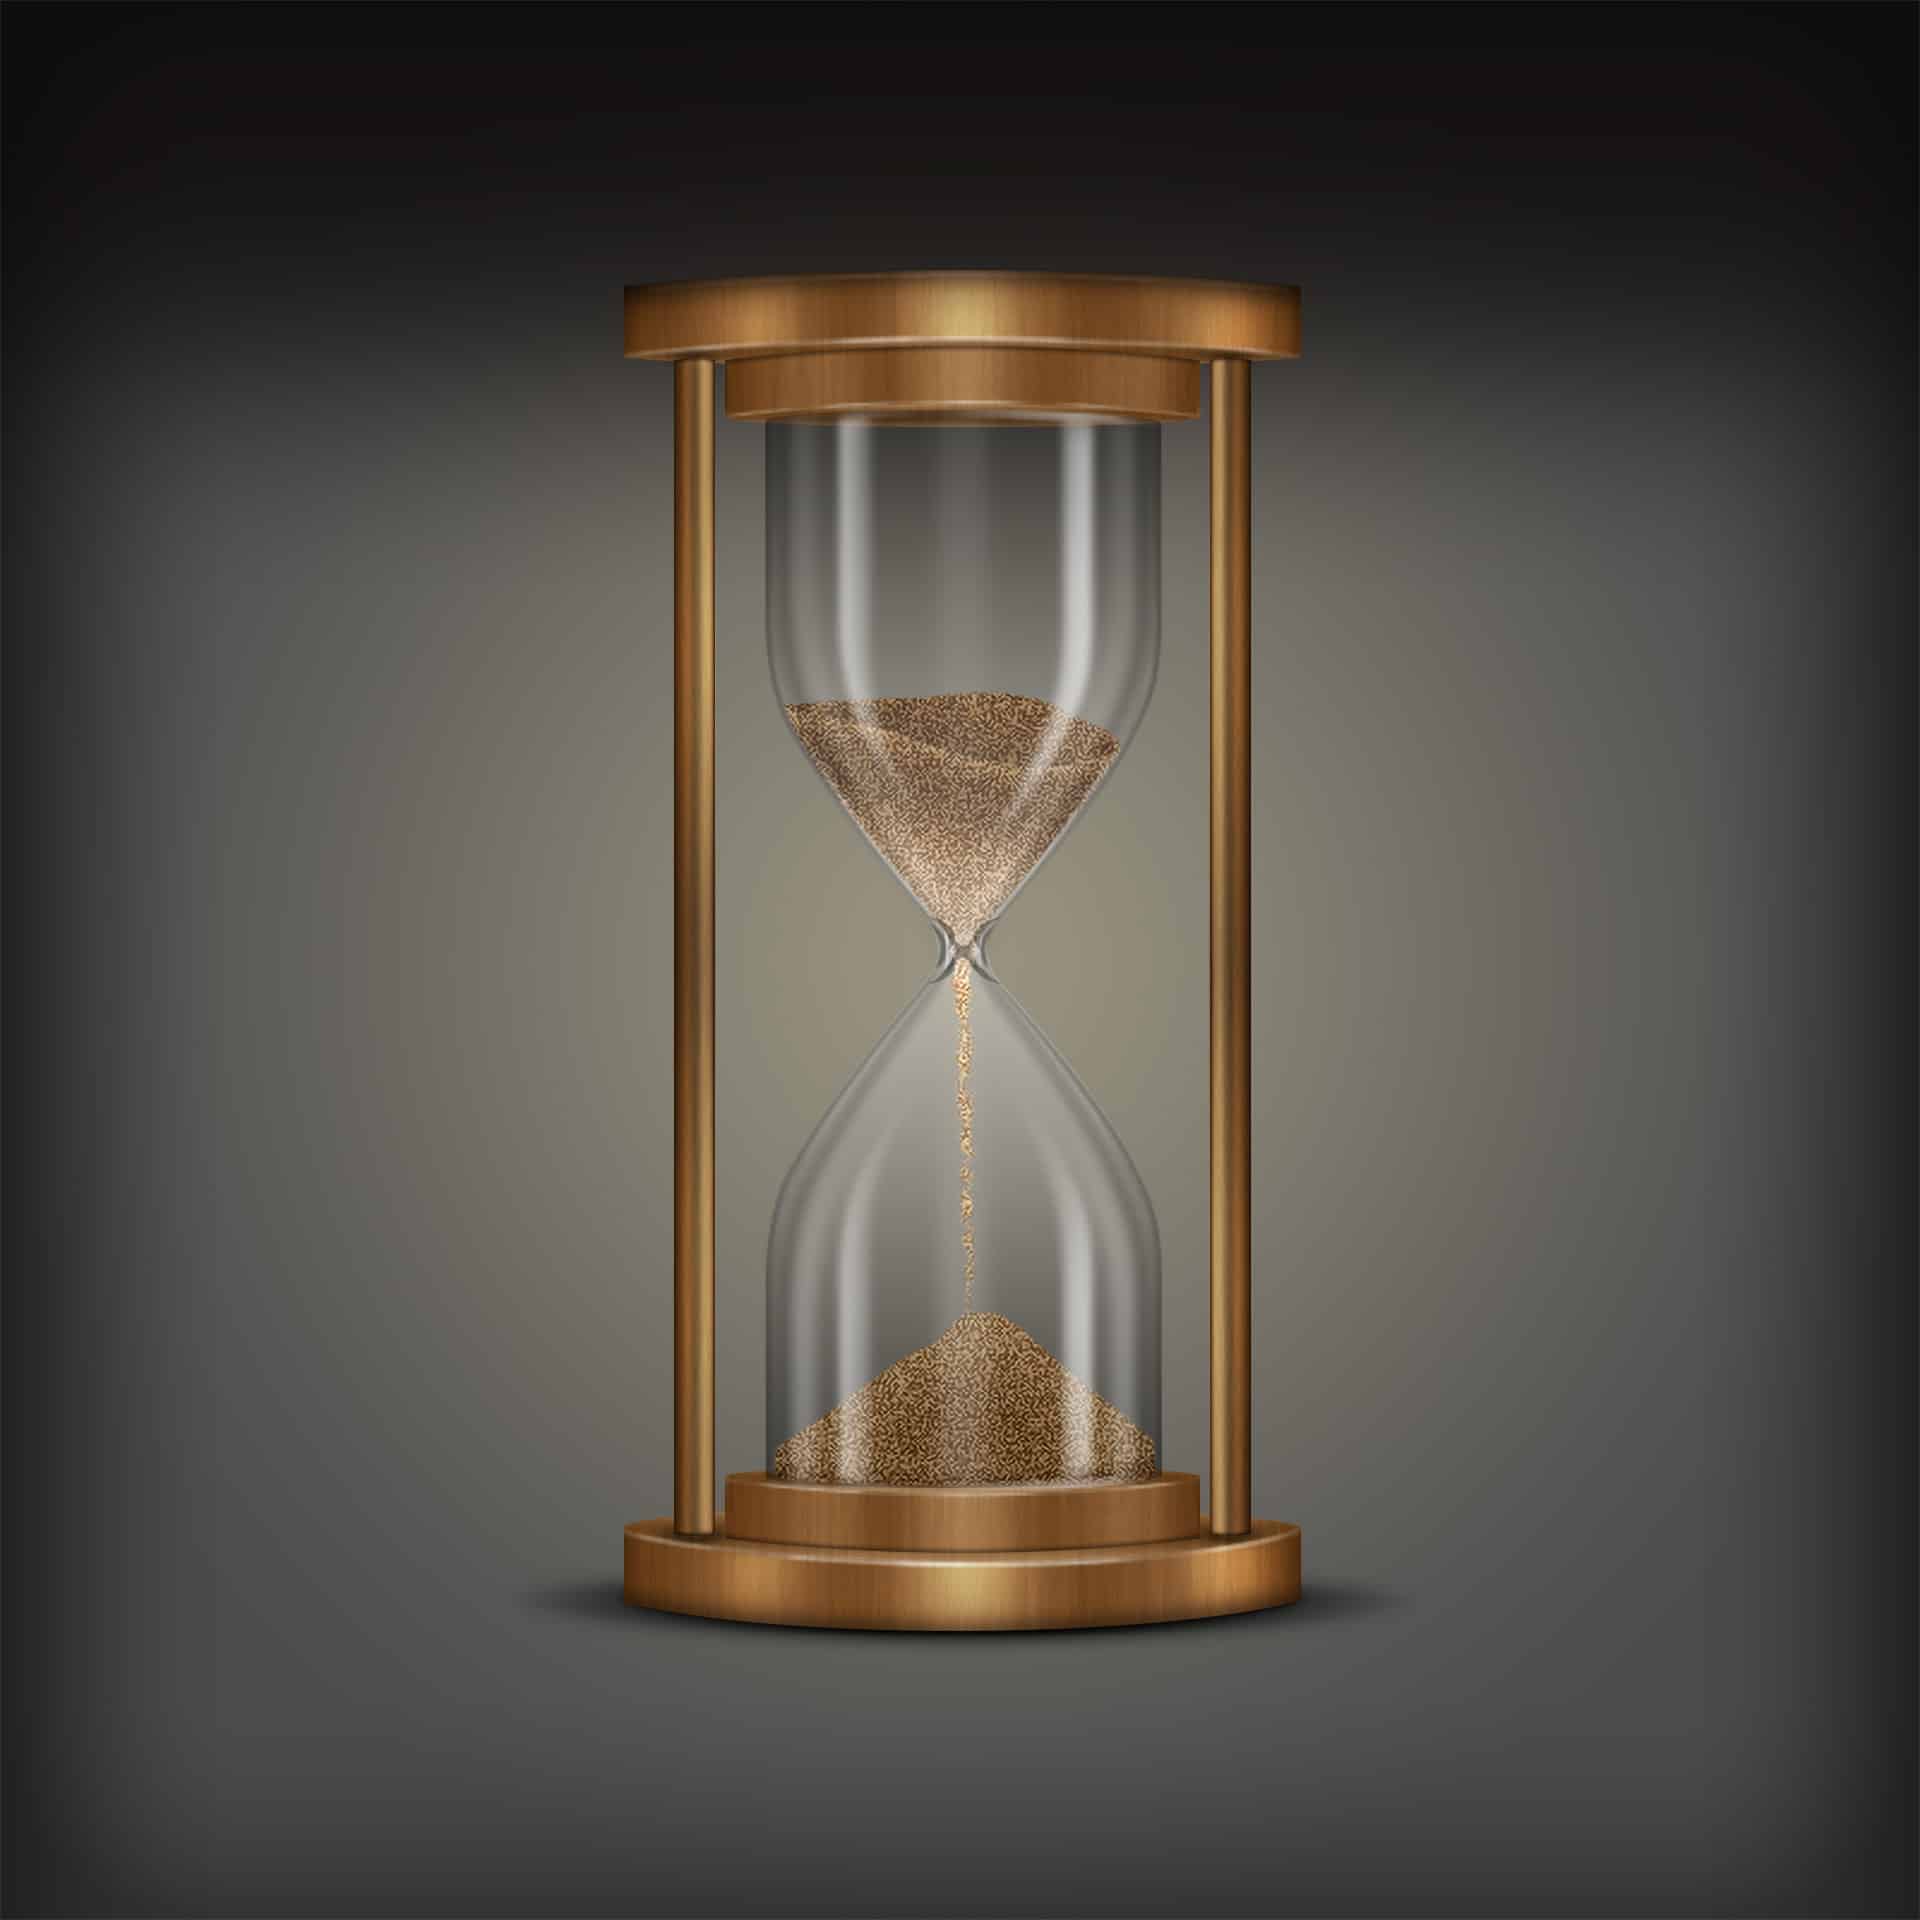
Learn how to create a realistic hourglass with Photoshop only. In this tutorial, you’ll learn how to create your own hourglass, add realistic shadows and lighting, then complete it with custom sand and wood texture. Throughout the tutorial, you’ll learn techniques that will help you create more realistic artworks in Photoshop.
What you’ll be creating
Hourglasses are common elements in print and web design. You will find them everywhere in various forms. They used as a symbol of time or passing of time. To create this image of an hourglass, we’ll start by creating shapes, then edit them to the hourglass shape. Next, we’ll add shadows and lighting to create the glossy surface of glass and wood. Finally, we’ll finish it up with a custom-made sand with Noise filter and use the Fibers filter to create the wood texture for the base and stands. You’ll need Photoshop CS3 or newer to follow this tutorial.
Step 1
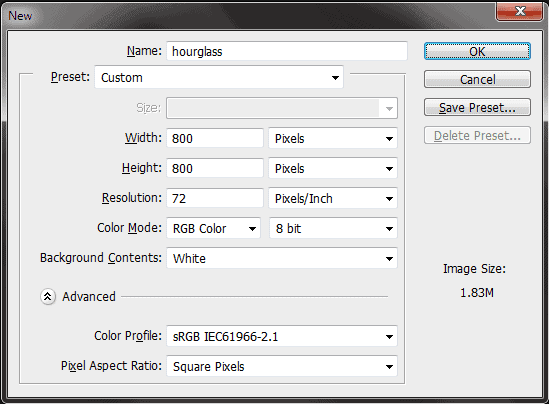
Open a new file (File > New) in Adobe Photoshop with the following settings. Save the file as “Hourglass.psd”. During work remember to frequently use File > Save (Ctrl/Cmd + S) to save and update the file.
Step 2
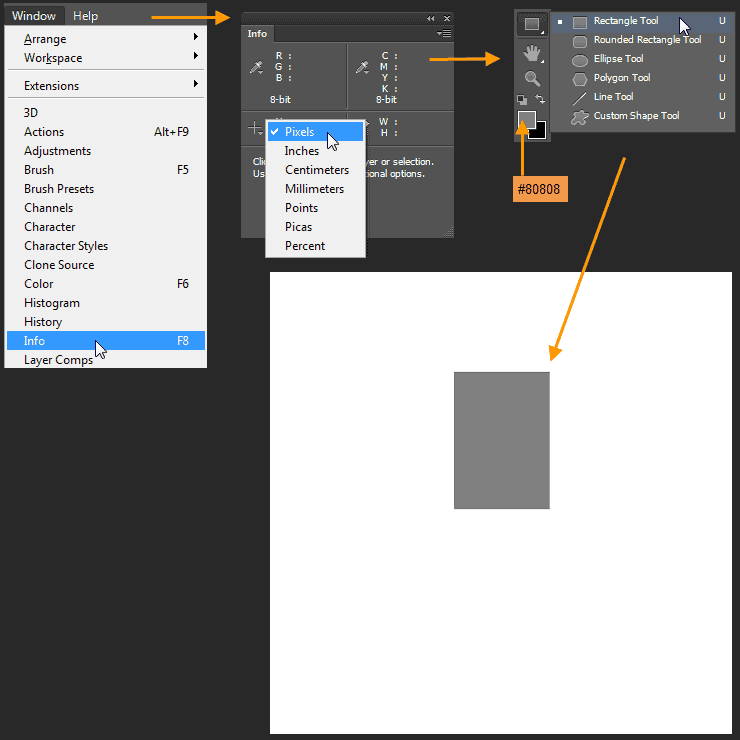
We need the Info Panel to create the hourglass shape precisely. Go to Window > Info to turn it on. In the Info Panel click on the “+” sign besides the X and Y coordinates and select Pixels as your unit. Then select the Rectangle Tool from the Toolbox and change the Foreground color to #808080. Go to the Option Bar above and select “Path” if it is not already selected. Then drag a 164 x 235 pixel rectangle like the below screen shot. Rename the layer to “Glass upper”.
Step 3
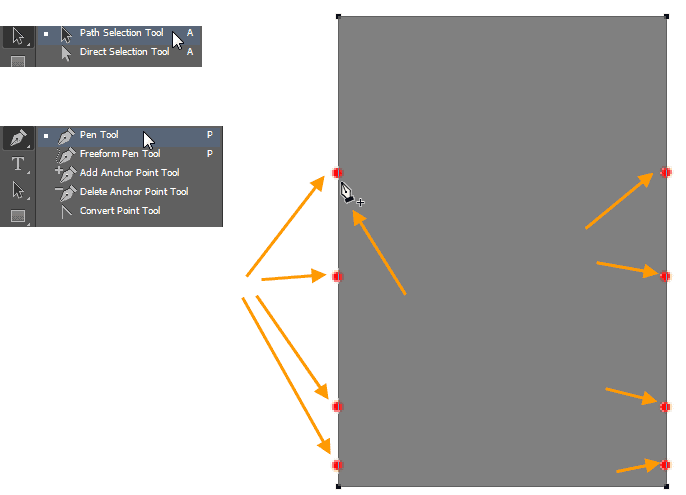
Take the Path Selection Tool and drag a selection around the rectangle to select it. Four selected Anchor Points are now visible like black solid squares. Select Pen Tool and add eight Anchor Points on the selected path of the rectangle by clicking on it. In the image below red dots indicate where you have to click to insert anchor points. Next we will edit the points to change the rectangle shape into the upper portion of the hourglass.
Step 4
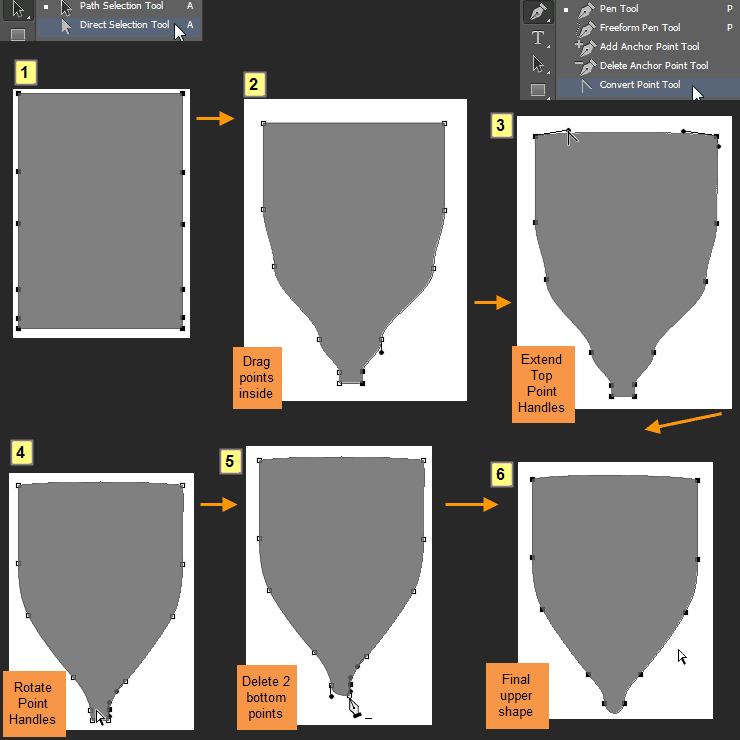
We will edit the points with Convert Anchor Point Tool and Direct Selection Tool. With Convert Anchor Point Tool, we will extend handles from Anchor point. Also it is helpful for creating spiky or angular shapes. Direct Selection Tool help us to rotate and move the Points. Direct Selection tool is good for creating or shaping curve shapes. Delete the two bottom corner points of the rectangle. This will help to create the neck portion of the upper hourglass. Practice with Anchor Point editing to refine your shape more.
Step 5
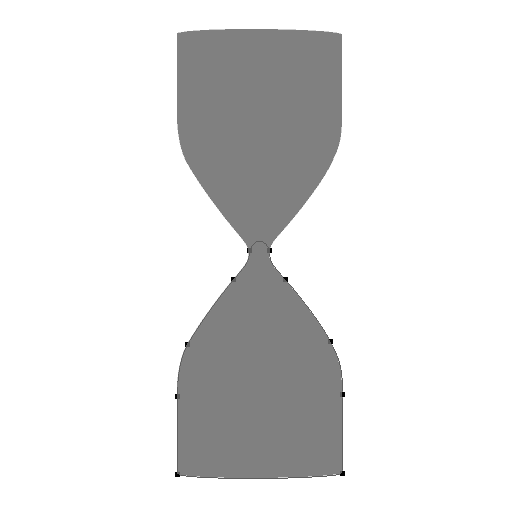
RT-click on the “Glass upper” layer and select Duplicate layer. In the Duplicate layer option box type “Glass lower” then click OK. Then Edit > Transform Path > Flip Vertical. Position the shape of the “Glass lower” layer like the image below. This is the lower portion of the hourglass.
Step 6
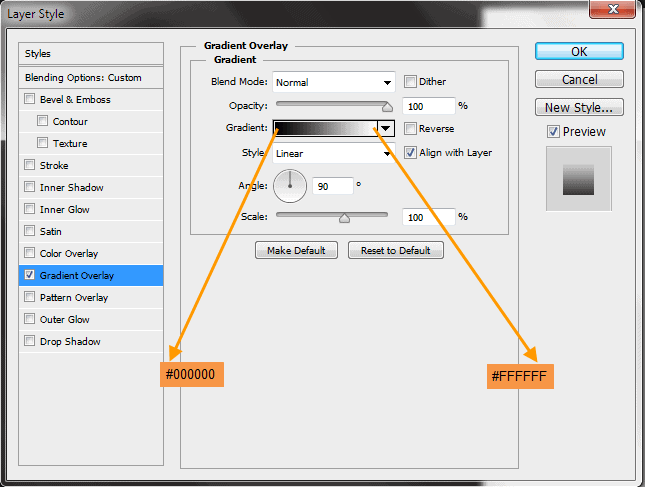
Double click on the “Glass lower” layer to open the Layer Style window. Create a Gradient Overlay like shown in the image below.
Step 7
RT-click on the Layer Style symbol of the “Glass lower” layer and select Copy Layer Style. Then RT-click on the “Glass upper” layer and select Paste Layer Style. Double click on the “Glass upper” layer to open the Layer Style window. Check the Reverse option at the right side of the gradient bar in the Gradient Overlay.
Step 8
Again double click on the “Glass lower” to open the Layer Style window. In the left side Blending Option: Custom should be selected, which is the first category. In the right side check Blend Interior Effects as Group. Then reduce the Fill Opacity to 35%. By checking this option we are ensuring that reduction of Fill Opacity will not effect the layer style opacity. This will give the glass a transparent look. Do the same for “Glass upper” layer.
Step 9
Select both “Glass upper” and “Glass lower” layers. Then Layer > New > Group from Layers. Rename the group to “Glass upr + lwr”.
Step 10
Click on the Background layer and create a new layer on top of it by clicking the Create a new layer button in the Layers Panel. Name this new layer “Bg grd” then double click on it to open the Layer Style window. Match the layer style settings from the images below. First the Inner Shadow.
Inner Glow settings:
Gradient Overlay settings:
Step 11
Click on the “Glass upr + lwr” group and expand it by again clicking on the arrow at the left side. Now CTRL-click on “Glass upper” layer to select. Collapse the group by again clicking on the arrow. Layer > New > Group to create a new group on top of that. Rename this group to “Glass upr highlights + shadows”. Click on Create a new layer button in the Layers Panel to create a new layer within this group. Rename this layer to “Glass upper shadow edge 1”. Fill this layer with Black (#000000).
Step 12
Selection still active, Select > Modify > Contract. Type 2 pixels in the Contract by field the click OK. Again Select > Modify > Feather and type 2 pixels in the Feather Radius field then click OK.
Step 13
Press Delete key to delete the selected area. The Feather is creating a nice fading effect from the edge.Change the layer opacity to 30
Step 14
Again CTRL-click on “Glass upper” layer to select. Then create new layer on top of “Glass upper shadow edge 1” with the name “Glass upper shadow edge 2”. Select > Modify > Contract with a value of 6 pixels.
Step 15
Then Select > transform Selection. Drag the top and bottom middle handle of the Bounding Box to elongate the selection.
Step 16
Fill the selection with Black (#000000). Then Select > Modify > Contract with a value of 4 pixels. Delete by pressing DELETE key. Then Filter > Blur> Gaussian Blur and set radius as 2 pixels. Reduce layer opacity to 20.
Step 17
Add a layer mask to the “Glass upper shadow edge 1” layer by clicking on the Add Layer Mask button in the layers panel. Select a soft brush with black color and 50% opacity. Then paint within the mask to hide the top and bottom edges.
Step 18
Add a similar type of layer mask to the “Glass upper shadow edge 2” layer also.
Step 19
Go back to the “Glass upper” layer. Add a Layer Mask like the image below to hide lower portion of the glass upper neck.
Step 20
Follow same process for “Glass lower” layer.
Step 21
Create a new layer named “Glass highlight upr sides” on top of the “Glass upper shadow edge 2” layer. Follow same technique like the edge shadow and create the white color shape within the shape of the “Glass upper shadow edge” layer. Experiment with the Contract and Blur filter. Remember that matching the exact shape is not the objective here. When you like the shape then add a layer mask to hide the top and bottom edges.Finally, Change the layer opacity to 30%.
Step 22
Select Pen Tool and create a white color shape like the image below on top of the “Glass highlight upr sides” layer. Rename this layer to “Glass highlight upr left” then Rt-click on it and select Rasterize. Gaussian Blur it and add a Layer Mask. Paint within the mask with soft black brush with 50% opacity to blend the right side. Then change the opacity of the layer to 70%.
Step 23
Similarly create the “Glass highlight upr right”. Check the image below for the process. Also change the opacity of the layer to 70%.
Step 24
CTRL-click on “Glass upper” layer to select. Create a new layer named “Glass upr right edge up” on top of “Glass highlight upr right” layer. Fill the selection with White color. Keep a small portion on top and delete the rest like the image below.
Step 25
Add a layer mask like the image below. The highlight will be more visible to the right side than the left side. Change the layer opacity to 70%.
Step 26
Create a new layer named “Glass upr highlight mid” on top of the previous. Take a 30 pixel soft brush with White color. Then draw a straight line the image below. Then Edit > Transform > Warp. Drag the bottom handles of the bounding box inside to taper the lower portion.
Step 27
Add a Layer Mask to this layer to mask the lower and upper portion to blend. Change the opacity of this layer to 10%.
Step 28
Follow same process like the “Glass upr right edge up” and create new layer named “Glass upr edge highlight left” with a white color shape like below. Then mask it to hide the some portion. Then change the layer opacity to 50%.
Step 29
Similarly create “Glass upr left edge up” layer.
Step 30
Take the Pen Tool and create two black color shape like below. Then change the opacity of this two layers to 30%. Names of these two shape layers will be “Glass joint shadow upr right” and “Glass joint shadow upr left”.
Step 31
Next we will create three small shapes in the neck area of the hourglass upper. But they should be the first three layers of the the group “Glass upr highlights + shadows”. You can create these three layers on top of the last layer (i.e. “Glass joint shadow upr left”) and later drag them down. So with the Pen Tool create a black color shape like below image. Name of this new shape layer will be “Glass joint mid shadow” and opacity 40%.
This is a combine shape layer, where we will create three separate shapes within a single shape layer. First we will create a shape like the image below. Shape layer is selected, go to Window > Paths to open the Path Panel. Make sure in the Path Panel path is selected. Then in the Option Bar above click on the Path operations button and select Combine Shapes.
Then create another shape within the same shape layer. This way you can combine multiple shapes. After completing the shape layer Rasterize it and then apply some low radius (2-3 px) Gaussian Blur. Change the layer opacity to 40%.
Step 32
Similarly create the white shape like the below image.
But no need to Gaussian Blur it. Just change the layer opacity to 50%.
Hourglass upper neck area with all the shapes. So upper portion of the hourglass is complete now.
Step 33
RT-click on the group “Glass upr highlights + shadows” and select Duplicate Group. Rename duplicate group to “Glass lwr highlights + shadows” then drag down below the “Glass upr highlights + shadows” group. Then flip this new group from Edit > Transform > Flip Vertical. Position this new group on top the lower portion of the hourglass.
Expand this “Glass lwr highlights + shadows” group and delete those shapes we created in the “Glass upr highlights + shadows” group previously. Those shapes only needed to be in the upper portion as they are overlapping.
Step 34
Create a new gropu named “Base upr + lwr” below the “Glass upr + lwr” group and on top of the “Bg grd” layer. Next we create the upper wooden base. The base is made off an ellipse and a curved rectangle. So we will use the Ellipse and rectangle Shape Tool. Check the image below for construction.
Select the Ellipse Tool and drag an Ellipse. Reduce the height to give it a perspective look. Then create a rectangle matching the width of the ellipse. Then follow the same hourglass process to curve the upper and lower edge. For this use the same Convert Anchor Point Tool and Direct Selection Tool. Shape layer names will be “Base upr large surface” and “Base upr large side”.
Step 35
Duplicate these two layers and rename them “Base upr small surface” and “Base upr small side”. Move these two layers (Base small) below the previous layers (Base large) and resize to create the small base below the large base.
Step 36
Double click on the “Base upr large side” layer to open the Layer Style window. Below is the Gradient Overlay settings:
Then the Inner Shadow settings:
Step 37
Next we will create the layer style for the “Base upr large surface” layer. Below is the Gradient Overlay settings:
Step 38
Next we copy paste layer style from “Base upr large side” to “Base upr small side” layer. Then from “Base upr large surface” to “Base upr small surface” layer.
Step 39
Duplicate all four lower base layers. Flip vertical and move them to bottom of the hourglass. Change “upr” to “lwr” in these four duplicate layers.
Step 40
Next we will create highlights and shadows for upper and lower bases. First create a new layer on top of “Base lwr large side” with the name “Base upr large side highlight”. CTRL-click to select “Base upr large side” then with a soft brush with White color and 50% opacity paint the highlights in the “Base upr large side highlight” layer within the selection. Then change the layer opacity to 70%.
Step 41
Create a new layer named “Base edge highlight upr large” on top the previous and create some edge highlights of Base upper large. Follow same technique like the way we created the edge highlights of hourglass upper.
Add a layer mask and paint with a soft black brush with 50% opacity to hide some areas. Reduce the layer opacity to 50%.
Step 42
Create a new layer with the name “Base upr large side shadow” on top and paint some shadow in the upper edge of the base upper large side. Use a soft brush with black color and 50%. Change the layer opacity to 70%.
Step 43
Next create a new layer named “Base edge highlight upr small” on top and paint some highlights on the lower edge of the base upper small. Use a soft brush with white color.
Add a layer mask and paint with a soft black brush with 50% opacity to hide some areas. Reduce the layer opacity to 50%.
Step 44
Similarly complete the highlights for lower base. But don’t create any shadow layer like “Base upr large side shadow” for base lower large side.
Step 45
Create a new layer group “Stands” on top of the existing group “Base upr + lwr”. Then create two new rectangle shape layers (#4c4c4c) connecting the upper and lower base. Each rectangle will be 17 pixels wide and 491 pixels tall. Shape layers names are “Stand left” and “stand right”.
Step 46
Double click on “Stand left” layer create the following layer style. First Gradient Overlay.
Inner Glow settings:
Inner Shadow settings:
Step 47
Copy “Stand left” layer style and paste on “Stand right”. In the layer style only change the Gradient Overlay angle.
Left and right stand after layer style.
Step 48
Create a new layer (“Stands left + right highlights”) on top of “Stand right” layer. Select a soft brush with 50% opacity and white color. Then CTRL-click to select the stand layers and paint some highlights like the image below. Change the opacity of the “Stands left + right highlights” layer to 50% and Blend Mode to Overlay.
Step 49
Next we will create two shadow layers for stands. First the vertical shadow. Create new layer on top of the “Stands left + right highlights” with the name “Stand shadows ver”. Then with a soft black color brush with 50% opacity paint straight vertical shadows for both stands. After that change the opacity of “Stand shadows ver” layer to 70% and Blend Mode to Multiply.
Step 50
Create the second shadow layer with the name “Stand shadows” on top of “Stand shadows ver” and paint some shadows like the image below with the same brush.
Step 51
Next we will create the sand within the hourglass. Create a new layer group with the name “Sand” on top of the “Stands” group. But before starting with the sand, let’s take a look at the structure first. The sand will consists of four basic shapes like the exploded view below.
Top, upper and lower sand shapes are created with Pen Tool. But we will create the falling sand with 59 pixel Spatter brush from the Brush preset. Then modify the Spatter brush in the Brush Panel (Window > Brush). Check the image below for Spatter brush settings:
Step 52
Within the “Sand” group create the top, upper and lower portion of sand as three shape layers with the Pen Tool. Shape layer color is not important as we will delete them later. Create a new layer with the name “Sand lower”. Chang your Foreground and Background colors to #c79e73 and #b7864d. Now fill the “Sand lower” layer with the #b7864d color. Then Filter > Noise > Add Noise. Type 25% as the amount, select uniform as distribution and check monochromatic. After that duplicate this “Sand lower” layer three times. Rename them “Sand falling”, “Sand upper” and “Sand top”.
CTRL-click on the sand lower shape layer to select. Selection still active target the “Sand lower” layer and add a layer mask.
Step 53
Similarly mask the “Sand upper” and “Sand top” layer. In the image below the visibility of “Sand falling” is turned off. You can delete the sand upper and sand lower shape layers now. Next we will create the mask of the “Sand falling” with the Spatter brush we created earlier.
Step 54
Target the “Sand falling” layer and from Layer > Layer Mask > Hide All. This will create a black mask. Now the “Sand falling” layer is completely hidden.
Select the Spatter brush and White as the brush color. Then paint within the mask to reveal the sand texture.
Step 55
Next we will add a Level Adjustment layer to brighten the falling sand more. But we need the Adjustment layer to effect the falling sand only not everything. To take care of that, first CTRL-click on the mask thumbnail of “Sand falling” layer. This will load the “Sand falling” layer mask as a selection. Selection is active go to Layer > New Adjustment Layer > Levels. The level adjustment layer will create a mask from that selection. So only the falling sand is brighten. Rename the level adjustment layer to “sand falling bright”.
Step 56
CTRL-click on the mask thumbnail of the “Sand top” layer to load that as a selection. Create a new layer on top with the name “Sand top shadow”. Select a soft brush with 50% opacity and color #463f3c. Paint some shadow on the top part of the sand. Then reduce the layer opacity to 30%.
Step 57
Next CTRL-click on the mask thumbnail of the “Sand upper” layer to load that as a selection. Create a new layer on top with the name “Sand shadow side”. Use the same brush to paint some shadow on the upper portion of the sand. Then reduce the layer opacity to 20%.
Step 58
Selection still active create a new layer on top with the name “Sand upr highlight”. Take a soft brush with 50% opacity and White color. Paint some highlight at the lower portion of the sand upper area. Change the layer opacity of “Sand upr highlight” to 30%. Sand is complete.
Step 59
Next we will create the wood texture of the hourglass. Create a new layer group named “Wood texture” on top of the group “Sand”. Create a new layer named “Base upr + lwr surface fibers” within this group. Change Foreground and Background colors to #724c27 and #dfbc9c. Then fill the layer with #dfbc9c color. Got o Filter > Render > Fibers and use 16 and 4 for Variance and Strength. Then again Filter > Sharpen > Unsharp Mask and use 100, 1.0 and 0 for Amount, Radius and Threshold.
Step 60
Resize the “Base upr + lwr surface fibers” layer with Edit > Transform > Scale. Duplicate this layer and rename to “Fibers overlay”.
Step 61
From the group “Base upr + lwr” CTRL-click on “Base upr large surface”. Then CTRL+SHIFT-click on “Base upr small surface”, “Base lwr large surface” and “Base lwr small surface”. Now we have a combined selection of four layers. Next we will subtract the combined selection of stand layers from this. This time CTRL+ALT-click on “Stand left” and “Stand right” from the “Stands” group.
Then go back to the “Base upr + lwr surface fibers” layer and add a layer mask to it. Change the opacity of this layer to 10%.
Step 62
Next create a combined selection of “Base upr large side”, “Base upr small side”, “Base lwr large side”, “Base lwr small side”, “Stand left” and “Stand right”. Target the “Fibers overlay” layer and add a layer mask. Change the layer opacity of this layer to 10% and Blend mode to Overlay.
Step 63
Duplicate the “Fibers Overlay” layer and rename to “Fibers Multiply”. Change the Blend Mode to Multiply and opacity to 10%.
Step 64
Next we will create the hourglass shadow. Create a new group named “Shadow” on top of the “Bg grd” layer. CTRl-click to select “Base lwr large surface” layer. from within the “Base upr + lwr” group. Then create a new layer within the “Shadow” group named “Base shadow area”. Fill the selection with Black color. Duplicate this layer and rename to “Base shadow contact”. Then target “Base shadow area” layer and Filter > Blur > Gaussian Blur then type 3 pixels and click OK. Next Filter > Blur > Motion Blur then type 100 pixels as Distance and Angle 0 degree.
Next target “Base shadow contact” layer and Filter > Blur > Gaussian Blur then type 2 pixels and click OK.
Press Down Arrow key to move down the “Base shadow contact” layer a little.
Final Results
Download the PSD
Tutorial by Ken Smith


– Ken Smith