Step 4
We will edit the points with Convert Anchor Point Tool and Direct Selection Tool. With Convert Anchor Point Tool, we will extend handles from Anchor point. Also it is helpful for creating spiky or angular shapes. Direct Selection Tool help us to rotate and move the Points. Direct Selection tool is good for creating or shaping curve shapes. Delete the two bottom corner points of the rectangle. This will help to create the neck portion of the upper hourglass. Practice with Anchor Point editing to refine your shape more.

Step 5
RT-click on the “Glass upper” layer and select Duplicate layer. In the Duplicate layer option box type “Glass lower” then click OK. Then Edit > Transform Path > Flip Vertical. Position the shape of the “Glass lower” layer like the image below. This is the lower portion of the hourglass.

Step 6
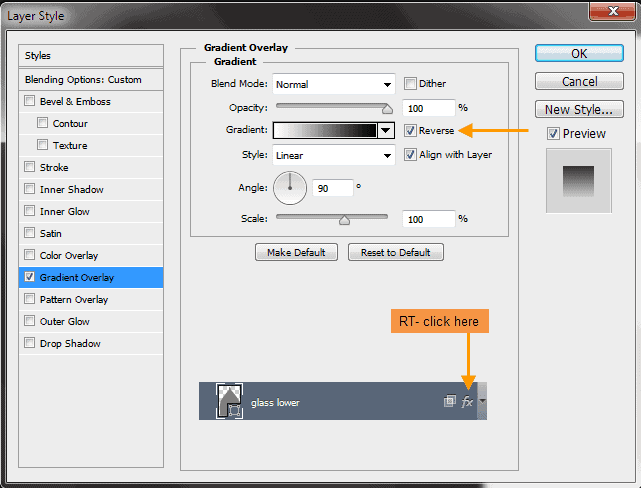
Double click on the “Glass lower” layer to open the Layer Style window. Create a Gradient Overlay like shown in the image below.

Step 7
RT-click on the Layer Style symbol of the “Glass lower” layer and select Copy Layer Style. Then RT-click on the “Glass upper” layer and select Paste Layer Style. Double click on the “Glass upper” layer to open the Layer Style window. Check the Reverse option at the right side of the gradient bar in the Gradient Overlay.

Step 8
Again double click on the “Glass lower” to open the Layer Style window. In the left side Blending Option: Custom should be selected, which is the first category. In the right side check Blend Interior Effects as Group. Then reduce the Fill Opacity to 35%. By checking this option we are ensuring that reduction of Fill Opacity will not effect the layer style opacity. This will give the glass a transparent look. Do the same for “Glass upper” layer.

Step 9
Select both “Glass upper” and “Glass lower” layers. Then Layer > New > Group from Layers. Rename the group to “Glass upr + lwr”.

Step 10
Click on the Background layer and create a new layer on top of it by clicking the Create a new layer button in the Layers Panel. Name this new layer “Bg grd” then double click on it to open the Layer Style window. Match the layer style settings from the images below. First the Inner Shadow.
20 responses to “Create an Hourglass in Photoshop”
-
Awesome. Thanks for sharing
-
This is terrible.
-
i agree
-
-
Thank You so much for giving such details. I created my hour glass for my upcoming DVD. best wishes to you. I will like to explore more and purchase soon.
-
Interesting :p :)
-
Am unable to download the file.
-
I am stuck with step 11.when i make that new layer ”glass upper shadow edge 1” ,i can’t fill it with black,but i don’t know why . Can anybody help me with that?
-
wow.. Fantastic steps.. I really like it. keep up :-)
-
Awesome… Thanks for sharing..
-
your welcome Hetor
-
-
Amazing, from scratch. Great work!
-
cool
-
fantastic
-
here the same: link doesnt work
-
Problems with website
-
Unable to load with this link.
-
yes! there is also same problem in link….
-
This link doesnt work for me, anyone else having the same trouble?
-
The Link Is Not Working For Me
-


Leave a Reply