Create a Minimalist Portal Scene in Photoshop

Create a Minimalist Portal Scene in Photoshop

Learn how to create an stormy landscape with a portal to another dimension. This tutorial will show you how to blend images using blending modes and use brush sets to create a stormy desert scene.

Preview of Final Results

How to Create a Minimalist Portal-scene in Photoshop JPG

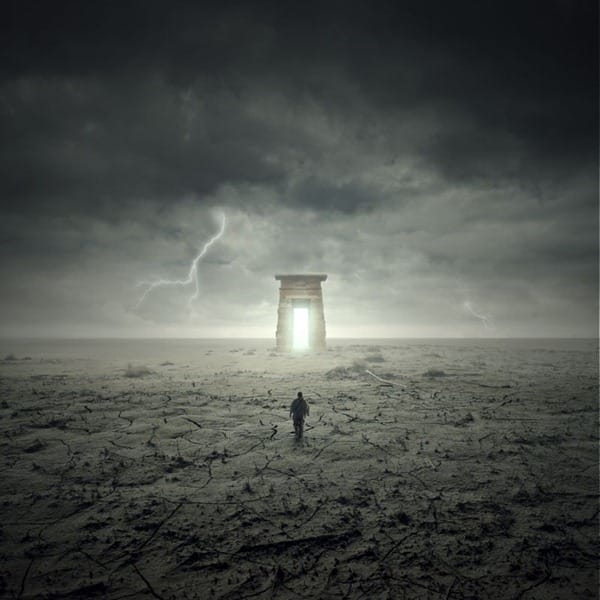
Minimalist Portal Scene Photoshop Tutorial

Resources

Step 1: Create a New Photoshop Image File

Okay, to start, let's create a new image file, go to the Menu bar and click File > New, and then input the following values on their respective fields:

  • Width: 3000px
  • Height: 3000px
  • Resolution: 300pixels/inch
  • Color Mode: RGB Color; 8 bit
  • Background Contents: Transparent
image006

Step 2: Create the Desert

For our second step, we will be creating the desert which will serve as the foreground of our picture. To start, open the image "premade 10" by night-fate-stock. Once you have it open, simply activate the Rectangular Marquee Tool by pressing M on your keyboard and then create a selection area as shown on the image below:

image007

After you've made the selection area, activate the Move tool by pressing V on your keyboard and click on the selected region and drag it to our canvas. Once moved to our canvas, the desert should look like this:

image008

Once you're done with that, rename this layer to "desert". To rename a layer, simply double-click on the words: "layer 1" (that is our sea image) to prompt a text box to appear. Once that appears, you may now rename the layer.

We should now resize it. To be able to do that, activate the Transform tool by pressing Ctrl/Cmd + T on the keyboard. Doing this will prompt a square with little squares on the corners and sides of the image. Now, we can resize the image. See the image below on how to resize it:

image009

The result should be similar to this:

image010

Step 3: Create the Sky

In this step, we will be creating our sky. To start, let's open "premade 4" by night-fate-stock. Activate the Rectangular Marquee Tool (M) and then create a selection area around the image's sky. See image below:

image011

Once you're done, activate the Move tool (V) once again and then drag it to our canvas. Rename this layer to "sky 1". Once done, drag and put this layer below the "desert" layer. Position it as shown below:

image012

Now, activate the Transform tool (Ctrl/Cmd + T) and let's transform "sky 1". See image below:

image013

The result should be similar to this:

image014

Now, that's it for "sky 1". Let's now add our other sky. We're going to blend these skies together to form a dark and stormy sky. Open "stock field" by digital amphetamine. We're going to the same step like we did in our previous step. Activate the Rectangular Marquee tool (M) and create a selection area around the sky, as shown in the image below:

image016

Now that that's done, activate the Move tool (V) and drag this selected sky to our canvas. Rename it then to "sky 2". Make sure that "sky 2" is above the "sky 1" layer. Next, activate the Transform tool (Ctrl/Cmd + T) and resize it as shown below:

image017

The result:

image018

Now, does that look like a stormy sky? It doesn't, right? So let's blend "sky 2" with "sky 1" to produce such a sky. To start, click on "sky 2" and change its blending mode from Normal to Multiply. See images below:

image019

Now, click on Multiply.

image020

We wouldn't want it to the dark, so let's reduce the Opacity to 70%.

image021

The result should be similar to this:

image022

Step 4: Create light and darkness

Now, we will enhance the light and shadows of our background. We'll start by darkening the foreground and the upper part of the sky. To be able to do that, let's create a new layer by clicking on the top most layer and pressing Ctrl/Cmd + Shift + N and once a box appears, type: "Darken" on the name field.

Note: We clicked on the top most layer so that the new layer would be created on top of it.

Next, activate the Brush tool by pressing B on the keyboard. Once open, make sure that the brushes are the default Photoshop brushes. See image below:

image023

To make sure that you're using that, simply right click the canvas while a layer is selected and while the Brush tool (B) is activated and then click on the button highlighted below:

image024

Then click on "Reset Brushes" from the contextual menu.

image025

Now, that that is done input the following settings for our Brush tool (B):

  • Brush size: 1100px
  • Hardness: 0%
  • Opacity: 15%
  • Flow: 100%
  • #: 000000
image026

The #: 000000 is the color of the Brush tool (B), so this means it is colored black. To set the brush color, follow the instructions below:

image027
image028

When you're ready apply black paint as shown on the image below:

image029

The result should be similar to this:

image030

After darkening our image, let us now paint in some light. To start, create a new layer (Ctrl/Cmd + Shift + N) and then name it "Light 1". Make sure to put this layer above the "Darken" layer. Activate the Brush tool (B) and then input the following:

  • Brush size: 400px
  • Hardness: 0%
  • Opacity: 15%
  • Flow: 100%
  • #: ffffff

Now, let's paint:

image031

Repeat it several times until you've come up with a result such as the one shown below:

image032

Next, create another layer (Ctrl/Cmd + Shift + N) and name it: "Light 2". Activate the Brush tool (B) and input the following:

  • Brush size: 700px
  • Hardness: 0%
  • Opacity: 25%
  • Flow: 100%
  • #: ffffff
image033

Drag it once, since the Opacity is higher. The result should be similar to this:

image034

Create another layer (Ctrl/Cmd + Shift + N) and name it "Light 3". Have the Brush tool (B) ready and then input the following:

  • Brush size: 1000px
  • Hardness: 0%
  • Opacity: 15%
  • Flow: 100%
  • #: ffffff

Then, get set to paint:

image035

The result of that should be similar to this:

image036

Finally, create another layer (Ctrl/Cmd + Shift + N) and then name it "Light 4". Activate the Brush tool (B) and input the following:

  • Brush size: 500px
  • Hardness: 0%
  • Opacity: 15%
  • Flow: 100%
  • #: ffffff
image037

The result:

image038

Now, that we're done, click on all these layers from the "desert" to the "sky" to the light and dark layers then press Ctrl/Cmd + G to group these layers to avoid confusion on later steps. Rename this group to "Background". Note: Renaming a group is similar to renaming a layer. You would also notice that the layers have been hidden from view, to view them again just left click on the arrow beside the Group's name. See below:

image039

Step 5: Create Lightning

In this step, we will add lightning bolts from the sky to make our image more epic. To start, create a new layer (Ctrl/Cmd + Shift + N) and name it "Lightning 1". Now, activate the Brush tool (B) and open the brush set: "Lightning Bolt Brushes V1" by GhostFight3r. To load them, simply, right click on our canvas through any layer and then click on the drop-down button as shown below:

image024[1]

This will prompt the contextual menu to pop up and once you see that, just click on Load Brushes.

image040

You will now be prompted to this directory: Adobe Photoshop > Presets > Brushes so make sure that you have put the brushes within this folder. Now locate the brush set and click OK. Right click on the canvas again using your Brush tool (B) and now you'll notice that you have lightning brushes. Now, let's choose a brush:

image041

With that brush selected, input the following brush settings for it:

  • Brush size: 600px
  • Hardness: Default
  • Opacity: 100%
  • Flow: 100%
  • #: dff9ff

This is the brush color we would be using:

image042

Now, let's paint in the first lightning bolt!

image043
image044

Notice the blocky part on the top part of the lightning?

image045

We would need to fix that and to do that, activate the Eraser tool (E) and input the following settings for it:

  • Brush size: 150px
  • Hardness: 0%
  • Opacity: 100%
  • Flow: 100%

Let's erase it now:

image046

The result should be similar to this:

image047

Now, we will make this lightning glow. To do that, right click on "Lightning 1" and then click on Blending Options.

image048

When the Blending Options menu opens, click on "Outer Glow" and set the following:

  • Outer Glow:
  • Blend mode: Screen
  • Opacity: 50%
  • Noise: 0%
  • #: efb0ff
  • Technique: Softer
  • Spread: 0%
  • Size: 0px
image049

The result of that should be similar to this:

image050

Next, let's now move to creating the second lightning bolt. Create a new layer (Ctrl/Cmd + Shift + N) and then name it "Lightning 2". Activate the Brush tool (B), make sure that "Lightning Bolt Brushes V1" by GhostFight3r is loaded, and then select the following brush from the set:

image051

Now, that you have that brush loaded, change its settings to the following:

  • Brush size: 200px
  • Hardness: 0%
  • Opacity: 100%
  • Flow: 100%
  • #: dff9ff

Paint "Lightning 2" on the region shown below to give a sense of depth:

image052

The result should be as follows:

image053

We would also need to make it glow so right click on "Lightning 1" and then click on "Copy Layer Style"

image054

Now, right click again on "Lightning 2" and then click on "Paste Layer Style"

image055

Now, let's give a bolt source for "Lightning 2". To start, create a new layer (Ctrl/Cmd + Shift + N) and then name it "Bolt source". Make sure that this layer is above "Lightning 2". Activate the Brush tool (B) and then click on that drop-down button again to open the contextual menu and then click on "Reset Brushes" since we're going to use the default PS brushes once again. Once they have been reset, set the Brush tool's settings to the following:

  • Brush size: 80px
  • Hardness: 0%
  • Opacity: 25%
  • Flow: 100%
  • #: ebfbff
image056

The result should be similar to the following:

image057

Group these layers (select all layers and press Ctrl/Cmd + G) and name the group to "Lightning".

Step 6: Create the Portal

Now, let's add the highlight of this image, the portal. To start, open "Arch Gate 07" by Dralliance Stock. Once the image is open, activate the Polygonal Lasso tool (L) and then create a selection area around the gate. See image below:

image058

Now that you have created a selection area around the gate, you may now move it to our canvas using the Move tool (V).

Upon moving the image to our canvas, rename this new layer to "Portal".

As you've noticed, its size would be something like this:

image059

Now we would need to reduce the size of this portal to the size that we need. So activate the Transform tool (Ctrl/Cmd + T) and then scale the "portal" as shown on the images below:

image060
image062
image063

Now, activate the Transform tool (Ctrl/Cmd + T) once again and right click on the canvas to bring out the Transform tool's contextual menu.

image064

Once you've done that, the only transformation you could do is to rotate the image.

image065

The result should be similar to this:

image066

Now that that's done, let's now tweak this "portal" to blend in with the rest of the images. First, let's tweak its Brightness/Contrast. Start by clicking on the "portal" layer and go to Image > Adjustments > Brightness/Contrast.

Use the following settings:

  • Brightness: +35
  • Contrast: -35
  • Use Legacy

The result should be similar to this:

image067

Next, activate the Eraser tool (E). We're going to make the "portal" blend in with the sand. Input the following for the Eraser tool (E):

  • Brush size: 45px
  • Hardness: 0%
  • Opacity: 100%
  • Flow: 100%

Make sure that you've zoomed in to the image to at least 50% so that you can clearly erase.

image068

Now, let's erase:

image069
image070

Next, let's lighten up the "portal" to make it blend more with the rest of the images. First, create a new layer (Ctrl/Cmd + Shift + N) and name it "Lighten". Make sure that this layer is above our "Portal" layer. We would need to apply this only on our "portal" layer only and to that, we would need a clipping mask. So, right click on "Lighten" and then click on "Create Clipping Mask".

image071

After that, you'd notice that the "Lighten" layer has an arrow pointing down at "Portal". Now, activate the Brush tool (B) and input the following settings:

  • Brush size: 70px
  • Hardness: 0%
  • Opacity: 15%
  • Flow: 100%
  • #: ffffff

Zoom level: 50%

image072

The result:

image073

Next, let's create another layer (Ctrl/Cmd + Shift + N) and this time name it "Lighten 2". Make sure that this layer is above "Lighten" and be sure to create a clipping mask for this new layer as well. Now, activate the Brush tool (B) and input the following:

  • Brush size: 250px
  • Hardness: 0%
  • Opacity: 15%
  • Flow: 100%
  • #: ffffff
  • Zoom level: 50%
image074
image075

Now, let's create the light in the "Portal" that leads to another dimension. To start, create a new layer (Ctrl/Cmd + Shift + N) and name it "portal light". Put this layer above all the layers for it to create haze around the mouth of the portal. Next, activate the Brush tool (B) and input the following:

  • Brush size: 150px
  • Hardness: 0%
  • Opacity: 50%
  • Flow: 100%
  • #: e7fbff

Let's paint!

image076
image077

The image should now be looking like this:

image078

Group these layers and name it "Portal".

Step 7: Create the Man

In this step, we would add the man that is walking towards the portal. To start, open "Walking on Ice 1" by Arctic Stock. Next, activate the Magnetic Lasso tool (L) and use this to create a selection area around the man.

image079
image080

After you've made the selection, move the man to our canvas using the Move tool (V). Once on the canvas, rename it to "man".

image082

The man is just the right fit for our canvas so we don't have to do any transformations. Now, let's make this man blend in well with the rest of the images. Let's start by editing its Brightness/Contrast by selecting the "man" layer and going to Brightness/Contrast in the Image > Adjustments > Brightness/Contrast tab. When it opens, input the following:

  • Brightness: +39
  • Contrast: -10
  • Use Legacy

The result should be as follows:

image084

Now let's darken the man's back to create contrast, to do that, we are going to use the Burn tool (O).

image085

Once open, input the following values for the Burn tool (O):

  • Brush size: 30px
  • Hardness: 0%
  • Range: Midtones
  • Exposure: 15%
  • Zoom at 300%

Burn the region shown below:

image086

The result:

image088
image089

Now, let's create a shadow for the man. Create a new layer (Ctrl/Cmd + Shift + N) and name it "shadow". Make sure to put this layer below the "man". Activate the Brush tool (B) and input the following:

  • Brush size: 80px
  • Hardness: 0%
  • Opacity: 15%
  • Flow: 100%
  • #: 000000
  • Zoom level: 50%
image090
image091

Group these layers now and rename it to "man".

Step 8: Create a Vignette

In this step, we will learn how to create a vignette which will help enhance the focus on our subject. To start, go to the Menu bar and click on File > New and use the same settings we used to create our canvas. (Refer to Step 1). Take note, the background contents should be white. Once it has been created, go to Filter > Distort > Lens Correction. Find the tab Vignette and use these settings:

  • Vignette amount: -100
  • Midpoint: +50
image092

Now that that's done drag the vignette to our canvas using the Move tool (V) and put it on top of all the layers that we've created, and then set the following:

  • Blending mode: Multiply
  • Opacity to 40%

To set the blending mode, simply click on the drop-down menu beside the word "Normal" on the top part of the Layer window. The Opacity is located just beside that drop-down menu as well. See image below:

image093
image094

The unblended Vignette will look like this:

image095

Once the blending mode is set to "Multiply" it would look like this:

image096

Step 9: Enhance the look and feel of the image

Now let's enhance the colors and overall feel of our image. Let's start by creating a Solid Color adjustment layer. To do that, simply click on the button shown on the image below:

image097

When it opens, click on the following:

image098

Once you've clicked on Solid Color, the Color Picker menu would open. When it opens, input the following color:

  • #: 02002a
image099

When you're done, you would see that your whole canvas is filled with a dark blue color. We would need to change that, so set the Blending Mode and Opacity to the following:

  • Blending Mode: Exclusion
  • Opacity: 50%
image100

Next, create another Solid Color adjustment layer (still from the Create New Fill/Adjustment Layer button). When the Color Picker opens, input the following color code:

  • #: 594427
image101

Next, set the Blending mode and Opacity to the following:

  • Blending Mode: Soft Light
  • Opacity: 50%

Next, let's create a Color Balance adjustment layer from the Create New Fill/Adjustment Layer button.

image102

When the Color Balance box opens, input the following:

  • Color Levels: -26, 0, -9
  • Tone Balance: Midtones
  • Preserve Luminosity: Check
image103

Next, create another Color Balance adjustment layer and now input the following:

  • Color Levels: -8, -13, -7
  • Tone Balance: Shadows
  • Preserve Luminosity: Check
image104

The result now should be something like this:

image105

Next, let's create an Exposure adjustment layer (Create New Fill/Adjustment Layer button).

image106

Once it opens, input the following:

  • Exposure: 0.3
  • Offset: 0.0000
  • Gamma Correction: 1.00
image107

On our final retouching technique, let's give it a slightly desaturated look, through giving it an infrared feel. Let's start by creating a Channel Mixer adjustment layer through the Create New Fill/Adjustment Layer button.

image108

When it opens, input the following:

  • Output Channel: Gray
  • Red: 0%
  • Green: +100%
  • Blue: 0%
  • Constant: 0%
  • Monochrome: Check
image109

The result of that would be a Black and White infrared photo:

image110

But we would want our image to be in color, so change the Opacity of the Channel Mixer layer to the following:

  • Opacity: 30%
image111

The result should be similar to this:

image112

Step 10: Final retouches

Now on this last step, we would be flattening our image. To do that, simply right click on any layer and then click on "Flatten image".

image113

Now that it has been flattened, let's add a little Lighting effect to our image to give the impact/focus on the center of our image. To do that, click on the flattened layer and go to Filter > Render > Lighting Effects. Once it opens, input the two following important changes:

  • Light type: Omni
  • Intensity: 17
image114

The result should be similar to this:

image115

Neat, isn't it? Now, finally, let's sharpen the image by clicking on the Flattened image and go to Filter > Sharpen > Unsharp mask. When this menu opens, input the following:

  • Amount: 25%
  • Radius: 50.0 pixels
  • Threshold: 1 level
image116

The result now should be something like this:

How to Create a Minimalist Portal-scene in Photoshop JPG

Finally, when you save in the JPEG format, it is advisable to save it in the highest quality which is 12.

Author's Comment

image119I'm a fan of minimalistic artworks, and I would like to share the process on how I do mine. I hope you'd enjoy creating this tutorial and I hope this would help you in whatever you're doing. Anyway, thank you for visiting this page and using my tutorial, if you want to see more of my art works, give me a shout at my website: https://www.wix.com/theflickerees/michaelVmanalo

- Michael Vincent Manalo

Luminar: AI Photo Editing
Sponsored

Luminar AI lets you turn your ideas into reality with powerful, intelligent AI. Download the photo editor and see how you can completely transform your photos in a few clicks.

Leave a Reply

Your email address will not be published. Required fields are marked *

cross