Make your artwork look like they're from an alternate universe. These Cyberpunk presets work with Photoshop (via the Camera Raw filter) and Lightroom. Download all 788 presets for 90% off.
Learn how to create this dark photo manipulation of an spirit ritual in Photoshop. In this tutorial, you'll learn how to change daylight image into dark night using techniques, create a light effect, painting human hair and blending techniques that will help you create better dark scens in Photoshop. Throughout the tutorial, you'll learn techniques that will help you create dark concepts in photoshop.
What you'll be creating
This tutorial is 42 Steps, containing three main sections. The story behinde this artwork tutorial is about magics rituals, that's why I called this Artwork Spiritual Ritual. To create this dark artwork, we'll start by creating a dark background of a temple. Next, we'll add some Light effect to the ground and add the model to the artwork and Finally add more light effects and blend all images in one atmosphere. I created this artwork using Photoshop CC but you can follow up with it using Photoshop CS6.
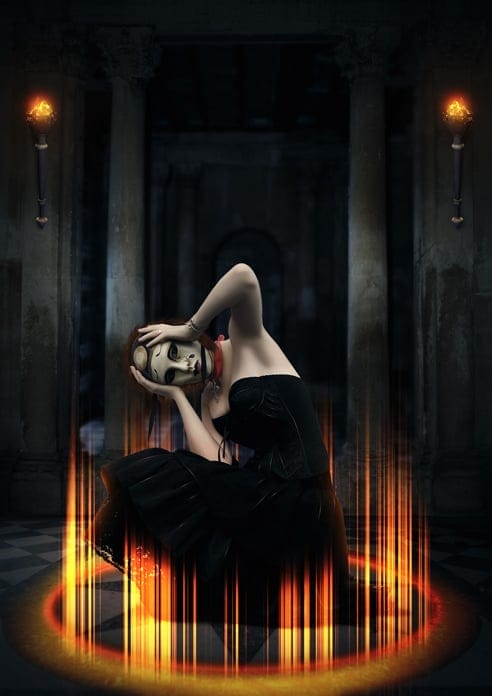
Tutorial Resources
- Model - seaoffirestock
- Background - elandria
- Torch - cactuskim
- Fire 1 - ayelie-stock
- Fire 2 - ayelie-stock
- Hair Brush - para-vine
Step 1
Create a new document, set the Width to 2480px and the Height to 3508px, Resolution on 300px, this is the A4 default size, set a name to your new document and hit OK.

Step 2
Lets add the background image, we want to add it as a smart object, to do this go to File > Place > and choose the background image. Resize the image so it fits the document, when done hit Enter.

Step 3
The ground on the image will not fit with the model perspective that we are going to use in later steps, so we will use the perspective tool to fix this. Start by picking the Lasso Tool (L) and make a selection around the ground then hold Ctrl+J to duplicate the selection to a new layer, name the duplicated layer to Ground.

Step 4
Go to Edit > Transform > Perspective, hold and drag out the bottom right pointer to change the ground perspective.
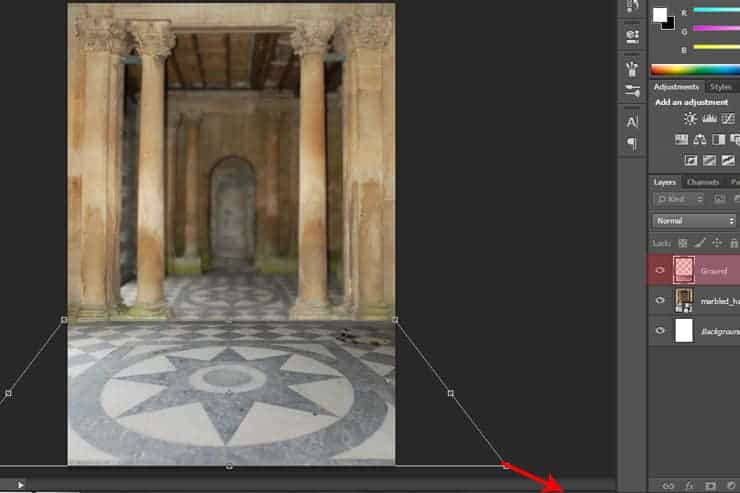
Go to Edit > Transform > Distort, hold and drag down the upper right and left pointer to change the ground distortion.

Step 5
Create a Levels Adjustment Layer and set the Output Levels values to 0, 105
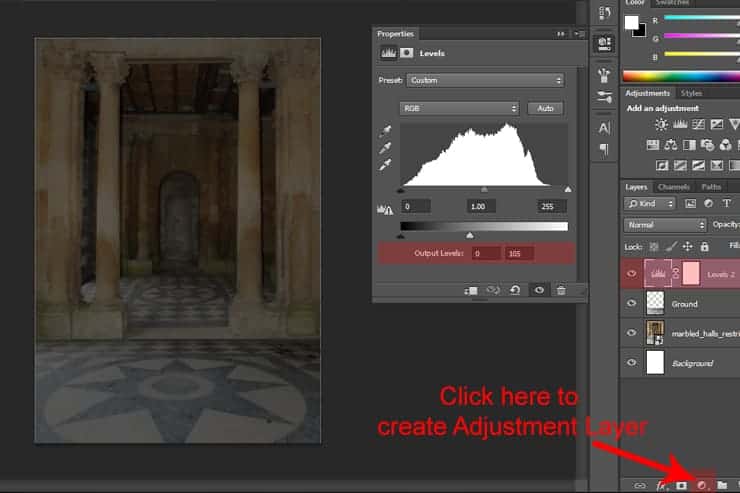
Step 6
Create another Adjustment Layer but this time choose Hue/Saturation, set the Saturation to -30 and the Lightness to -35.

Step 7
Create a Curves Adjustment layer and create a curve as shown in the image below. Now click on the Curves Layer Mask and fill the Mask with Black, use Alt+Delete to fill it with black but make sure your Foreground color is set to Black. Next pick the Brush Tool (B) and set the Brush Size to about 3300px Hardness 0%, set the Foreground color to white. Start brushing in the middle of the image (make sure you are working on the Curves Mask) to show the curves effect, we did this because we want the curves effect to be hidden in the image corners. (The red color in the image below shows where you should use the brush tool)

Step 8
Create a Gradient Map Adjustment Layer, make it black to white Gradient, and set the Blend Mode for this Adjustment Layer to Hard Light.

Step 9
Go back to our main background image and apply a Gaussian Blur effect to it, Filter > Blur > Gaussian Blur and set the radius to 7%.

Step 10
Adding a Filter to a smart object layer will create a Layer Mask to the filter so you will have much control over the filter. We will use the filter mask to apply the effect only on the back section of the background. Click on the Filter Mask and pick the Brush Tool (B) Size on 200px Hardness 0% and make sure your Foreground color is set to black, next start brushing over the columns and the front walls of the background image, make sure you are using the brush on the Filter Mask. (The red color in the image below shows where you should use the brush tool)

Step 11
Create a Solid Color Adjustment Layer and set the color to #125c9a, change the Layer Blend Mode to Hard Light and set the Opacity to 50%.

Pick the Brush Tool (B) and set the Size to 250px Hardness 0% and set your Foreground color to black, make sure you are working on the Solid Color Layer Mask and start brushing over the columns and front walls of the image (The red color on the image below shows where you should use the brush tool).

Step 12
Again create a Solid Color Adjustment Layer and set the color to #0f3b61 and change the Blend Mode to Soft light and Opacity on 35%.

Pick the Brush Tool (B) and set the Size to 250px Hardness 0% and set your Foreground color to black, make sure you are working on the Solid Color Layer Mask and start brushing over the back area of the image(The red color on the image below shows where you should use the brush tool).

Step 13
Create a new layer and name it to Shadows then pick the Rectangular Marquee Tool (M) and make a selection on the bottom part of the wall and columns (as shown in the image below), next grab your Gradient Map Tool (G) and set your Gradient on black to transparent, type of the Gradient is Liner. Create a gradient from the bottom of the selection to the top (as shown in the image below).

Next change the Blend Mode of the shadows layer to Multiply and set the Opacity on 50%.

Step 14
We are done with the background, create a Folder and put all the background layers into that folder to keep our document organized, and rename the folder to Background.

Step 15
Let's start adding light to the ground, create a new Layer and name it Ground_Light, pick the Elliptical Marquee Tool (M), set the selection type to Add Selection and make a circle selection on the ground as shown in the image below, we are still in the Elliptical Tool, change the selection type to Subtract Selection, and make a selection in the middle of the first selection as shown in the image below.

Step 16
Now set your Foreground color to #653a0f, and fill the selection with it by holding Alt+Delete, set the layer Blend Mode to Overlay.

Now go to Filter > Blur > Gaussian Blur, and set the Radius to 25.

Step 17
Create a new Layer then repeat Step 15 and Step 16, but this time fill the selection with this color #bf6004 and the layer Blend Mode to Color Dodge Opacity 75%, your result should look like the image below.

Step 18
Create a new Layer and rename it to Light_Effect, now repeat Step 15 to create the circle selection with Elliptical Marquee Tool the same way we did in step 15, but this time make it bigger as shown in the image below.

Pick the Gradient Map Tool (G) choose gradient type color to transparent and set the color to #854f06 then set the Gradient Map to Radiel. Next hold from the middle of the circle selection and drag up as shown in the image below.

Set the layer Blend Mode to Liner Dodge and the Opacity to 50%, next go to Filter > Blur > Gaussian Blur and set the radius to 25px.

Now create a layer mask to this layer, pick your Brush Tool (B) Size about 900px Hardness 0%, make sure your Foreground color is set to black, and start brushing over the edges of the ground light we created, we don't want to overcome with the light on the ground, that's the purpose behind this step.(Red color in the image below shows where you should use the brush tool)

Step 19
Duplicate the Liner Dodge layer, then change the Blend Mode to Color Dodge and set the Opacity to 100%.

Create a Hue/Saturation Adjustment Layer, check on the colorize box and set the Hue to 48, Saturation to 100 and the Lightness +30 (Don't forget to clip the adjustment layer to the color dodge layer).

Step 20
Time to work with the model, go to File > Place and choose the model image to place it in the document as a smart object.(Place it as shown in the image below)

Create a selection around the model using any selection tool you are familiar with (Pen Tool, Lasso Tool ....etc), when done selecting the model click on the Layer Mask icon to mask the Model out of the background.(include the model hair with your selection because we are going to paint the hair anyway).


Step 21
We have to erase these white parts that is showing on the model dress, to do this we are going to use the Mask Edge method.

Double click on the mask box to open the Mask dialog box then click on Refine mask and set the Radius on 5 and check on the Smart radius box.

Now use the Refine Mask Tool on the white parts as shown in the image below (the usage of this tool like the Brush tool usage).

Here is a before and after so you can see the result.

Step 22
Let's add the model shadow, start by creating a new layer under the model layer and rename the layer to Shadows, next pick the Brush Tool (B) Size 100px Hardness 0% and set the Brush Opacity to 50% Flow 50%, make sure your Foreground color is set to black. Now start brushing under the model skirt to create a shadow effect.(as shown in the image below).

Step 23
In this step we are going to draw the model hair, I drew this hair using the mouse, usually you should use a drawing tablet, it's easier drawing it using the tablet but I used the mouse because I don't have a drawing tablet :( Anyway, start by creating a new layer under the model layer and rename it to Hair, pick the Brush Tool (B) Size 100px Hardness 100% and Foreground color #391f12, and create the shape as the one shown in the image below.

Now pick the Smudge Tool, set the Strength to 75%, and as a brush choose the Hair 2 from the brushes pack you download in the start of the tutorial. Start brushing in and out in a curvy way like the image below to create the base of the hair.

Your result should look like the image below.

Step 24
On the same Hair layer, use your Brush Tool (B) the same way we used it in the past step to create the Hair shape but this time set the color to #634026 and draw a shape like the one shown in the image below, then use the Smudge Tool the same way we used in the past step, only change the Brush from Hair2 to Hair1.

Your result should look like the image below.

Step 25
Repeat step 24, but use the color #250f04 to draw the shape as shown in the image below.

Your result should look like the image below.

Still on the hair layer with Smudge Toole, Create slight flowing hair, use the Hard Round brush type to create slight flowing hair as shown in the image below.

Step 26
Now you know how to draw hair, use the same drawing method to draw the last part of the hair as show in the image below.

Step 27
In this step we are going to make the mask and the model skin look softer using the Mixer Brush Tool, start by creating a new layer and rename it to Mixer_Brush_Tool, clip the new layer to the Model layer, pick the Mixer Brush Tool (B) and set the brush on (Clean the brush after each stroke) then set the Wet, Load, Mix and flow to 10%, make sure the Brush Hardness is 0% and the Sample All Layers box is checked.

You need to be very carefull not to mix the shadows with the highlights, start by painting over the mask to mix the colors, hold and drag in the highlights parts, then hold and drag on the shadows parts, and as I said try not to mix the shadows with the highlights.(the image below shows how should you hold and drag the brush)

Your result should look like the image below.

Step 28
Let's make the Model skin softer, so repeat the same step we did to the model mask, use the Mixer Brush Tool as we did with the mask, and be carefull not to mix the shadows with highlights.

Your result should look like the same image below.

Step 29
Now create a new layer and rename it to Shadows_and_Highlights, set the layer Blend Mode to Soft Light and clip it to the model layer, next pick the Brush Tool (B) Size on 5px to 7px Hardness 0%, with the black color brush over the shadows parts on the model mask (Blue color in the image below shows where you should paint with black color) and with white color paint over the Highlights parts on the model mask (Red colors shows where you should paint with white color).

Step 30
Now create a new layer and rename it to Highlights, pick the Brush Tool (B) Size on 1px Hardness 0%, make sure your Foreground color is set to white and the Brush Opacity and Flow is set to 100%.

Now pick the Pen Tool (P) and start creating lines and curves as shown in the image below, each time you finish creating a line or curve hold Ctrl+Left Mouse Button to create a new line that is separated from the other one.

When done drawing the lines and curves, click with your Right Mouse Button and choose Stroke Path, then choose Brush and check on the Simulate Pressure box.

Go to the Path tab in the Layer Tabs and delete the Path layer because we don't need it anymore.

And finally your result should look like the image below.

Step 31
Let's blend the model with the background, start by creating a new Hue/Saturation Adjustment Layer, set the Saturation to -35 and place it on top of Shadow_and_highlights layer then clip it to the Model layer as the other layers clipped to the model layer.

Duplicate the Hue/Saturation Adjustment Layer by (Ctrl+J) and set the Adjustment Layer Blend Mode to Soft light with 25% Opacity, and clip it to the model layer too.

Now create a Gradient Map Adjustment Layer and set the shadows color to #042135 and highlights color to #fef0d2, then set the layer Blend Mode to Color with 15% Opacity, and make sure to clip it to the model layer as the others.

Step 32
Create a new Layer and name it Beam, use the Elliptical Marquee Tool (M) and the Lasso Tool (L) to make a selection as shown in the image below.

Pick the Gradient Mao Tool (G), set the Gradient Map type to Linear and the Preset to Noise as shown in the image, and create a gradient in a horizontal line as shown in the image below.

Now go to Image > Adjustments > Hue/Saturation, check on the Colorize box and set the Hue to 22 and Saturationto 100%.

Next go to Filter > Blur > Motion Blur and set the angel to 90% and the Distance to 755.

Create a Layer Mask for the Beam layer, pick the Brush Tool (B) Size about 1900px Hardness 0%, make sure your Foreground color is black and use the Brush and Mask to hide the top part of the beam as shown in the image below, when done change the Blend Mode of the beam layer to Linear Dodge(Red Color shows where you should use the Brush Tool on the Mask Layer).

Step 33
Duplicate the beam layer and place it under the model layer to make the beam looks like it's surrounding the model, use the Layer Mask to unhide the back parts of the beam that we hide in the main beam layer.

Step 34
Go back to the main beam layer, duplicatet the layer (Ctrl+J), change the Blend Mode to Color Dodge, go to Image > Adjustment > Hue/Saturation, check on the Colorize box and set the Hue to 24 Saturation to 10 and Lightness to +11.

Step 35
On top of all layers that are clipped to the model layer, create a new layer and rename it to Liner_Dodge then clip it to the model layer as the the other blending and shadows layers, next change the Blend Mode to Linear Dodge, pick the Brush Tool (B) Size 600px and Hardness 0% with a #ff7200 color and paint over the edges of the model skirt as shown in the image(Red color in image below shows where you should paint).

Step 36
Go to File > Place and add the Torch image, place it as shown in the image below, when done create a layer mask to the Torch layer and use the Mask to hide the text under the Torch and to hide the top part of the Fire, we are going to add our own fire.

Create a new layer and place it under the torch layer then rename it to Shadows, pick the Brush Tool on a small Size and Hardness 0%, set the Opacity to 50% then choose black color and start painting under the right edges of the torch to create a shadow(Red color in the image shows where to paint the shadow).

Step 37
Add the fire image by File > Place, use the Transform Tool (Ctrl+T) to resize it and place it in the torch fire holder, set the Fire layer Blend Mode to Screen.

Create a Layer Mask to the Fire layer and use it to Hide the unwanted parts of the fire (Red color in the image below shows where you should use the layer mask).

Add the second fire image, set the new fire layer Blend Mode to Screen, then use the Layer Mask to hide the unwanted parts of the fire, the same as we did with the first fire image.

Step 38
Create a new Group and place all the torch and fire images into the new group, next right click on it and choose Duplicate Group.

Move the duplicated torch group to the right part of the image, activate the Transform Tool(Ctrl+T) then Right Click on it and choose Flip Horizontal.

Step 39
Create a new layer and name it Torch_Light_1, set the layer Blend Mode to Linear Dodge and Opacity on 50%, pick the Brush Tool with a small Size and Hardness 0% and choose #f68909 as a Foreground color, paint over the top part of the fire to create a fire light effect as shown in the image below.

Again create a new layer and rename it to Torch_Light_2, set the Blend Mode to Color Dodge and with Brush Tool (B) create another light effect on top of the fire, choose the #f85d09 as a Foreground color.

Step 40
Create a new layer and name it Screen then set the Blend Mode to Screen, pick the Brush Tool (B) Size 800px Hardness 0% and Opacity on 50%, choose #3b1903 as a Foreground color, paint over the top part of the torch so you create a bigger Light Effect (Red color in the image below shows where you should paint).

Create a new layer and name it Light then set the Blend Mode to Color Dodge, pick the Brush Tool (B) Size 800px Hardness 0% and Opacity on 100%, Foreground color #51250a and paint as shown in the image below (Red color in the image below shows where you should paint).

Step 41
Create a Curves Adjustment Layer on top of all layers, and do as shown in the image below, just move the shadows pointer of green curves and red curves a bit, same goes for blue curves.

Create a Selective Color Adjustment Layer on top of all layers, in the colors tab choose Natural and set the black color to +15.

Step 42
Now hold Alt+Ctrl+Shift+E to make a merged layer of all the layers.

and finally go to Image > Adjustments > Variation and do the steps as shown in the image below.

Final Results

Download the PSD
[vc_column width="1/1" el_position="first last"] [vc_cta_button title="Download" href="https://downloads.photoshoptutorials.ws/Spiritual Ritual.zip" color="btn" size="btn-large" icon="none" target="_self" position="cta_align_right" call_text="Spiritual Ritual.zip | 79.6 MB" width="1/1" el_position="first last"] [/vc_column]
5 comments on “Create a Dark Spiritual Ritual Scene of a Girl in Photoshop”
Had a hard time getting the mixer brush tool, never delivered as smooth a surface as the tutorial displays. (Step 27)
Also, the gradient noise for the beam isn't as sharp after motion blur applied.
Besides that, great descriptive tutorial. Thanks.
thank you for sharing. Your dahtuger is precious. I hope the world is always good to her. your link to the book has a 404 error. no book there so is your site down?
Too many step images are missing/failing to load - review your upload before announcing it. This could have been an great tutorial as an inspirational learning project.
some images may not load properly
Quite a few of the step images are missing/failing to load :-( Otherwise this is an awesome tutorial.