Step 7
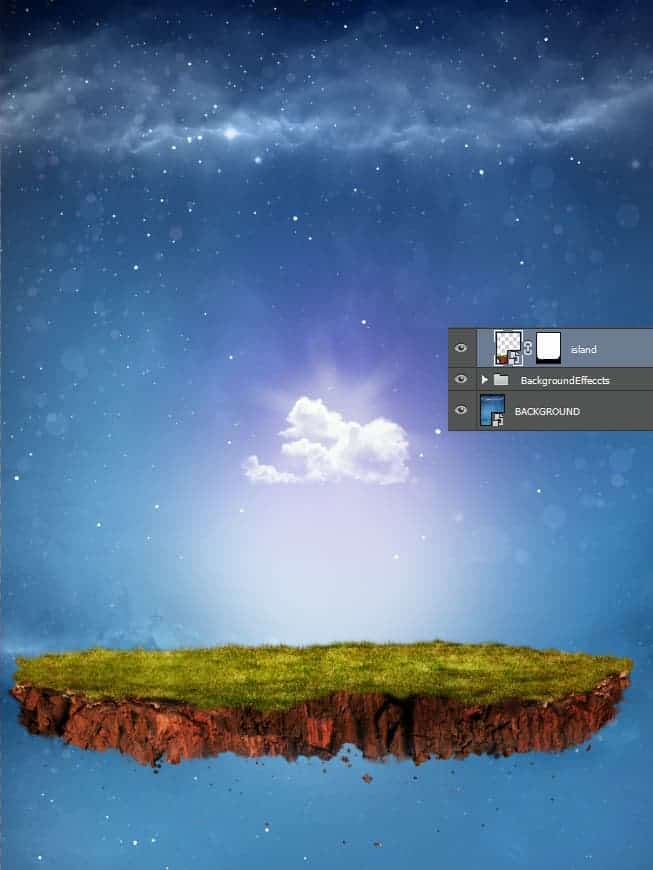
Open the image “Island”. Select all by pressing Ctrl + A and copy by pressing Ctrl + C. Go back to our scene and press Ctrl + V to paste. Press Ctrl + T to enter Free Transform and position the island as shown below.

Step 8
Add a layer mask to the island layer ( Layer > Layer Mask > Reveal All). Use the standard chalk brush in the layer mask to hide the bottom of the island ( in a layer mask black hides everything and white reveals so paint with black in the layer mask over the areas you want hidden).

Step 9
Open the file “Chains”. Select a set of chains you like and copy/paste them into our scene (click on one of the layers you like, Ctrl + A to select all, Ctrl + C to copy and Ctrl + V to paste back in our document). Right click the pasted chain layer and choose from the drop down menu “Convert To Smart Object”. Do this for all the imported layers (smart objects allow us to preserve pixel information after countless resizes and transforms). Use layer masks to hide the upper portions of the chains.

Step 10
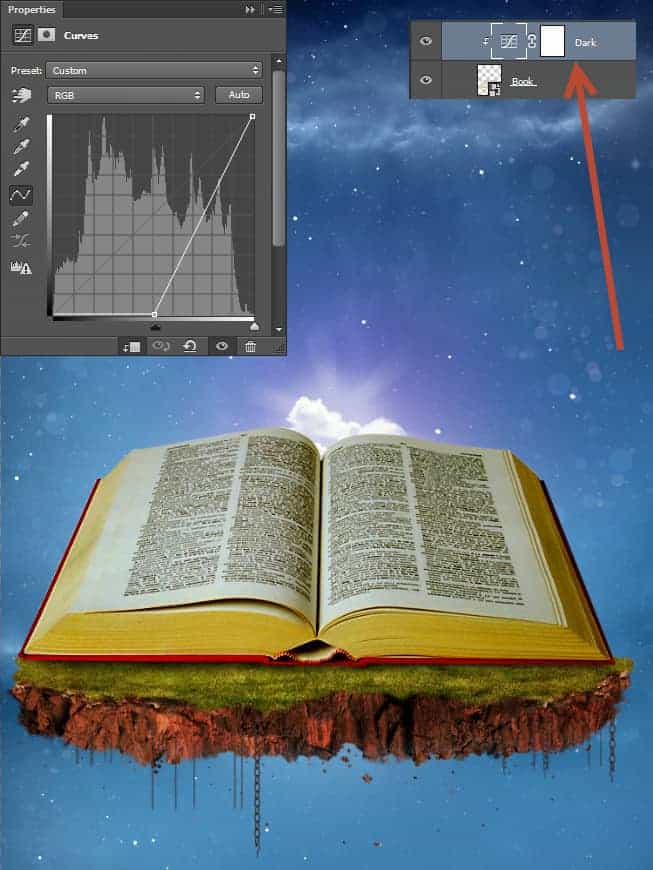
Open the file “Book”. Use the Pen Tool to make a selection of the book (P for Pen Tool) and after you’re done press Ctrl + Enter to convert the path into a selection. Copy/paste the book in our scene and place it on top of the island. Don’t forget to convert it to a smart object.

Step 11
Create a new layer and place it below the book layer. Use the standard round soft brush to paint with black a shadow. Change the layer blending mode to Multiply.

Step 12
Create a new Curves Adjustment Layer (Layer > New Adjustment Layer > Curves) and use the settings shown below to increase the darkness and the contrast. Once you’re done with the curve settings hold the Alt key and click once between the curves and the book layer – this will clip the curves layer to the book. Clipping a layer to another means that the upper layer will be visible only through the bottom layer pixels – in our case the effects of the curves layer will be restricted only to the book layer below.

Step 13
Create a Hue/Saturation Adjustment Layer ( Layer > New Adjustment Layer > Hue/Saturation) and lower the saturation to -68. Now clip this layer to the curves layer we created at step 12. This will in effect restrict the saturation effect only to the book layer (because it is the bottom most layer).
10 responses to “How to Create a Fantasy Book Scene in Photoshop”
-
stop
-
Beautiful
-
very nice excellent
-
excellent tutorial..very clear explanation…u r genius
-
That’s Amazing Dude Very Very Nice !
-
Beautiful
-
Mr cordes U slayer :)!$
-
excelente tutorial. :)
-
Woooow…awesome work ???
-
Wow


Leave a Reply