Download Lightroom presets and LUTs, absolutely free. Use the presets to add creativity and style to your photos.
Next make a new layer and change it's blend mode to Color Dodge. Using a white soft round brush at 10% opacity paint over the areas shown below to make them look like they are lighted from inside the skull.
Make yet another new layer and change it's blend mode to Multiply. Using a soft round black brush at 20% opacity add more shadow to the outer parts of the circuits.
Group all these circuits layers and move the group below the "Face" layer but above the "Metal Skull" layer. If you did not masked the circuits in the previous steps than add a layer to this group and mask away the unwanted circuits.
Make a selection of all the circuits than on a new layer fill this selection with whatever color you want. Drop the fill opacity to 0% than add a drop shadow effect. Mask away the unwanted shadows.

Step 9
Let's add some wires to our circuitry. Using the Eliptical Marquee tool draw a small circle and fill it with black (or any other color). Drop the fill to 0% than add an inner shadow effect. Use a 4 px hard brush tool to connect the hole with the circuits then add the effects shown below to the wire. Group the wire and the hole than duplicate this group two times and make each duplicate smaller than the previous. Arrange them like shown below.

Step 10
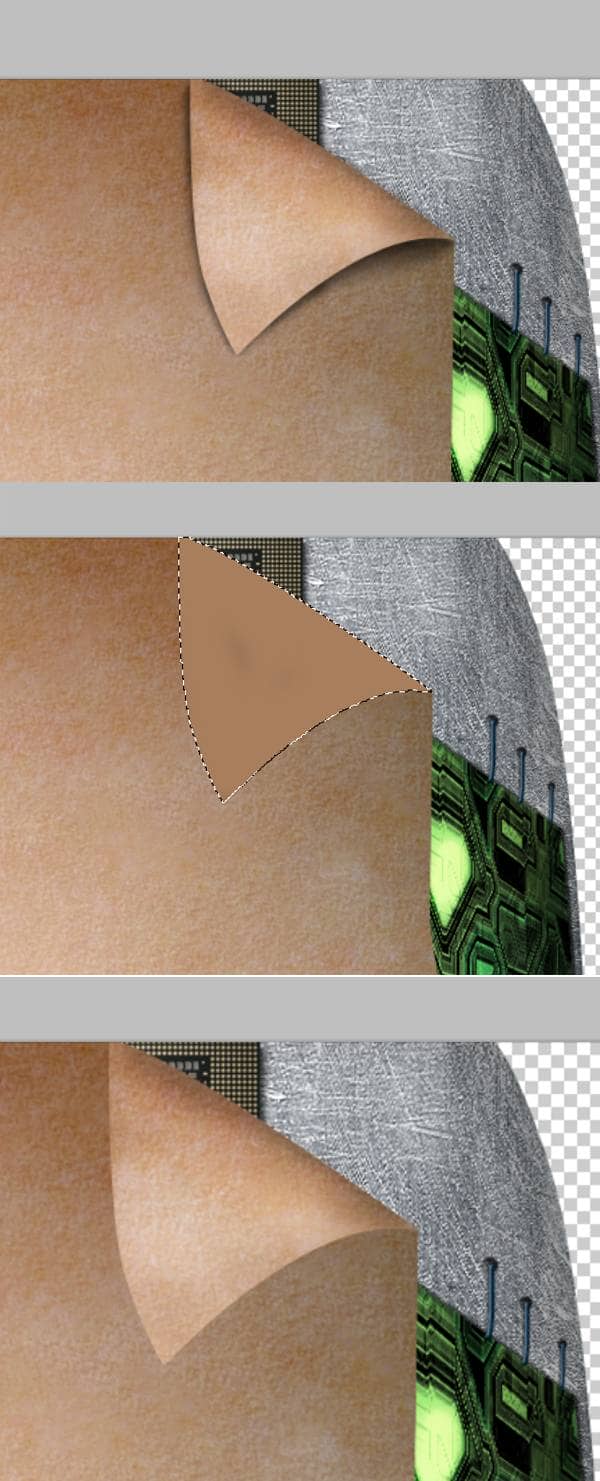
To make the skin fold draw a selection like shown below and fill it with a color sampled from the nearby skin. Then use the Clone Stamp tool to add the skin texture and afterwards use the Burn and Dodge tools to add shade and light to our fold. Basically you should use the Burn tool near the fold and the Dodge tool in the opposite direction. Follow your intuition.
Make a new layer and place it below the fold layer. Using a soft black brush tool at 50% opacity paint some shadows. Change this layer blend mode to Multiply. On the same layer paint some shadow on the metal skull.

Step 11
The skin should have a realistic shadow were is cut so let's add some. First Ctrl+Click the layer mask of the group "Face" to load it as as selection. Next make a new layer and fill it with any color. Drop the fill to 0% and add a Drop Shadow effect. Mask away the upper part. You can also use a 50% opacity brush to partially mask the area were the shadow meets the light parts of the circuit.


2 comments on “How to Create a High-Tech Cyborg Photo Manipulation in Photoshop”
Elegant, modern, very different..
you can always be creative in making robotic effect to an object. This Adrian's is an example, simple effect for beginner to try. I like IA, so I made some androids from my fave actors. Hi5, Adrian! :)