How to Create a Traditional Painting-Like Surreal Image using Photoshop

How to Create a Traditional Painting-Like Surreal Image using Photoshop

In this tutorial, we are going to learn how to create a surreal image that has the look and feel of a traditional image. We are going to learn how to blend images seamlessly together. We are going to learn how to create reflections, shadows and light using only the images themselves, a few brush strokes and some Photoshop adjustment layers. We are also going to learn how to blend textures together to enhance the feel of the image and finally we are going to learn how to make the image look like a traditional painting.

Preview of Final Results

image118

Traditional Painting-Like Surreal Image Photoshop Tutorial


Resources


Step 1: Create a New Photoshop File

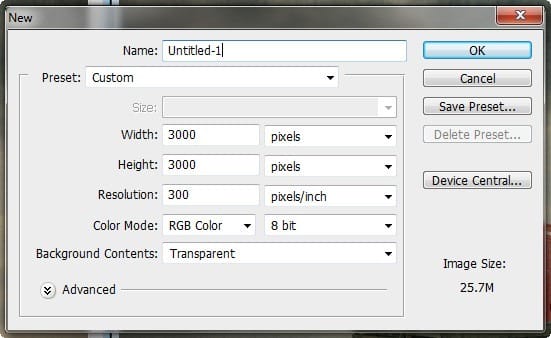
Let's start by creating a new Photoshop file, go to the Menu bar and click File > New, and then input the following values on their respective fields:

  • Width: 3000px
  • Height: 3000px
  • Resolution: 300pixels/inch
  • Color Mode: RGB Color; 8 bit
  • Background Contents: Transparent
image005

Step 2: Create the Afternoon Sky and its Reflection

In this step, we will be creating the sky and its reflection which will serve as the background of our picture. To start, open the image "sky 17" by sacral stock. Once you have it open, simply activate the Move tool by pressing V on your keyboard and left-click on this image and drag it to our canvas. Once on the canvas, rename this new layer to "Sky". To rename a layer, simply double-click on the words: "layer 1" (which is our layer - clouds) to prompt a text box to appear. Once that appears, you may now rename the layer.

See sample below:
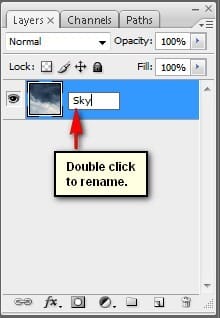
image006

Move it and position as shown on the image below:
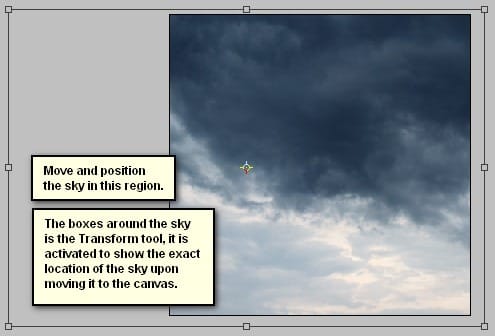
image007

Next, activate the Transform tool by pressing Ctrl/Cmd + T and resize it as shown on the image below:
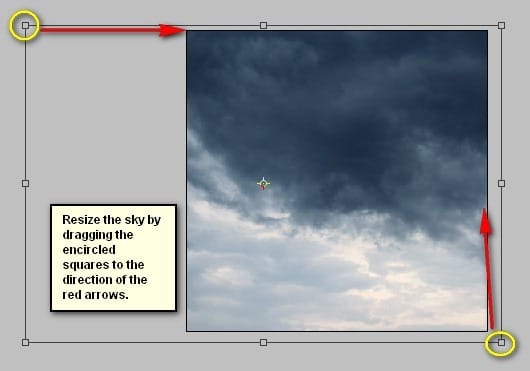
image008

The result should be similar to this:

image009

Now, that the sky is done, we will now create its reflection on the sea, but first we will have to duplicate it by pressing Ctrl/Cmd + J. Once duplicated, activate the Transform tool (Ctrl/Cmd + T) and then right click on the canvas to bring up the Transform tool's contextual menu and once the menu is active, click on Flip Vertical. See image below:
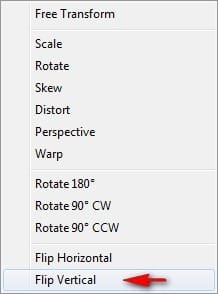
image010

After you click on Flip Vertical, the result would be like this:

image011

Now, activate the Move tool (V) and drag the image as shown below:
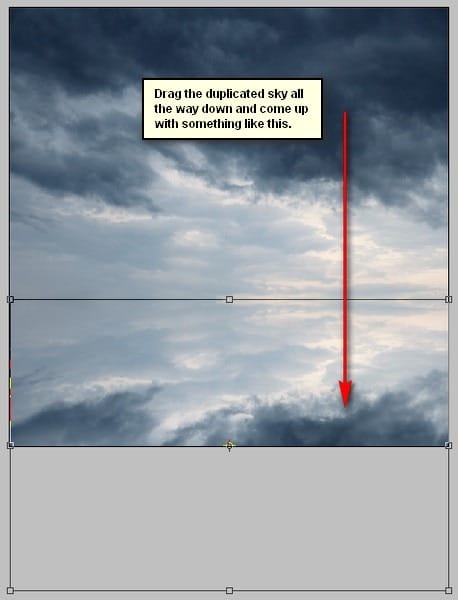
image012

Next, we will make this reflection on the sea more realistic by adding a little Motion Blur. To do that, first make sure that the duplicated layer is active and then go to Filter > Blur > Motion Blur and then input the following:

  • Angle: 0'
  • Distance: 50pixels
image012[1]

The result:

image014

Step 3: Add a Sea Texture

Now, we will be making the reflection on the sea more realistic by blending an image of the sea to it. To start, open "Calm water" by strwberrystk. Once open, activate the Rectangular Marquee tool (M) and create a selection area around the water in the stock image. See image below:

image015
image016

The result:

image017

Now, when you're done, activate the Move tool (V) and drag the selected area (sea) to our canvas. Rename the layer to "Water". Make sure that this layer is above the two layers that we've already created.

image018

Next, move it to the position shown on the image below:

image019

After that, activate the Transform tool (Ctrl/Cmd + T) and resize the image as shown below:

image020

The result:

image021

Now, let's desaturate the water's color a bit to make it blend nicely with our sky and its reflection. To do that, make sure that the "water" layer is selected and then go to Image > Adjustments > Hue/Saturation and input the following:

image022

The result would be similar to this:

image023

Next, let's change the "water" layer's Blending mode to Soft Light and its Opacity to 50%. To change that, simply click on "Normal" on the Layer window to show the list of Blending modes and once open, click on Soft Light. To the right is the Opacity level, so set it to 50%. See image below:

image024

The Blended layer will look like this:

image025

Now, we will make the horizon in this image look seamless. To do that, we will need the help of the Eraser tool (E). Activate that and set the following:

  • Brush size: 125px
  • Hardness: 0%
  • Opacity: 100%
  • Flow: 100%
image026

Now, we're all set to erase!

image027

The result:

image028

Now, select ALL the layers that we've made and press Ctrl/Cmd + G to put them all in one group. Now, name the group to "Background".

Note: Renaming a group is similar to renaming a layer.


Step 4: Add the Platform

In this step, we will be adding the platform to where the phone booth and the lost woman will be situated. To start, open "57" by annerireSTOCK. Next, activate the Polygonal Lasso tool (L) and create a selection area around the platform. See images below:

image029
image030

Now that you're done, activate the Move tool (V) and drag the selected area to the canvas. Rename this layer to "platform". Position it on this region:

image031

Next, let's create its reflection on the water. To start, open "57" by annerireSTOCK again and activate the Polygonal Lasso Tool (L) and create a selection area as shown on the image below:

image032

Activate the Move tool (V) and drag the selected area to the canvas. Rename it to "platform reflection". Position it as shown on the image below:

image033

Note: Make sure that that layer is on top of the "platform" layer.

Activate the Transform tool (Ctrl/Cmd + T) and resize the image. See image below:

image034

The result:

image035
image036

Now, we will blend this reflection to the water to make it seamless. Activate the Eraser tool (E) and input the following:

  • Brush size: 70px
  • Hardness: 0%
  • Opacity: 100%
  • Flow: 100%

Now, let's erase!

image037

After erasing, reduce the "Platform" layer's Opacity to 95%.

image038

The result of erasing and reducing the Opacity:

image039

Select all the layers we handled in this step and group them. Rename this group to "Platforn".


Step 5: Add the Phone Booth

Now, in this step, we will be adding a phone booth on the platform. Now, let's get started - open "phone booth" by digital amphetamine and create a selection area using the Magnetic Lasso Tool (L).

image040
image041

When you're done, activate the Move tool (V) and move this layer to our canvas. Once on the canvas, rename this layer to "phone booth". Position the phone booth on this area:

image042

Now, activate the Transform tool (Ctrl/Cmd + T) and resize the phone booth as shown on the image below:

image043

Next, let's adjust the Brightness/Contrast of this layer. Make sure this layer is active and then go to Image > Adjustments > Brightness/Contrast and input the following:

  • Brightness: -53
  • Contrast: -30
  • Use Legacy: Uncheck
image044

The result:

image045

Now, we will remove that distracting plant on the booth's lower area. To do that, we will need to activate the Clone Stamp tool (S). Once activated, input the following:

  • Brush size: 20px
  • Hardness: 0%
  • Opacity: 100%
  • Flow: 100%

Now, in order for us to clone properly, we'll need to zoom in to the image, zoom in by pressing Z on your keyboard and left-clicking on the canvas or you could set the zoom level to 100% on the Navigator window. See image below:

image046
image047

The result of that should be similar to this:

image048

After that, let's now darken the phone booth to make it blend well with the rest of the images. To start, create a new layer (Ctrl/Cmd + Shift + N) and name it "Darken". Put this layer above the "phone booth" layer.
Now, click on the "Darken" layer and right click on it to show the contextual menu. Once the menu is shown, click on "Create Clipping Mask".

image049

Now, activate the Brush tool (B) but before we proceed on setting the right settings, make sure that your brushes are the default brushes.

image050

To make sure that you're using that, simply right click the canvas while a layer is selected and while the Brush tool (B) is activated and then click on the button highlighted below:

image051

Then click on "Reset Brushes" from the contextual menu.

image052

Now that the brushes are the default ones, input the following:

  • Brush size: 250px
  • Hardness: 0%
  • Opacity: 25%
  • Flow: 100%
  • #: 000000

Note: #: 000000 is the Brush's color. To set that, simply follow the instructions below:

The #: 000000 is the color of the Brush tool (B), so this means it is colored black. To set the brush color, follow the instructions below:

image053
image054

When you're ready apply black paint through the "Darken" layer as shown on the image below:

image055

Now, let's make the phone booth look more realistic by adding a shadow. Start by selecting the "phone booth" layer and duplicate it (Ctrl/Cmd + J) and then activate the Transform tool (Ctrl/Cmd + T) and the right click on the canvas and then click on Flip Vertical. When you're done, activate the Transform tool (Ctrl/Cmd + T) once again and right click on the canvas and then click on Distort and then just follow the instructions below:

Drag the encircled squares to the direction of the cyan arrows:

image056
image057
image058
image119

Now, let's convert this distorted phone booth to a shadow! Click on this duplicated layer and go to Image > Adjustments > Brightness/Contrast and input the following:

  • Brightness/Contrast:
  • Brightness: -100
  • Contrast: -100
  • Use Legacy: Check

Change the opacity of the duplicated phone booth's layer to 95%.

The result should be like this:

image061

Now that we're done, group all the layers and name the group - "Phone Booth".


Step 6: Add the Woman with an Old Trunk

In this step, we will be adding the woman who in our image is trying to get a ride from the flying boats. To start, open "Old trunk17" by sd_stock, once open activate the Polygonal Lasso Tool (L) and create a selection area around the woman. See image below:

image062

Activate the Move tool (V) and drag the woman to our canvas. Once on the canvas, rename this layer to "woman". Now, activate the Transform tool (Ctrl/Cmd + T) and right click the canvas and then click on Flip Horizontal. After that, resize the woman as shown on the image below:

image120

Next, let's create her shadow. To start, create a new layer and name it "Shadow". Put this layer below the "woman" layer.

Activate the Brush tool (B) and input the following:

  • Brush size: 30px
  • Hardness: 0%
  • Opacity: 15%
  • Flow: 100%
  • #: 000000

Let's start painting!

image065

The result is:

image066

Now let's adjust the brightness some parts of the woman. To do that, first create a new layer (Ctrl/Cmd + Shift + N) and then name it to "Darken". Make sure that this layer is on top of the "woman" layer. Now, right click on "Darken" and click on Create clipping mask.

After that, activate the Brush tool (B) and input the following:

  • Brush size: 125px
  • Hardness: 0%
  • Opacity: 15%
  • Flow: 100%
  • #: 000000

Now let's start painting - Use the Brush to the direction of the red arrow:

image067

Now that we're finished, group these layers and name it "Woman".


Step 7: Add the Flying Ships

In this step, we will be adding some ships that instead of treading through sea, they will be flying in the sky. To start, open "Ship 13" by Alegion-stock (this is included in the Tall Ship PNG stock).

Activate the Move tool (V) and drag this ship to our canvas. This is a PNG file, and its background is transparent, that means it has no background - just the ship. So after moving it to our canvas, you'd only see the ship. Rename this layer to "Ship 1".

Position "Ship 1" on this location:

image068

Next, activate the Transform tool (Ctrl/Cmd + T), right click on the canvas and click on rotate. Rotate as shown below:

image069
image070

Next, activate the Transform tool (Ctrl/Cmd + T) once again and resize it as shown below:

image071

Next, to give the illusion that this ship is far away from our subject, reduce its Opacity to:

  • Opacity: 70%

The result:

image072

Now, let's create ship # 2. Click on "ship 1" and hit Ctrl/Cmd + J to duplicate it. Rename it to "ship 2". Once duplicated, activate the Move tool (V) and drag it to the position shown on the image below:

image073

Next, activate the Transform tool (Ctrl/Cmd + T) and rotate and resize it as shown below:

image074

Reduce the Opacity of the "ship 2" layer to:

  • Opacity: 40%

The result:

image075

Now, for ship # 3 - select "ship 1" and duplicate it (Ctrl/Cmd + J). Once duplicated, activate the Move tool (V) and drag it to the area shown on the image below:

image076

Now, activate the Transform tool (Ctrl/Cmd + T) and then rotate and resize the image as shown below:

image077

Now, reduce this layer's Opacity to:

  • Opacity: 60%

The result:

image078

When you're done, select all these layers and then group them. Name the group to "Ships".


Step 8: Add Textures

Now, let's add some textures to our image to give it a grungy feel. To start, let's open "Texture 119" by Sirius_sdz. Activate the Move tool (V) and drag this to our canvas. Make sure you put it on top of the "Ships" group. Rename this layer to "Texture 1".

Position it as shown on the image below:

image079

Now, activate the Transform tool (Ctrl/Cmd + T) and resize it as shown below:

image080

The result:

image081

Next, let's change the Blending mode and Opacity of this texture:

  • Blending Mode: Soft Light
  • Opacity: 40%

The result:

image082

Let's now add the next texture - open "Texture 54" by night-fate-stock. Activate the Move tool (V) and drag it to our canvas. Rename to "Texture 2". Position it here:

image083

Next, activate the Transform tool (Ctrl/Cmd + T) and resize it as shown below:

image084

Now, change Blending mode and Opacity of this texture:

  • Blending Mode: Soft Light
  • Opacity: 40%

The result:

image085

Next, open "Metal Texture 15" by wojtar stock. Move it to the canvas using the Move tool (V). Once there, rename it to: "Texture 3". Position it as shown below:

image086

Activate the Transform tool (Ctrl/Cmd + T) and resize it as shown below:

image087

Now, change Blending mode and Opacity of this texture:

  • Blending Mode: Soft Light
  • Opacity: 100%

The result:

image088

Next, open "Paper Texture 1" by Wojtar Stock. Move it to the canvas using the Move tool (V). Once there, rename it to: "Texture 4". Position it as shown below:

image089

Resize it using the Transform tool (Ctrl/Cmd + T) as shown below:

image090

Now, let's change the Blending mode and Opacity of this texture:

  • Blending Mode: Overlay
  • Opacity: 40%
  • Fill: 70%

The result:

image091
image092
image093
image095

Group all those layers, and rename the group to "Textures".


Step 9: Create a Vignette

In this step, we will learn how to create a vignette which will help enhance the focus on our subject.

To start, go to the Menu bar and click on File > New and use the same settings we used to create our canvas. (Refer to Step 1).

Take note, the background contents should be: WHITE

Once it has been created, go to Filter > Distort > Lens Correction. Find the tab Vignette and use these settings:

  • Vignette amount: -100
  • Midpoint: +50
image097

Now that that's done drag the vignette to our canvas using the Move tool (V) and put it on top of all the layers that we've created, and then set the following:

  • Blending mode: Multiply
  • Opacity to 40%

To set the blending mode, simply click on the drop-down menu beside the word "Normal" on the top part of the Layer window. The Opacity is located just beside that drop-down menu as well. See image below:

image098
image099

The unblended Vignette will look like this:

image100

Once the blending mode is set to "Multiply" it would look like this:

image092[1]
image093[1]
image094
image096
image091[1]


Step 10: Retouch the Image

Now let's retouch the colors of our image to give it a more painting-like feel! For starters, we're going to create a Solid Color adjustment layer. To do that, simply click on the button shown on the image below:

image101

When it opens, click on the following:

image102

Once you've clicked on Solid Color, the Color Picker menu would open. When it opens, input the following color:

  • #: 00011e
image093[2]

Now, you're canvas is covered in dark blue, so let's change its Blending mode and Opacity to the following:

  • Blending Mode: Exclusion
  • Opacity: 80%

Let's create another Solid Color adjustment layer, this time input the following:

  • #: cd8e50

Then change the Blending mode and Opacity to the following:

  • Blending Mode: Soft Light
  • Opacity: 40%

Now, from the Create New Fill/Adjustment layer button, let's create a Levels adjustment layer.

image103

Once it opens, input the following for the Red Channel:

  • Input Levels: 15, 1.00, 255
image104

Don't close the Levels menu yet, click on the drop down button again and input the following for the Blue Channel:

  • Input Levels: 15, 1.00, 255
image105

Now the result of that would be like this:

image106

Next, let's create a Channel Mixer adjustment layer.

image107

When it opens, input the following:

  • Output Channel: Gray
  • Source Channels:
  • Red: 0%
  • Green: 100%
  • Blue: 0%
  • Constant: 0%
  • Monochrome: Check
image108

Next, let's create a Photo Filter adjustment layer:

image094[1]

When it opens, use the following:

  • Deep Blue
  • Density: 25%
  • Preserve Luminosity
  • Layer Opacity: 50%

Next, create another Photo Filter adjustment layer and use the following:

  • Photo Filter
  • Warming Filter (81)
  • Density: 25%
  • Preserve Luminosity

Finally, create a Brightness/Contrast adjustment layer:

image095[1]

When it opens, input the following:

  • Brightness/Contrast
  • Brightness: -15
  • Contrast: 0

Step 11: Make it look like a painting

In this step, we're going to make our photo-manipulation look like a painting using some Photoshop Filters. To start, select any layer in our image and right click on it to bring out the contextual menu. Once the menu is shown, click on Flatten Image.

image096[1]

Once flattened, duplicate this layer (Ctrl/Cmd + J) and go to Filter > Filter Gallery. Once the Filter Gallery opens, click on the Artistic Folder and then click on Dry Brush.

image109

Once you've clicked on Dry Brush, input the following settings located on the right:

  • Brush size: 2
  • Brush Detail: 8
  • Texture: 1
image110

The result of that will be like this:

image111

But that doesn't look too good because the details are lost so we should reduce its Opacity to:

  • Opacity: 40%

The result:

image112

Select both layers and right click on any of them and click Flatten Image.


Step 12: Add some Lighting Effects

Now, for our final step, let's enhance the lighting of this image .We're going to put the focus of our viewers to the subjects of our image - the girl and the phone booth. To do that, first, duplicate the image (Ctrl/Cmd + J) and then go to Filter > Render > Lighting Effects. When it opens, input the following:

  • Style: Default
  • Light Type: Omni
  • On: Check
  • Intensity: 21
image113

After that, reduce the Opacity of that layer to:

  • Opacity: 70%

The result of that would be:

image114

Authors Comment

image121I am a huge fan traditional artworks and themes, but I'm a frustrated one so I tried making one through Photoshop. I hope you'd enjoy creating this tutorial and I hope this would help you in whatever you're doing. Anyway, thank you for visiting this page and using my tutorial, if you want to see more of my art works, give me a shout at my website: https://www.wix.com/theflickerees/michaelVmanalo

- Michael Vincent Manalo

3 comments on “How to Create a Traditional Painting-Like Surreal Image using Photoshop”

Leave a Reply

Your email address will not be published. Required fields are marked *

cross