Turn any photo into a dot grid artwork with these Photoshop actions. You'll get great results with dots that change size. They get larger in brighter areas and smaller in darker areas. Free download available.
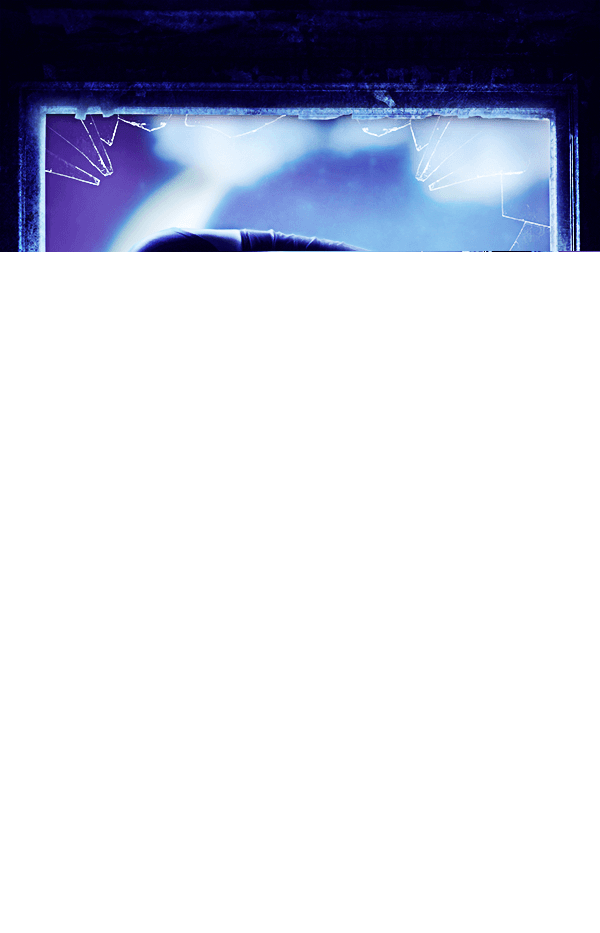
Learn how to create this dreamy artwork by Fabrizio Panattoni! In this Photoshop tutorial, Fabrizio will show you how to add broken glass, create a blue color tint, and finish it off with a dreamy glow.
Preview of Final Results
Tutorial Resources
- Window and Woman - SXC
- Moon - Konishkichen
- Cloud - Dadrian
- Stars - Greenaleydis-stock
- Texture - Struckdumb
- Teddy Bear - Tefee-stock
- Broken Glass Brush 1 - Archaii
- Broken Glass Brush 2 - Scully7491
Step 1
Open the 'Window and Woman' stock.

Step 2
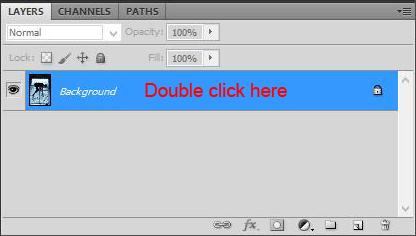
Since we have to work on this layer we have to unlock it. Double click on the layer and name it 'Main'.

Step 3
Now that the layer is unlocked you have to convert it to Smart Object. Right click on the 'Main' layer and choose 'Convert to Smart Object'.

Step 4
Now we have to rotate a bit the image. Go to Edit > Transform. Right click on the image and choose 'Rotate'. Then rotate the image to make it straight.


Step 5
Obviously we have to crop the empty parts. Grab the Crop Tool and build a selection so that the empty areas are out of it. When you are done right click on the image and choose 'Crop'.


Step 6
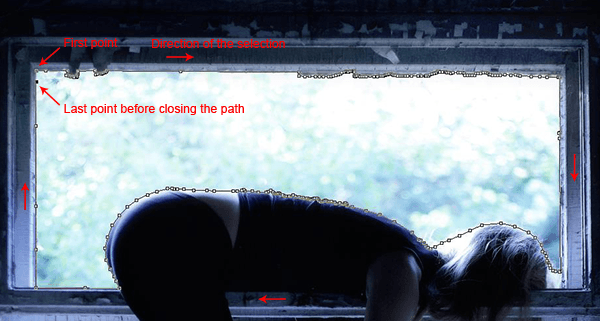
Now we have to hide the part of the background outside the window so we can replace it with a dreamy sky. We will have to do it in several steps. Grab the Pen Tool and start to make a selection of a part you want. I will start from the higher part. The first point you make with the Pen Tool is the beginning of your selection. By adding some other anchor points you will be building your path. When you want end your path add the last point above the first point.
Step 7
After closing the path you have to make a selection. Right click on the image and choose 'Make Selection'. A window will pop up asking for the feather radius. Since the image is not huge 1 px is enough. After clicking ok you will have your selection.


Step 8
Now we have to hide this part. Go to Selection > Inverse to invert the selection. Then click on the Layer Mask Button. Photoshop will automatically create a Mask that hides the part you selected. The mask will have the hidden part in black and the rest in white. That's why to hide the other unwanted parts we need to paint with black on them.


Step 9
To hide the other three unwanted parts you have to repeat the previous step. The Layer Mask for this layer is created so you don't need to create another one.
- Select the area to hide with the Pen Tool and make the Selection.
- Invert the selection
- Fill it with black color (Edit > Fill > Black).
Don't be afraid to include hair in the selection, we will draw it later on.

Step 10
Go to File > Place and open the Moon stock. Put it below the Main layer and name it 'Moon'. Go to Edit > Transform and scale it like in the figure below.

Step 11
Now go to Filter > Blur > Gaussian Blur and apply 8 px for the Moon Layer.

Step 12
Go to File > Place and open the Cloud stock. Place it between the Main layer and the Moon layer and name it 'Cloud'.

Step 13
Now set the Cloud layer to Hard Light with Opacity and Fill at 80%.

Step 14
As you can see the edges of the Cloud stock is still visible. We will hide it with a Layer Mask (like we did with the Main layer). Add a Layer Mask to the Cloud layer. Take a soft brush and paint with black on the mask to remove the harsh line.

Step 15
Go to File > Place and open the Stars stock. (The layer goes above the Cloud layer).

Step 16
Right click on the image and choose Rotate 90° CW.


Step 17
Right click again on the image and choose Scale. Scale the image to fit the scene.


Step 18
Set the Stars layer to Overlay with Opacity and Fill at 80%.

Step 19
Go to Filter > Blur > Gaussian Blur and apply 5 px to the Stars layer.

Step 20
Let's start to work on the colors and contrast. Add a Curves Adjustment Layer above the Stars Layer. Choose the 'Medium Contrast' Curve in the presets. The set the adjustment to Luminosity.


Step 31
Create a new layer and name it 'Light & Shadow for the Sky'. Set the layer to Soft Light with Opacity 50%. With a big soft brush you have to paint some light in the middle of the sky and some shadows at the edges. For the light I used the color #e9eef1 and for the shadows #4d6da8. Below you can see where I painted them with the Layer set to Normal at 100% And then the result with the Soft Light layer.


Step 32
Add a Selective Color Adjustment Layer above the Stars layer with these settings:
- Cyans: -28 0 0 –13
- Blues: -35 0 0 –7
- Whites: 0 0 -59 –7
- Neutrals: +5 0 +14 0
- Blacks: 0 0 0 +6
This will fix color.

Step 33
Now we have to fix the Window and the Girl. Add a new layer clipped to the 'Main' layer and name it 'Main fix'. Fill the layer with the color #4366a1.
TIP: To clip a layer or an adjustment to the layer below simply hold ALT and click on the line between the two layers that you want to “clip.”

Step 34
Now set the Main fix layer to Soft Light with Opacity at 75%..

Step 35
We want to make the window to seem older and more ruined. Go to File > Place and open the Texture stock.

Step 36
Like we did for the Main layer we have to rotate this layer and scale it to fix the scene.

Step 37
Now clip the Texture layer to the Main layer. Then set it to Overlay with Opacity and Fill at 80%.


Step 38
The texture makes the windows seem older and ruined.
As you can see it affects the whole layer but obviously we don't want it on the girl.
All we have to do is working with a Layer Mask like we did in the previous steps.
Add a Layer Mask to the Texture layer and with black paint over the girl to hide the texture effect on her.

Step 39
We have to darken a bit the Main layer to give a bit contrast with the sky. Add a Curves Adjustment layer clipped to the Main layer and set it to Luminosity. Drag the curve down in the Midtones area. My points are: output 117 and input 137


Step 40
Go to File > Place and open the Teddy Bear stock.

Step 41
Name the layer 'Teddy'. Now we have to mask it out. You have to make a selection of the teddy. You can use the Pen Tool method like we did in the previous steps. In this case I used the Quick Selection Tool because lights and shadows are harsh and it's easier. After you picked the Quick Selection Tool click once on the Teddy and it begins to make the selection. If you keep to move the cursor your selection will enlarge and you can select the whole teddy.

Step 42
Once the teddy is selected to go Select > Modify > Feather and put 3 px.

Step 43
Now click the Layer Mask Button and the teddy will be automatically masked..

Step 44
Now you have to scale the teddy down (Edit > Transform > Scale). Then place it like in the image below.

Step 45
Obviously we have to work on the color to blend it in the scene. We will do it with four adjustments layer, all clipped to the Teddy layer. First of all add a Hue/Saturation Adjustment Layer (clipped to the Teddy layer) with these settings:
- Hue: 0
- Saturation: -65
- Lightness: 0

Step 46
Add a Color Balance Adjustment layer (clipped to the Teddy layer) with these settings.
- Shadows: -11 -6 0
- Midtones: -21 -7 0
- Highlights: -19 -7 0

Step 47
Add a Photo Filter Adjustment Layer (clipped to the Teddy layer). Choose the Cooling Filter (80). Set it to 84%.

Step 48
Add a Brightness/Contrast Adjustment Layer (clipped to the Teddy Layer) with these settings.
- Brightness 7
- Contrast 33

Step 49
Below you can see all the adjustments I made for the Teddy layer.

Step 50
The scene is built. Now we have to work on the hardest parts. Colors and Light/Shadow. We will start with the color. Add a Selective Color Adjustment Layer above all layers with these settings:
- Cyans: -12 +11 -100 +7
- Blues: -42 -16 +18 0
- White: +10 -1 +2 0
- Blacks: +12 +19 -3 -4

Step 51
Add a Color Balance Adjustment Layer above all layers with these settings:
- Shadows: -4 -8 -2
- Midtones: -5 -11 +5
- Highlights: -3 0 +5

Step 52
Add a Curves Adjustment layer above layer and set it to Luminosity. Choose the Linear Contrast in the Preset curves.


Step 53
Let's start to work on the Lights and the Shadows. Unfortunately we can't do it generally but for one and each layer. I started with the Sky with some Dodge & Burn. Create a new layer below the Main Layer and name it 'D&B for the Sky'. Set it to Overlay. I worked on the lights using the Dodge Tool set at 10% and Range Midtones. Where you see stronger light I changed the Range to Highlights. For the shadows I used the Burn Tool with Range Midtones at 10%. Below you can see my Dodge and Burn layer and then the result.


Step 54
Let's work on the window and the girl.
Create a new layer below the Teddy layer and clip it to the Main layer.
Name it 'Light for the Main layer'
Pick the color #97d6f6.
With a soft brush paint some light on the window and woman's edges.
I used a low Opacity for the brush. Something like 20%
Below you can see the layer without being clipped and the the result.


Step 55
We will do the same for the shadows. Create a new layer above the one you created for the light and name it 'Shadow for the Main Layer'. Set it to Multiply with Opacity at 20%. Pick the color #1a0948. Paint some shadows in the window and on the woman. Below you can see the layer set to Normal and the the result with Multiply.


Step 56
To add some drama to the scene we can add some broken glass at the ruined windows. Create a new layer below the 'Main' layer and name it 'Broken Glass'. Now load both 'Broken Glass' brushes. Choose the white color and add some broken glasses to the window.

Step 57
I duplicated the Broken Glass layer and set it to Soft Light with Opacity and Fill at 80%.

Step 58
Now we are going to fix general lights and shadows. Create a new layer above all layers and set it to Overlay.
Go to Edit > Fill > 50% Gray. Name the layer 'D&B'. Use the Burn Tool to add shadows and the Dodge Tool to add lights. My settings are: Range: Midtones; Exposure 10%. For the highlights I changed the Rage to Highlight. Below you can see my Dodge & Burn layer and the result.


Step 59
Now we want to add a bit more of light around. Create a new layer above all layer and name it 'General Light'. Set it to Soft Light. Pick the color #d7ebff and paint some light outside the window. Below you can see my layer set to Normal and then the result with the blend Soft Light.


Step 60
Let's bring out some details. Make a stamp of all layers (Click CTRL+SHIFT+ALT+E). Name the layer 'High Pass'. Go to Filter > Other > High Pass and put 10px Then set the layer to Overlay.


Step 61
Add a Vibrance Adjustment Layer with these settings:
- Vibrance +30
- Saturation -5.

Step 62
Now that the scene is done we can work on the hair. We will do it in several layers. I did this job in four steps. Sometimes you need more layers to create hair. Create a new layer above all layers and name it 'Hair 1'. Pick the color #0d083e and paint a kind of base. Use a soft small brush. Usually we have to build the base with a 100% brush. But since hair is in the light the result would be fake.

Step 63
Create a new layer and name it 'Hair 2'.
Pick a lighter color and add some other strands. (I chose #666dad).

Step 64
Create another layer and name it 'Hair 3'. Once again pick a lighter color and add strands. (I chose #a3a8d8).

Step 65
Create last layer for hair and name it 'Hair 4'. I picked the color #b6d5f4 for highlights.

Final Results
![final-results[1] final-results[1]](https://cdn.photoshoptutorials.ws/wp-content/uploads/2013/11/finalresults1.png?strip=all&lossy=1&quality=70&webp=70&avif=70&w=1920&ssl=1)
Tutorial by Fabrizio Panattoni

Thanks a lot for your attention. I hope I could help you with this tutorial.
For more guides or artworks made by me visit my dA page https://b-r-a-c-i-a-t-a.deviantart.com/
- Fabrizio Panattoni.
4 comments on “Create a Wonderful Midnight Photo Manipulation in Photoshop”
wowww amazing work can u please upload psd for this workk
wow! Its a nice work............thanks for sharing
Thanks a lot! Very helpful tutorial. Here is my result http://milanaserk.deviantart.com/art/Moonlight-482132626?ga_submit_new=10%253A1410640832
thanks alot!