Step 34
Now set the Main fix layer to Soft Light with Opacity at 75%..

Step 35
We want to make the window to seem older and more ruined. Go to File > Place and open the Texture stock.

Step 36
Like we did for the Main layer we have to rotate this layer and scale it to fix the scene.

Step 37
Now clip the Texture layer to the Main layer. Then set it to Overlay with Opacity and Fill at 80%.


Step 38
The texture makes the windows seem older and ruined.
As you can see it affects the whole layer but obviously we don’t want it on the girl.
All we have to do is working with a Layer Mask like we did in the previous steps.
Add a Layer Mask to the Texture layer and with black paint over the girl to hide the texture effect on her.

Step 39
We have to darken a bit the Main layer to give a bit contrast with the sky. Add a Curves Adjustment layer clipped to the Main layer and set it to Luminosity. Drag the curve down in the Midtones area. My points are: output 117 and input 137


Step 40
Go to File > Place and open the Teddy Bear stock.

Step 41
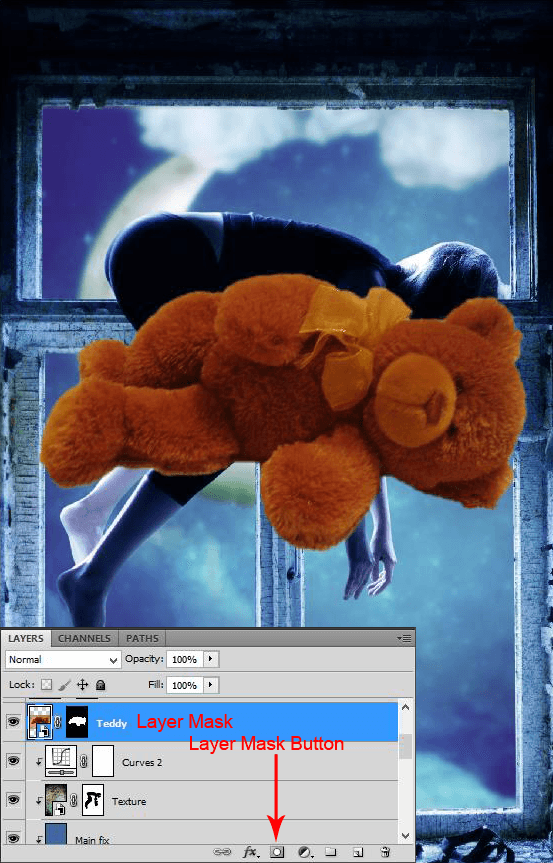
Name the layer ‘Teddy’. Now we have to mask it out. You have to make a selection of the teddy. You can use the Pen Tool method like we did in the previous steps. In this case I used the Quick Selection Tool because lights and shadows are harsh and it’s easier. After you picked the Quick Selection Tool click once on the Teddy and it begins to make the selection. If you keep to move the cursor your selection will enlarge and you can select the whole teddy.

Step 42
Once the teddy is selected to go Select > Modify > Feather and put 3 px.

Step 43
Now click the Layer Mask Button and the teddy will be automatically masked..

Step 44
Now you have to scale the teddy down (Edit > Transform > Scale). Then place it like in the image below.

Step 45
Obviously we have to work on the color to blend it in the scene. We will do it with four adjustments layer, all clipped to the Teddy layer. First of all add a Hue/Saturation Adjustment Layer (clipped to the Teddy layer) with these settings:
- Hue: 0
- Saturation: -65
- Lightness: 0

Step 46
Add a Color Balance Adjustment layer (clipped to the Teddy layer) with these settings.
4 responses to “Create a Wonderful Midnight Photo Manipulation in Photoshop”
-
wowww amazing work can u please upload psd for this workk
-
wow! Its a nice work…………thanks for sharing
-
Thanks a lot! Very helpful tutorial. Here is my result http://milanaserk.deviantart.com/art/Moonlight-482132626?ga_submit_new=10%253A1410640832
-
thanks alot!


Leave a Reply