Create a Cartoon-Style Graffiti Text Effect in Photoshop

Create a Cartoon-Style Graffiti Text Effect in Photoshop

Learn how to create graffiti text from scratch in Photoshop! This tutorial will show you how to use layer styles and finish the effect with a vector-style brick background.


Preview of Final Results

final-results

Download the PSD

Graffiti Text.zip | 16.32 MB
Download from Website


Graffiti text effect tutorial


Resources


Step 1- Create a New Document

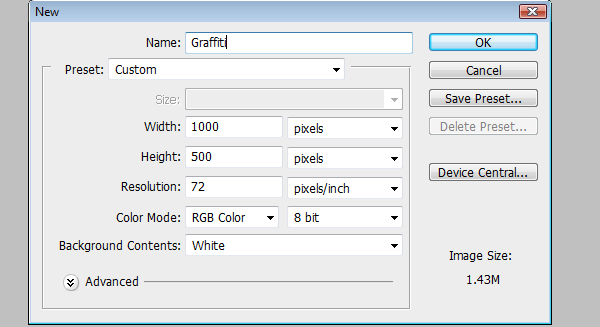
Create a new 1000x500 pixels document. You can do this by going to File > New.
step-001

Step 2

With the background layer selected, use the Paint Bucket tool to fill the layer with #D0CFCF.

step-002

Step 3 – Text

Now for the text create a new layer, you can go online and find a font that would best fit your design or for my tutorial I created a rough sketch of how I wanted my text to look and scanned it into my computer. Next, grab your pen tool and make one of the letters. I used the word "Graffiti".

step-003

Step 4

Make a selection from the work path (right-click>Make selection) fill it with any color for now

step-004

Step 5

Rename this layer. In my case I named this layer "G". Duplicate this layer, place this layer underneath the regular layer. Double click this "G Copy" layer so that it brings up the Layer style box and change the color.

step-005

Step 6

Then move the "G copy" layer upward 5px by using your arrow keys and also move it 8 or 9 pixels to the right.

step-006

Step 7

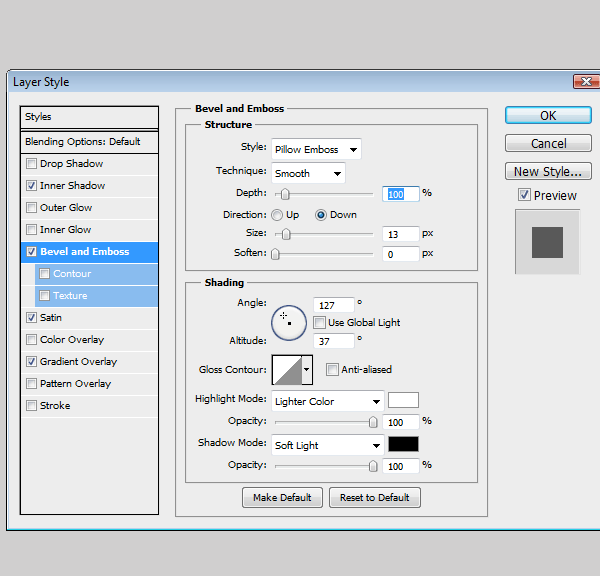
On the original "G" layer add these layer styles, lets start with the Inner Shadow

step-007
step-007a
step-007b
step-007c

Step 8

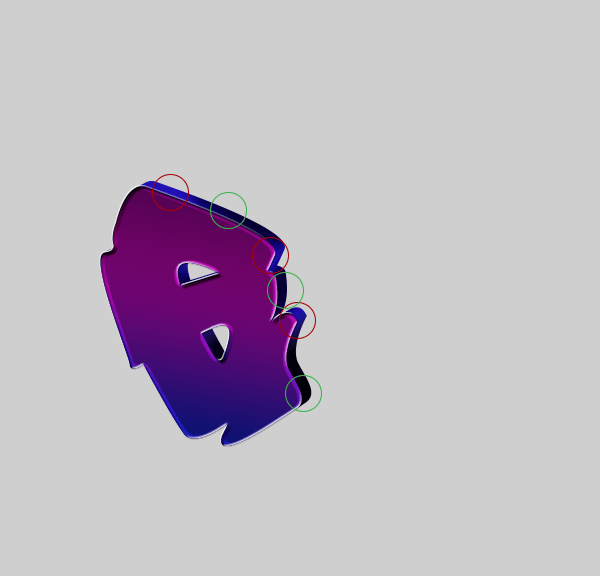
This is how it should look so far. Go to your "G copy" layer, once you have selected this layer go to Layer>Layer Style>Create Layer. Now select your Burn tool and darken in some areas. Once you have finished that take your Dodge tool and highlight certain parts. Note: The green circle is where I used the Burn tool, the red circle is where I used the Dodge Tool.

step-008
step-008a

Step 9

While the "G copy" layer is still selected add a Drop Shadow.

step-009

Step 10

Create a new layer and on the "G copy" layer make a selection of it and add a Stroke. Edit>Stroke, place this stroke layer beneath the "G copy" layer.

step-0010

Step 11

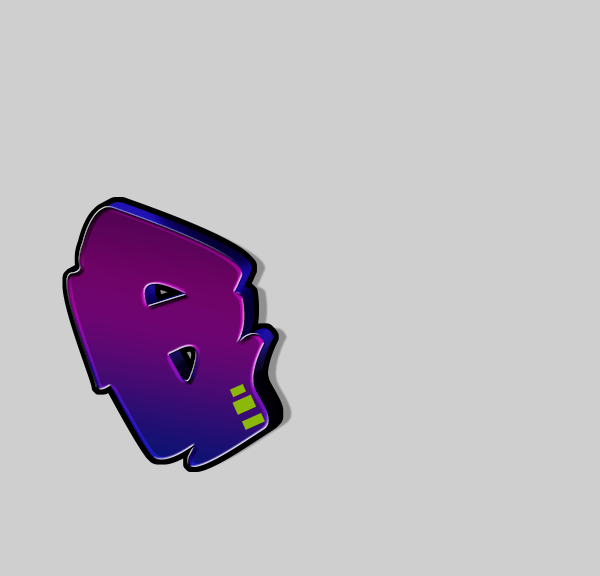
Create a New Layer and rename it "Squares", grab your selection tool and make some squares fill it with #8cb809
step-0011

Step 12

Now we will add the highlight, create a new layer and with your pen tool create the place for the highlighted area. Fill it with #FFFFFF

step-0012

Step 13

Erase the unnecessary areas. To do this make a marquee selection of the original "G" and "G Copy" layer (while holding the ctrl+alt key, select the box next to the layer's name) Select>Inverse, then delete while the highlight layer is still selected.

step-0013

Step 14

Change this layer to 'Soft Light' and add this layer style (Layer > Layer Style > Inner Shadow).

step-0014

Step 15

Repeat these same steps for the rest of your letters

step-0015
step-0015a
step-0015b
step-0015c
step-0015d
step-0015e
step-0015f
step-0015g

Step 16 Cloud

Create a New layer and rename it "cloud". Place this layer beneath the letter layers. Grab your brush tool and use different sizes of circles to create the cloud. I used the color #e40480. Once finished duplicate this layer

step-0016

Step 17

Add these layer styles to the original layer (Layer > Layer Style > Bevel and Emboss).

step-0017
step-0017a
step-0017b
step-0017c

Step 18

This is how yours should look.

step-0018

Step 19

Create a new layer above the cloud layer and with a #FFFFFF soft round brush place some highlights around the cloud. Make sure the opacity on the brush is very low.

step-0019

Step 20

Go to your "Cloud copy" layer and place it underneath the original cloud layer and change the opacity of this layer to 27%. Also maneuver this layer a bit so that the shadow shows.

step-0020

Step 21

Create a new layer for the inner cloud grab a hard round brush of different sizes and create a cloud. I used the color #8cb809

step-0021

Step 22

Add these layer styles to this layer

step-0022
step-0022a
step-0022b

Step 23

Create a new layer and add some shine to this cloud layer with a small soft round brush. I used the smudge tool also to stretch out highlights

step-0023

Step 24

Now I will show you how to create the background. First Create a New Document

step-0024

Step 25

Grab your rounded rectanlge tool and make a rectangle. The color I'm using is #8cb809 Radius: 21px

step-0025

Step 26

Add a Stroke in the layer style panel

step-0026

Step 27

Make multiple duplicates of the brick. Note: Make sure to overlap the bricks so that there is no white background showing.

step-0027

Step 28

Create a new layer above the bricks and with a 60px #000000 soft round brush apply shadow to the bricks. Change this layer's Opacity to 27%.

step-0028

Step 29

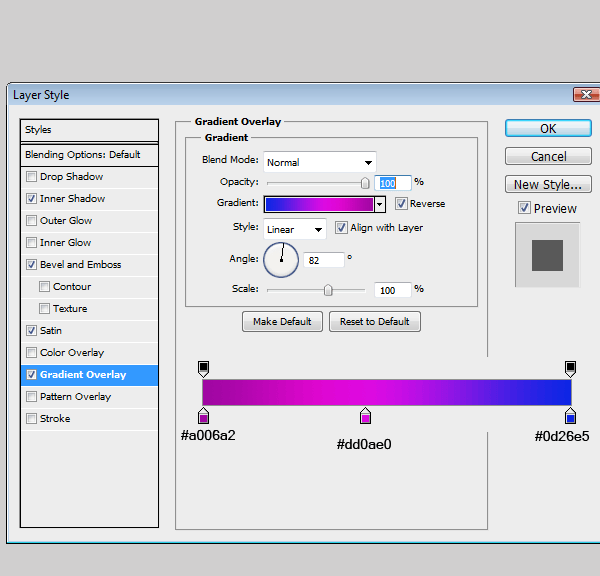
Go to Edit>Define Pattern and name it bricks, click ok. Go back to your graffiti document. Create a New Layer underneath your cloud layers. Fill this layer with #FFFFFF. Change this layer Fill to 0%. Add these layer styles

step-0029
step-0029a

Step 30

Create a new layer and randomly add highlights to the bricks. I used a soft round brush and the smudge tool to smooth it out.

step-0030

Step 31

Now for the light streaks. Create a New layer above your text and grab your pen tool. Prior to making your light streaks set your brush tool to 87px.

step-0031

Step 32

Once you have created the light streak with the pen tool, right-click the path>Stroke Path (make sure that the 'Stimulate Pressure' box is checked)

step-0032

Step 33

Add a Outer Glow

step-0033
step-0033a

Step 34

Create another light streak

step-0034

Step 35

Create a new layer and add some stars from the brushes you downloaded earlier.

step-0035

Final Results

final-results[1]

Download the PSD

Graffiti Text.zip | 16.32 MB
Download from Website


Authors Comment

profileThank you for following my tutorial. I'm a 21 year old Graphic Design student. I wanted to create something dealing with graffiti because I've always loved that style. Enjoy!

- Ashlee

Download Free Presets
Sponsored

Download Lightroom presets and LUTs, absolutely free. Use the presets to add creativity and style to your photos.

15 comments on “Create a Cartoon-Style Graffiti Text Effect in Photoshop”

  1. Fantastic tutorial, thank you. Used it in my Graphic Design assessment, it made all the difference.

Leave a Reply

Your email address will not be published. Required fields are marked *

cross