Make your artwork look like they're from an alternate universe. These Cyberpunk presets work with Photoshop (via the Camera Raw filter) and Lightroom. Download all 788 presets for 90% off.
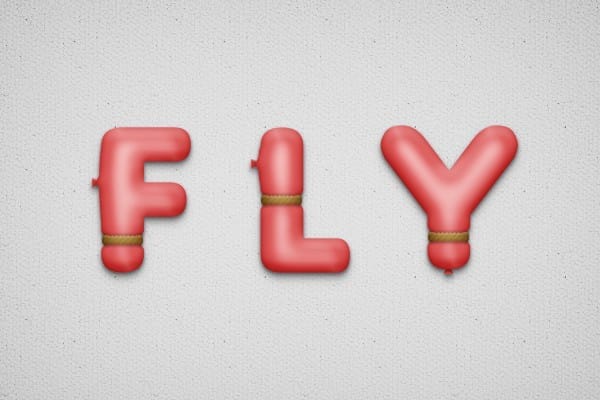
In this tutorial you will learn how to create a balloon text effect in Adobe Photoshop.You will begin to create the text using a font and then you will convert it to a vector shape. You will learn how to manipulate the anchor points to create a unique text design. Finally you will create a highlight over the text, to accentuate the 3D feeling using a simple procedure and you will create a rope as an ornament for your text. Let's begin!
What you'll be creating


Tutorial Resources
Step 1
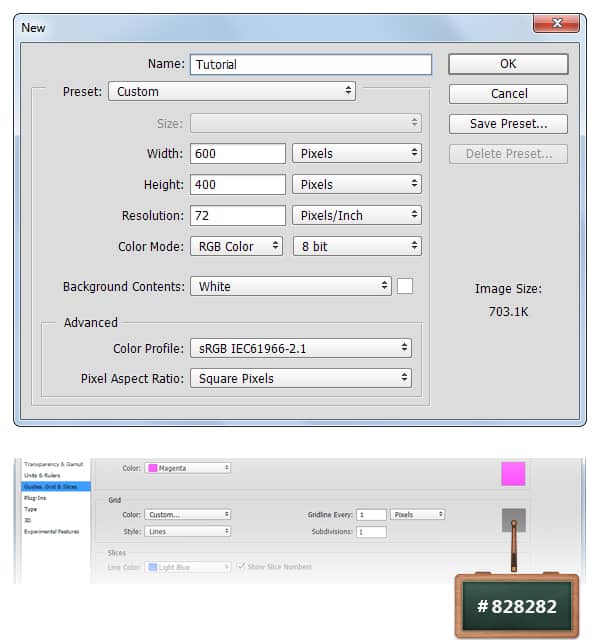
Create a 600x 400px document, go to View > Show > Grid to enable the Grid and then go to View > Snap To > Grid to enable the Snap to Grid. Hit Control + K to open the Preferences window, go to Guides, Grid & Slices and enter the settings mentioned in the next image. Along the tutorial I turned off the grid ( Control + ' ) for you to have a better vision. The grid will make it easier for you to create/edit the shapes.
Step 2
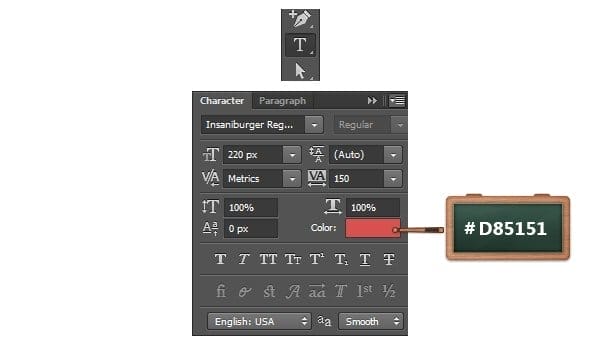
Pick the Horizontal Type Tool and use the Insaniburger font.
Move to your canvas, add the "F" text with the size to 220px and the color to #D85151.

Step 3
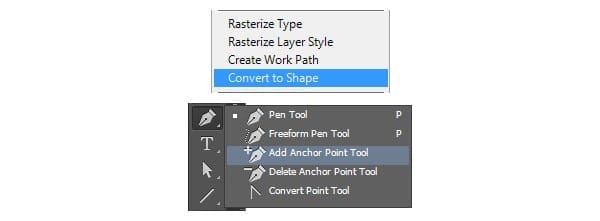
Focus on the Layers panel, right click on your "F" text layer and go to Convert to Shape.
Make sure that your "F" vector shape is selected and pick the Add Anchor Point Tool.
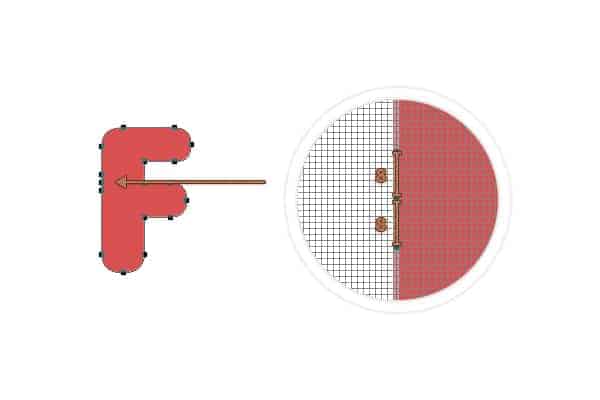
Keep focusing on your "F" shape and add new anchors points as shown in the next images.
Tip: Use the Control and "-" to zoom out or Control and "+" to zoom in. You can return to your default zoom using the Control and 0 shortcut


Step 4
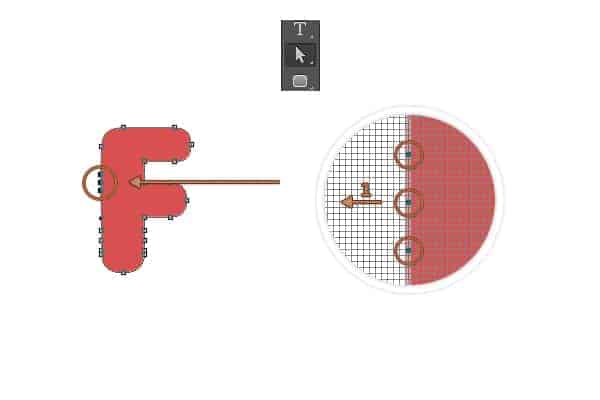
Pick the Direct Selection Tool, focus on the top of your "F" text and select only the first 3 anchors points added in the previous step (highlgihted in the first image).
Hit the left arrow button from your keyboard once to move the anchors points 1px to the left.
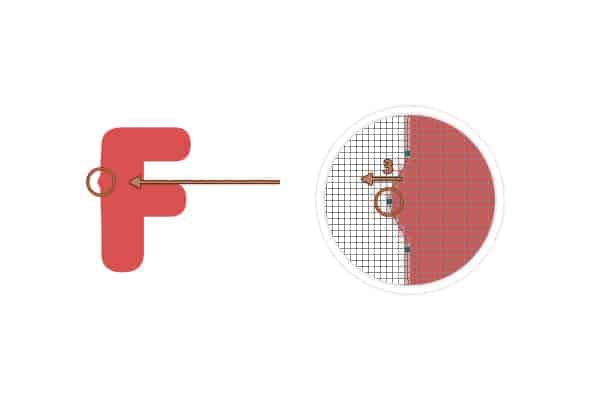
Now, select only the middle anchor point and hit again that left button three times to move it 3px to left. In the end things should look like in the second image.
Step 5
Focus on the bottom side of your "F" shape, select the left anchor point highlighted in the following image and drag it 5px the right and then select the right anchor point highlighted in the same image and drag it 5px to the left. In the end your shape should look like in the second image.


Step 6
Pick the Horizontal Type Tool set the size to 220px and color to #D85151.
Move to your canvas, add the "L" text and place it as you can see below.


Step 7
Focus on the Layers panel, right click on your "L" text layer and go again to Convert to Shape.
Make sure that your "L" vector shape is selected, pick the Add Anchor Point Tool and add new anchors points roughly as shown in the next images.


Step 8
Pick the Direct Selection Tool, focus on the top side of your "L" shape, select the three anchors points highlighted in the first image and drag them 2px to the left. Now, make sure that only the middle anchor point remains selected and move it another 3px to left.


Step 9
Focus on the middle side of your "L" shape, select the left anchor point highlighted in the following image and drag it 5px the right and then select the right anchor point highlighted in the same image and drag it 5px to the left. In the end your shape should look like in the second image.


Step 10
Now, add the "Y" use the same font and color adn then basically repeat the procedure used for your "F" and "L" shapes.


Step 11
Open the Layer Style for one of your text vector shape and enter the settings mentioned in the next images. After you apply thesse settings, focus on the Layers panel, right click on that edited shape and go to Copy Layer Style . Move to the other two shapes, right click and this time go to Paste Layer Style.


Step 12
Make sure that your three shapes are selected and duplicate them using the Control-J keyboard shortcut. Focus on the Layers panel, select the fresh copies, right click on one of them and go to Merge Shapes. Open the Layer Style window for the shape made in this step, disable the existing settings, enable the Drop Shadowand then enter the attributes shown below. Keep focusing on the Layers panel, make sure that the shape made in this step is still selected and lower the Fill to 0%.


Step 13
Focus on your Layers panel, hold the Control buttons from your keyboard and then click on the thumbnail icon that stands for the vector shape made in the previous step to load a simple selection around it.
Go to Select > Modify > Contract and set the Contract by to 15px.
Focus on the bottom side of the Layers panel and click the Create a new layer button.
Set the foreground color to #FFFFFF, pick the Paint Bucket Tool and fill your selected zone.
Once you're done, simply hit Control + D to clear your selection.


Step 14
Focus on the Layers panel, rename the layer made in the previous step "Highlight" and lower its Fill to 0% .
Open the Layer Style window for your "Hightlight" layer and enter the settings mentioned below.


Step 15
Make sure that the "Highlight" layer is selected and duplicate it ( Control + J ).
Open the Layer Style window for this "Highlight copy", go to Gradient Overlay and simply inverse the angle.


Step 16
Focus on the Layers panel, right click on your "Hightlight" layer and go to Convert to Smart Object.
Make sure that your new smart object stays selected, change the Blend Mode to Overlay, lower the Opacity to80% and then go to Filter > Blur > Gaussian Blur . Enter a 5px Radius and then click the OK button. .


Step 17
Focus on the Layers panel and convert your "Hightlight copy" layer into a smart object.
Make sure that your new smart object stays selected, change the Blend Mode to Overlay, lower the Opacity to50% and then go to Filter > Blur > Gaussian Blur . Enter a 5px Radius and then click the OK button. .


Step 18
Set the foreground color to #C33333, select the Rounded Rectangle Tool and click on your canvas to openCreate Rounded Rectangle window. Enter the settings shown in next image and then click the OK button.
Make sure that your vector shape is selected and pick the Direct Selection Tool.
Select the top left anchor points and hit the up arrow button twice and then select the bottom, left anchor points and hit the down arrow button twice.


Step 19
Duplicate the vector shape made in the previous step and place the shapes as you can see below.
Open the Layer Style window for these tiny vector shapes and enter the settings mentioned in the next images.


Step 20
Make a new copy of that tiny vector shape, rotate it ( Control + T ) - 90 degrees and then place it as shown in the following image. Open the Layers Style window for this shape and replace the existing attributes with the ones shown below.


Step 21
In this step you will learn how to create a pattern.
First, hit Control + N and create a 6 x 6px document.
Set the foreground color to #000000, pick the Line Tool and set the size at 2px. Move to your canvas and create the following vector shapes.
Once you're done, save your pattern simply by going to Edit > Define Pattern. Pick a name for your pattern and click OK.


Step 22
Return to your main document. Set the foreground color to #97712E, pick the Rounded Rectangle Tool , focus on the top bar and set the Radius to 2px.
Move to your canvas and simply create a 4x10px vector shape.
Make sure that this vector shape is still selected, hit Control + T and rotate it 30 degrees.


Step 23
Duplicate ( Control + J ) the vector shape made in the previous step seven times and move the copies as you can see below.

Step 24
Pick the Rounded Rectangle Tool and set the Radius to 4px. Move to your canvas, create two, 8 x10px vector shapes and place them as you can see below.
Select all your brown vector shapes, right on one those shapes and go to Merge Shapes.


Step 25
Open the Layer Style window for your brown vector shape and enter the settings mentioned below.
Make sure that your brown vector shape is still selected, make two copies (Control-J) and place them as shown in the first images.


Step 26
Make sure that your three, brown shapes are selected and duplicate them ( Control-J ). Focus on the Layerspanel, select these fresh copies, right click on one of them and go to Merge Shapes. Open the Layer Stylewindow for the shape made in this step, disable the existing settings, enable the Drop Shadow and then enter the attributes shown below. Keep focusing on the Layers panel, make sure that the shape made in this step is still selected and lower the Fill to 0%.


Step 27
Concentrate on your Layers panel, select all your shapes and layers and then group them using the Control + Gshortcut.
Open the Layer Style window for this group and enter the settings mentioned below.


Step 28
Focus on the Layers panel, select the Background layer and click on the padlock icon to unlock the layer.
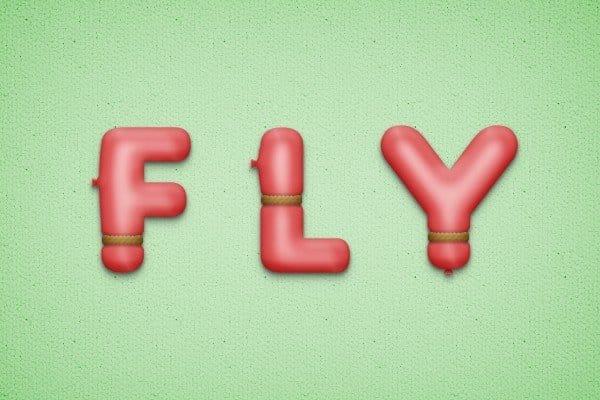
Set the foreground color to #CDCDCD or #A3D49C, grab the Paint Bucket Tool and fill the canvas with a new color.
Open the Layers Style window for the layer unlocked in this step and enter the settings mentioned in the next images.


Final Results


Download the PSD
[vc_column width="1/1" el_position="first last"] [vc_cta_button title="Download" href="https://downloads.photoshoptutorials.ws/Balloon Text.zip" color="btn" size="btn-large" icon="none" target="_self" position="cta_align_right" call_text="Balloon Text.zip | 6.45 MB" width="1/1" el_position="first last"] [/vc_column]
One comment on “Create a Balloon Text Effect in Photoshop”
nice text effect. :-)