This tutorial will teach you how to merge some simple photos and turn it into a fantastic photo manipulation with interesting effects and exciting lighting! In this tutorial, I will show you the basic techniques of retouching and creating a cyborg, work with color, blend modes, and much more. You will find a lot of interesting techniques and creative solutions.
We start by creating a background and work on the model. I’ll show you the basic techniques of retouching. The next steps will be to work on the central sphere and details. I conclude tutorial interesting techniques and color effects. I have used Photoshop version CC 2014 to create this work but you can use any version from CS onwards will be fine as well.
Tutorial Resources
- Model– almudena-stock
- Metal Squiddy Spread– Della-Stock
- Cables texture– ribot02
- Underwater Bubble Brushes– MorganBW
- Z-DESIGN Tech Brush Set v6– z-design
- Hexagons textures– MariaSemelevich
Step 1
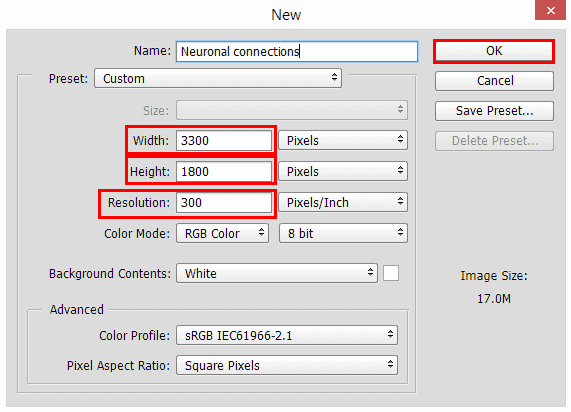
Open Photoshop and Let’s start by creating a new document. Do to File > New or use hot keys Cmd/Ctrl + N with 3300 pixels wide and 1800 pixels height, resolution 300 Pixels/Inch.

Step 2
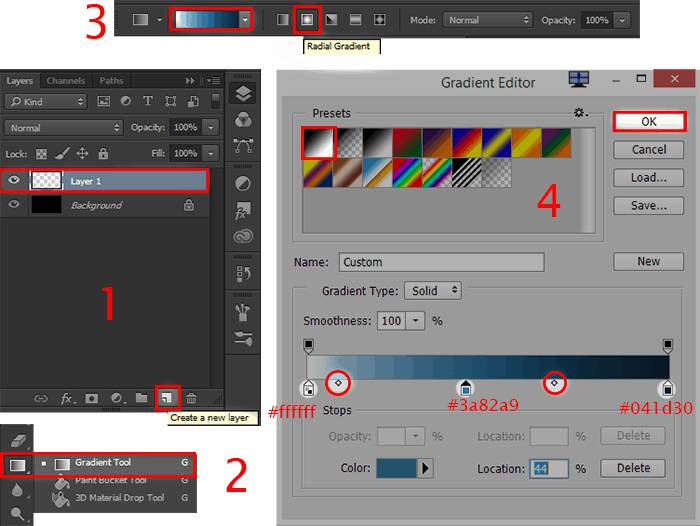
First I made the basic background to see the volume and choose a suitable color. It is important not to work on a pure white or black, when you are dealing with a painting or fine detail. Create a new layer (Layer > New > New or Cmd/Ctrl + Shift + N) and take a Gradient Tool (G). Set Gradient Style: Radial and go to Gradient Editor and make gradient #ffffff – #3a82a9 – #041d30. Move gradient midpoints (two small dots between bottom sliders) both slightly to the left to make more hard color transitions.

Step 3
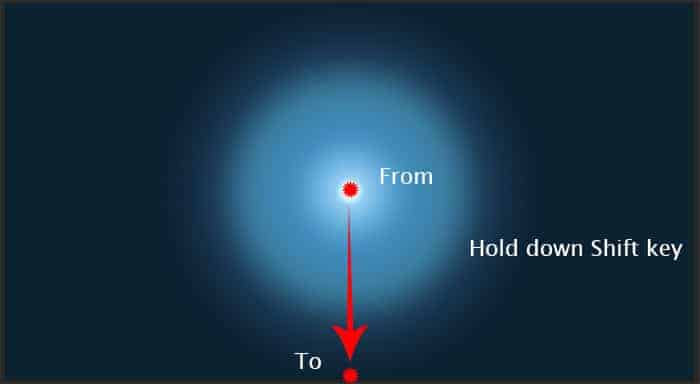
Now draw a gradient like shown in the image below. Start with the middle of the document and move horizontally down. To do that accurately and precisely aligned, hold Shift on keyboard.

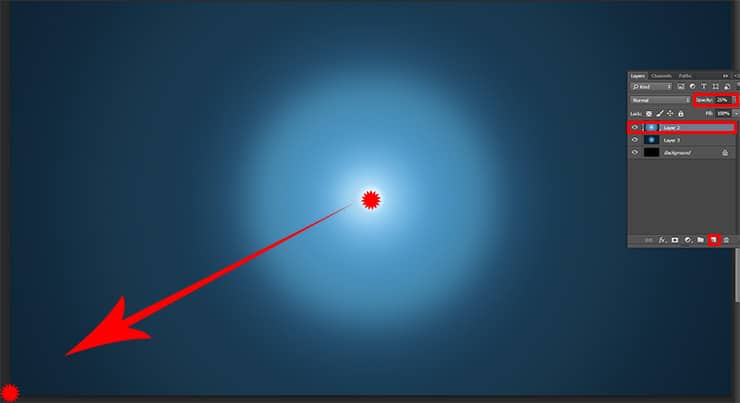
Now in a new layer (Cmd/Ctrl + Shift + N) draw another one radial gradient with same settings, that the light-blue part be a little beyond the boundaries of the working area. This time, draw a gradient from the center to any corner of the working field. Set Layer Opacity around 25%.

Step 4
Add another one gradient on a new layer (Cmd/Ctrl + Shift + N). With it we darken the bottom part of the image. Set Background color – black (D to restore the default colors and X to switch them) and Foreground color – #015890, set gradient style: Linear. Draw from the top to the bottom edge of the document with holding Shift. Decrease layer opacity to 15%.
3 responses to “Create a Chilling Sci-Fi Scene of Cyborgs in Bubbles”
-
love it
-
Nice one..enjoy ur tutorials..pls I have questions ..what does a vector mask do
-
Thank you, a cognitive a lesson )) the result from the by curves differs


Leave a Reply