Step 7
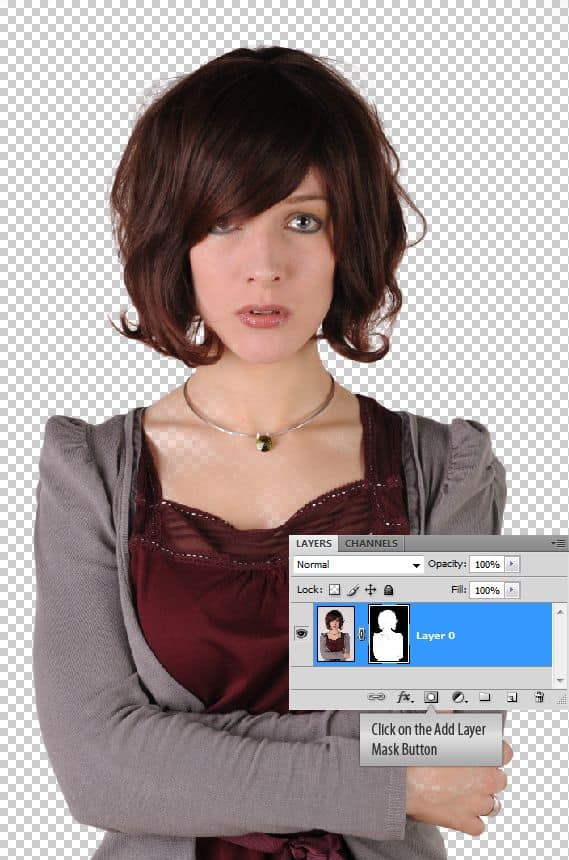
We just refined our selection. So let’s use it to mask out the model. While the selection is on, click on the Add Layer Mask button located at the bottom of the Layers Palette.

Step 8
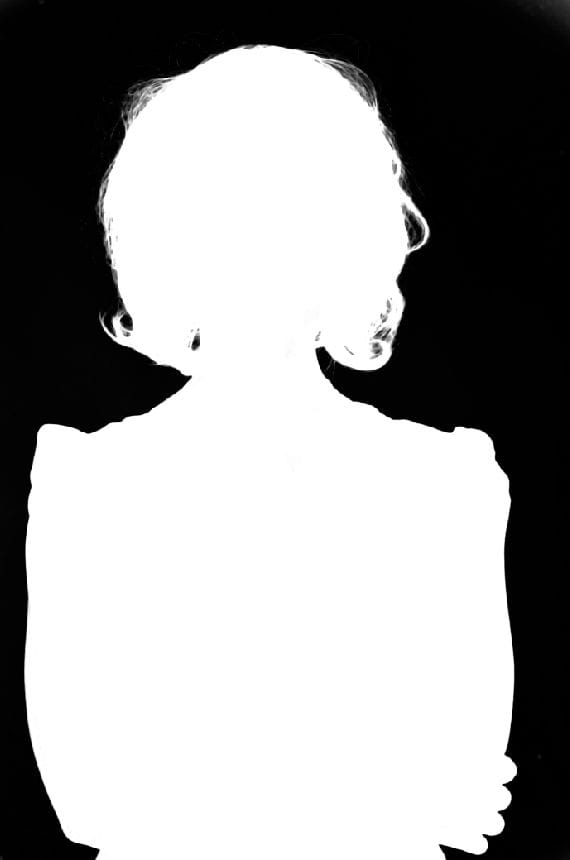
Now let’s deal with the holes in the mask. To view the mask hold Alt key and click on the layer mask thumbnail. Now you are inside the mask. Notice, there are some grey areas inside the white area and at the corners of the mask. Those are holes and we need to get rid of them. Pick a hard brush, color set to white and paint out. Now change the brush color to black and paint out the corners. Make sure you didn’t left any greys.

Here is the perfect mask after the corrections.

Step 9
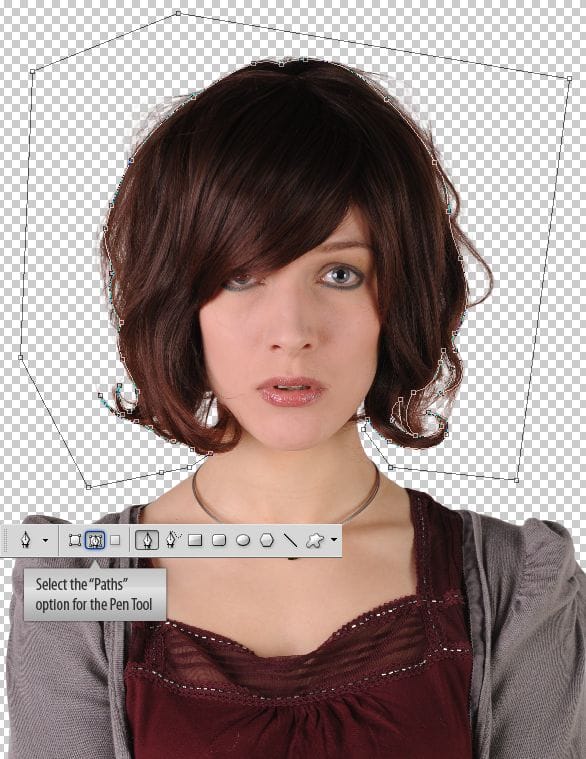
Examine the image once again. There are lots of strands of hair which can cause problems. I want to remove them. Select them using the Pen Tool. Since lot of curves involved Pen Tool is the best choice. Select the “Paths” option for the Pen Tool on the Options Panel.

Try to be as good as you can. Just leave of those strands of hair.

Step 10
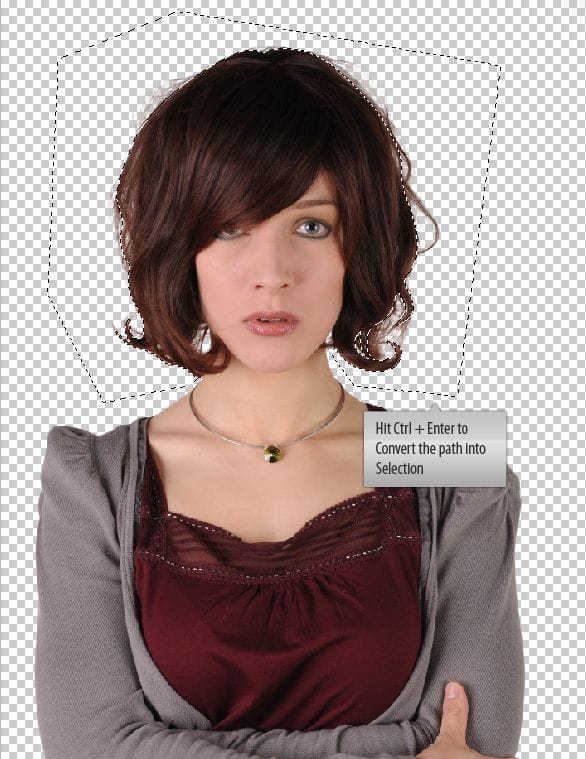
If you finished drawing the path. Convert it into a selection. Hit Ctrl + Enter or just right click on the path and choose Make Selection.

Now use the selection to hide those strands of hair. Remember we already have a mask associated with the model. Now click on the Layer Mask. Set the foreground color to #000000 and hit Alt + backspace to fill the selection. That is the great thing about layer masks. We can hide or reveal as we need! totally non destructive.

Step 11
One final step before we drag the model into our main document. Convert this layer into a smart object. Right click on the layer and choose Convert to Smart Object from the context menu. This is just a good practice with numerous benefits. we can transform smart objects freely and apply filters to them without destroying the original, can apply layer masks to them and all those good things. And at any point of time we can revert to our original image.

Step 12
Ok we are done with the model and we are ready to go. Drag the model smart object layer into the main document. You need to resize her and position her properly on the canvas. We are not going to use the whole of the image. Hide the bottom portion of the image. Grab the Pen Tool and make the selection. Make it a bit organic with curves. It should look something like the below one.
41 responses to “Create a Colorful Retro Poster in Photoshop and Illustrator”
-
What a fantastic tutorial
-
i really liked it practical skills worth knowing
-
yo
-
Some good techniques I just learned here – thank you! I just wish Photoshop had some of Illustrators features so I don’t need to go back and forth. I can copy and paste the illustrator elements into Photoshop CC but the problem is to get Illustrator, you need the full Adobe Creative Cloud subscription. Most of my students can only afford the Lightroom and Photoshop plan.
-
Nice artwork!
-
Nice tutorial but sad how you have to use adobe illustrator for that trace contours thing
-
What is the canvas size for step 1?
-
1169×1654 pixels
Although you can use any canvas size you like, it’s best to use something similar while following the tutorial.
-
-
WELL DONE!! Great tutorial Niranth!
-
who else really gets this ?
-
totally right couldnt agree more
-
<3 Cool post ?
-
I agree Amazing info ?
-
Yup
-
Worlds best tips fan
-
nice
-
<3 Sweet reply
-
tnx
-
-
Really nice stuff!
-
Agreed Awesome !
-
-
Can we do the same in Inkscape and Gimp?
-
Really covered a lot of different techniques and new shortcuts. It’s cool seeing such seemingly “random creativity” captured and explained step by step.
I also appreciated seeing vector art combining with textures in photoshop. Merges the gap for me that I have in my head.
thank you!
-
You should add some bookmark or like buttons!!
-
this is hard as fuck
-
Where can you find the original pictures to do this? I tried on a random picture and i got lost.
-
Awesome Post. Lighting is most beautiful.Thanks for sharing such informative post its help me to know deeply Photoshop work step by step.
-
What a fantastic tutorial! :)
Thank you very much!!!!!!!!!!! -
I hate illustrator i was doing geat up until the hair i surrender…
-
Oh great explanation. I have ready mate unique retro poster
-
im trying to do this, but i have illustrator cs6 and i cant do it :x
What version its this?
cs5?
Anny help? -
Que versão é usada no ilustrator?
eu tenho o cs6 e não consigo :/ -
This Tutorials is very helpful for me.
-
Waow this is cool!
-
Thank you for this amazing tutorial!!
-
Nice Work , See My Work Too ;)
-
Way to challenging… yup I give up! I Rhymed!
-
Where Can I Download PSD file?
-
Fascinating!!! Got to give this a try. :)
-
What a fantastic tutorial!
-
This is my copy :)
https://www.box.com/s/frz9gp0hi3mpkzs9f0b7 -
Nice Tutorial .. I’m loving it. Thanks


Leave a Reply