Luminar AI lets you turn your ideas into reality with powerful, intelligent AI. Download the photo editor and see how you can completely transform your photos in a few clicks.
Learn how to draw this Stargate timer in Photoshop. In addition to drawing, you will learn how to setup the ruler and create guides to align the elements properly.
Preview of Final Results
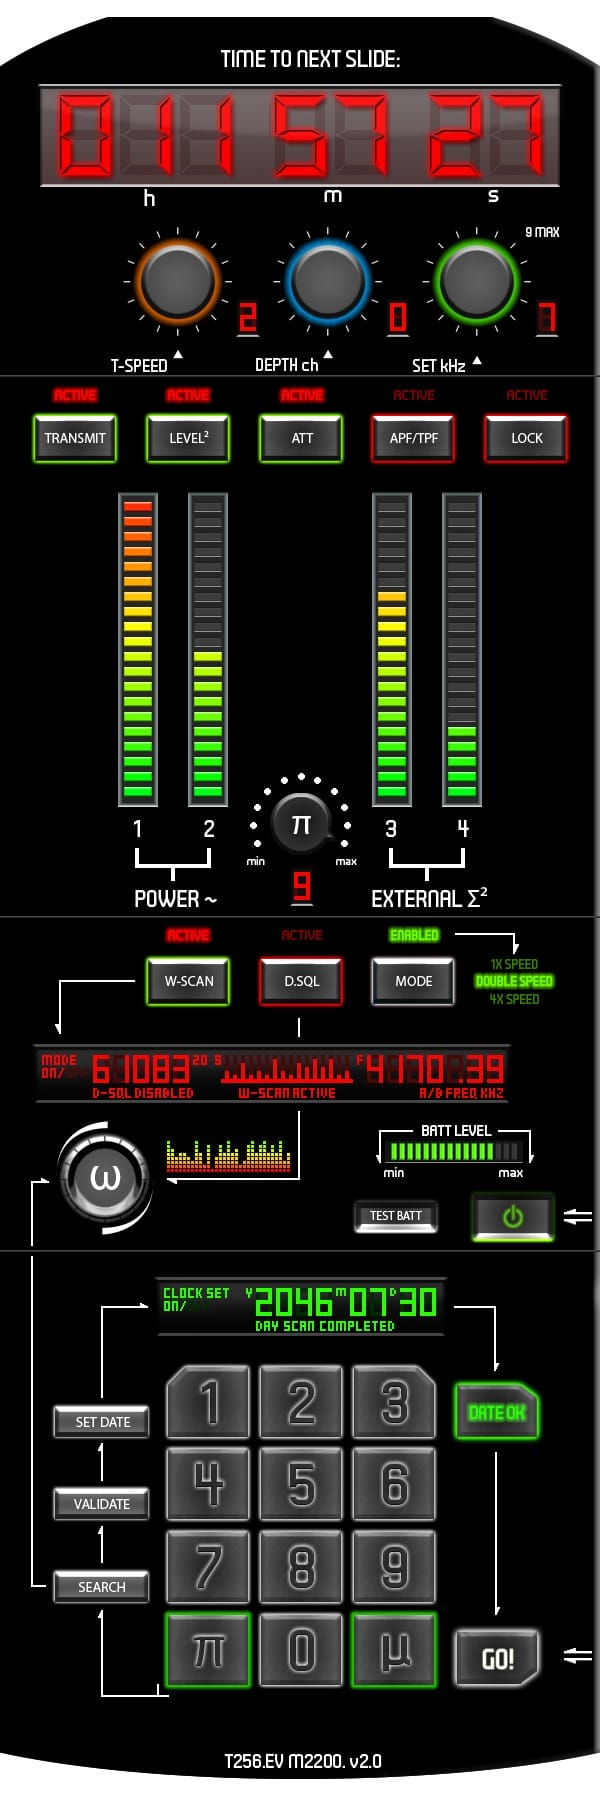
Stargate Timer Photoshop Tutorial
Step 1 – Correct Your Ruler System
To use the correct ruler system, first make the ruler visible (Enable rulers > View > Rulers). Then, under Preferences (Edit > Preferences), select “Units & Rulers,” and set the units to “pixels.” Then select “Guides, Grid, Slices & Count” in the left menu and set the colour of your rulers. Drag your ruler to the top left corner of your document.

Step 2 – Create a layout of the timer shape
Create a new document with a width of 1000 and a height of 2000. Make some rulers as shown in the image below. Draw a selection between the rulers, with a width of 600 and a height of 1800.

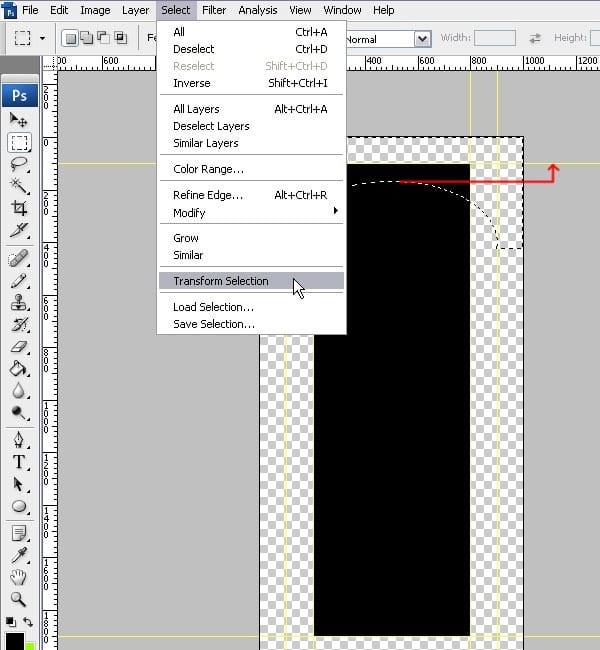
Paint the selection black (#000000). In the same layer, create an elliptical selection like shown below. Keep the selection between the ruler at 100 and 900. Then inverse the selection (Select > Inverse) and transform (Selection >> Transform Selection) this selection up (using your up arrow key or mouse) to the 100 ruler line. Then approve the transformation (Enter) and erase (Delete) sections of the black rectangle.
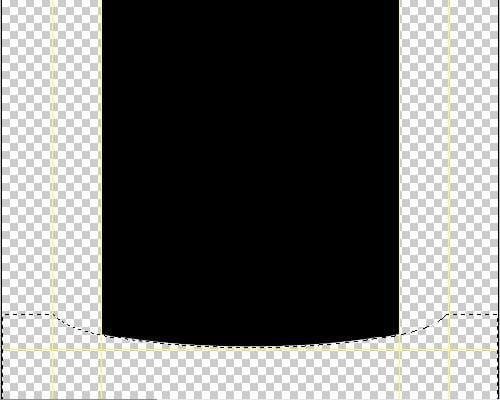
Do the same with the bottom.
Step 3 – Create the top display
This is what you will make.

Create a horizontal grid line from a width of 300 to a width of 700. Then create a vertical grid line from a height of 150 to a height of 250. Create a new layer and make a new selection.
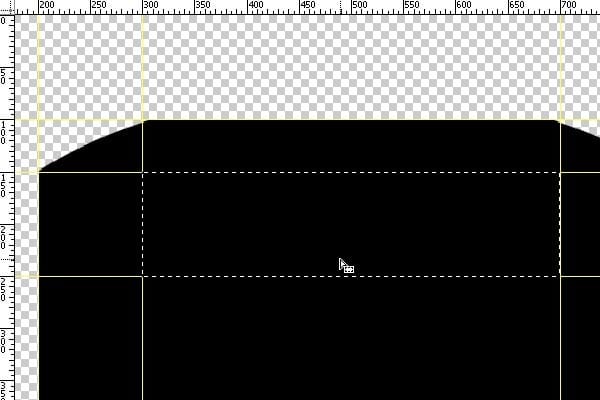
Paint the selection with a gradient. Use the colours #383838 and #5d5d5d.
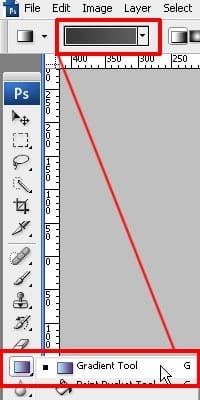
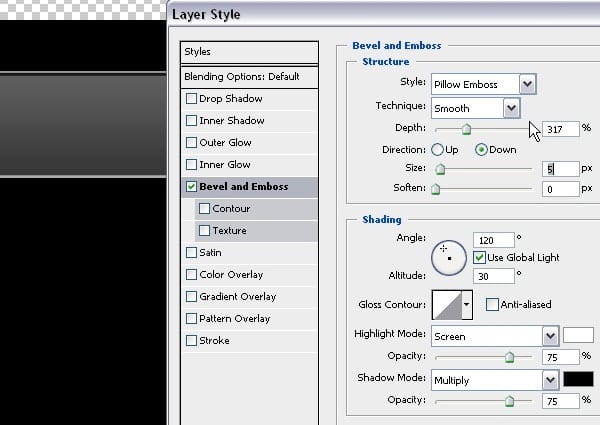
Then change the Bevel and Emboss preferences in the Layer Style (Right click > Choose > Blending Options) to the settings shown below.
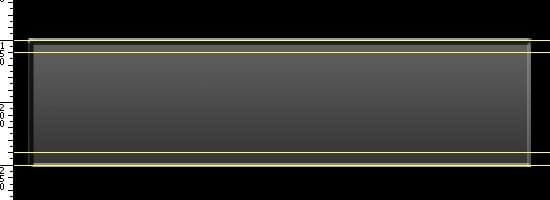
Create two horizontal grid lines from a height of 160 and a height of 240. Stay within this height to create the digital numbers.
Create horizontal grid lines at a height of 162, 170, 172, 180, 190, 195, 200, 205, 210, 220, 228, and 230. Then create vertical grid lines at a width of 635, 640, 643, 645, 650, 653, 660, 670, 677, 680, 687, and 690. Make some diagonal lines as shown below.
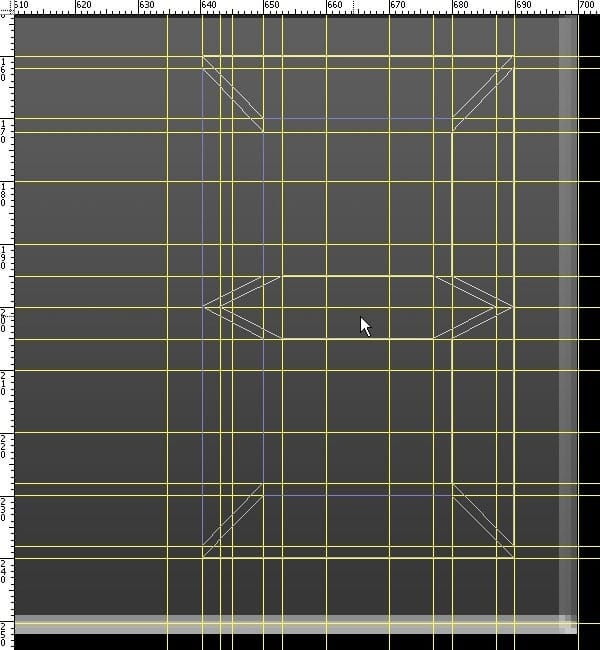
Select the Pen Tool (P), enable the “Paths” option, and create the number '8.' With 8, you can then create the other numbers.

Temporarily disable the ruler by (View > Extras). Make a selection (Right click > Make Selection). Set the Feather Radius to 0 and uncheck “Anti-Aliased.”

Create a layer and call it “Zero.” Use red (#FE0000) for the lines that would display the number 0. Create another layer for the line that would not be filled for that number and colour those lines brick red (#490305). Name it “Zero BackGr.”


Select the layer labelled “Zero” and use the following Outer Glow settings in the Layer Style windows.

Then select “Drop Shadow” and use these settings.
- Distance: 2
- Size: 0
Then select “Bevel and Emboss” and use these settings under “Inner Bevel.”
- Size: 3
- Depth: 100%
Create five different numbers each on their own layer, making sure there are two layers each. When you have created the numbers, merge the two layers together (Shift + Click both layers > Right Click > Merge Layers)

Your display is now complete.

Space the numbers out so that their edges are 10px from each other. For example, the first number begins at 260 and ends at 310, the next number should begin at 320, and so on.

Create a layer over the display. Load the digital display rectangle (Ctrl+Click) and select the Pen Tool (P). Draw a path like the example shown below. Right click on the path and selection “Make Selection.” Before you hit “OK,” hold “Shift,” then click “OK.” The path will have deleted the bottom section of the selection.

Fill the selection white and set the opacity to 10-15%. Then blur (Filter > Blur > Gaussian Blur) it at 4px.

Step 4 – Creating knobs
This is what you will make.

Make a new layer and group for the knobs. Hide the other layers. As seen in the red box below, make sure the X and Y are measured in pixels (Click the + sign > Pixels). Then draw an elliptical selection of 440 × 440. To draw a perfectly round selection, hold “Shift” while drawing.

Fill the selection with a gradient. Make sure you select “Radial Gradient.” Fill from the centre outwards with the colours #393939 and #5C5C5C.

Now change the Bevel and Emboss settings in the Layer Style window to the ones below.

Contract (Select > Contract) the selection by 5px. Then Inverse (Select > Inverse) the selection. Last, Blur (Blur > Gaussian Blur) by 2px.

Create two perpendicular gridlines to find the centre of the circle. Then create gridline for the top and bottom of the circle. Last, create gridlines 60px above the top gridline and 60px below the bottom gridline. I've changed the background colour below so that you may see better. Create a new layer and draw 2px lines from the 60px lines outwards.

Duplicate the layer with the lines and rotate it by 90 degrees (Hold the cursor in the corner and wait until the rotating symbol appears).

Repeat the above step for 45 degrees to the left and right, then 22,5 degrees for the rest.

Merge the lines and the knob together. If you changed your background colour, make sure you uncheck that before the merge. Call the merged layer “Turn_button_A.” Resize the knob to 110 × 110 and use the following Layer Style.

Place your knob in the area as shown below.

Create a new layer in the same group as the knob and label it “displayBackGr.” Make a selection with a width of 50 and a height of 80. Fill the selection with #0F0F0F.

Use these blending options for the selections.

Create another new layer in this group and label it “displayNumber.” Use the Pencil Tool (B) and right click to add the square brush set. Select the 4px square pencil tip.


Create a number by using red (#FF0000) for the lines that are lit and brick red (#494949) for lines that are not lit.

Nudge the Knob group to 350px on the ruler.

Select the polygon tool, set the sides to 3, and create a triangle path. Then right click on the path to make a selection and fill it white.

Duplicate the Knob group twice. Place one at the horizontal mark of 490 and the other at 640. Change the Outer Glow of knob 2 (Turn_button_B) to #2C8BB9 or another colour that you like. Change the display number as well. Then change the Outer Glow of knob 3 (Turn_button_C) to #46BF0C or another colour you like. Then change the display number for that knob as well.
Select the Text Tool and the Font “Tenby Five.” Then create a new group and label it as “Text.” I named Turn_Button_A “T-SPEED,” Turn_Button_B “DEPTH ch,” and Turn_Button_C “SET kHz.” I also added “h,” “m,” and “s,” under the top display for hours, minutes, and seconds, and “9 MAX” to tell how high the numbers go.

Step 5 – Power meters
This is what you will make.

Make a new group (Meter Group) and new layers (meter 1, bar, bar shadow, background). Make a selection with a width of 50 and a height of 315. Fill it with #262626. Then set the “Bevel and Emboss” to the settings below.
- Inner Bevel: Smooth
- Depth: 100%
- Size: 2px
- Direction: down
Then set the “Inner Glow” preferences to the image shown below.

Make a selection like the one below.

Fill the selection with #FF2F00 and use the Bevel and Emboss settings below.

Set some gridlines at the bottom of the bar and 5px from the bottom of the first bar.

Use the Action function to duplicate the red bar into a power meter. Push ALT+F9 and make a new action.

Call the New Action “Hue & Position” and click Record.

First duplicate the red rectangle layer. Then change the Hue/Saturation (Image > Adjustments > Hue/Saturation) to the settings below.

Nudge the duplicated layer 5px down. Then hit the stop button to stop recording. When you hit play, you will see that you make a new rectangle that becomes greener every time.

Hit play until there is a nice green rectangle at the bottom.

Merge the coloured bars together into one layer and label it “bars.” This metre is at full capacity and will serve as a template. Duplicate the layer “bars” and label it “bars shadow.” Drag the “bars shadow” layer below the “bars” layer. Duplicate the group of bars to create three other groups. See below for the ordering of layers and groups. Note that I have created groups for Meters 2, 3, and 4.

Select the “bars shadow” layer and desaturate it (Image > Adjustments > Desaturate). Then right click to get to Layer Style and adjust the “Bevel & Emboss” settings to the following.
- Style: Inner Bevel
- Technique: Smooth
- Depth: 100%
- Direction: Down
- Size: 0
- Soften: 0
Delete some coloured bars from the “bars” layer and you will end up with something like this. Do this for the other coloured bars.

In the same group as your lines and text, draw a 1-2px line under the text from the Turn_buttons. You can hold the Shift key to create a straight line.

Your picture should look something like this.

Step 6 – Cool push buttons
This is what you will make.

Create a new group called “Push Button” and a new layer called “background.” Here is an example of what it would look like (note that I have added other groups and layers in).

Create horizontal gridlines at 390 and 435 and vertical gridlines at a 240 and 320. Then create a selection with a width of 80px and a height of 45px. Fill the selection with a Radial Gradient with #585858 as the outside colour and #252525 as the inside colour.

Give the selection the following Bevel and Emboss options.

Give the selection the following Outer Glow options.

Give the selection the following Brush Strokes options.

Create a new layer and use the Text Tool to type “TRANSMIT” with the following settings.
- Font Face: Myriad Pro
- Size: 14px
- Type: Regular

This button will be duplicated several times.
Step 7 – Active Lights
The active lights show whether the buttons are active or not. Create a group called “Active Ligths” and a subgroup called “Active Light_1”.
Create a new layer and call it “Active Light.” Type “ACTIVE” with the following settings.
- Font Face: Tenby Five
- Size: 14px
- Color: #FD0000
Duplicate this layer and call it “Deactive.” Give the text a duller colour (#800000). Put this layer below the “Active Light” layer.

Right click on the “Active Light” layer and choose “Rasterize.” Then give it the following Outer Glow options.

Duplicate the buttons and repeat the above steps to create more buttons. When the button is turned off, the outer glow colour is red (#EF0000).

Step 8 – Middle knob
This is what you will make.

Select one of the knobs you created earlier and copy it. Paste the knob onto a new layer in a new group. Use the Pen Tool to create a little triangle on the knob. Fill the triangle with the same light gray as the knob.

Use the following Bevel and Emboss settings to blend the triangle to the knob.

Create some gridlines to find the centre of the knob. Then use the Pencil Tool with a 7px tip to draw white dots in a semicircle around the knob.

Create some text (i.e. min, max, Power, External S², p) with the following settings.
- Font Face: Bell Gothic Bold
- Size: 32px
- Colour: white
Type 1, 2, 3, and 4 below the power metres and draw connecting lines to Power and External S². Use gridlines to help keep the lines even. See below for an idea.

Step 9 – More Text
This is what you will make.

Duplicate a green and a red button from step 6. For the third button, use white (#FFFFFF) for the outer glow. Create the following new text in green (#6CFF00).
- ENABLED
- 1X SPEED
- DOUBLE SPEED
- 4X SPEED
Use the following Outer Glow settings with the same green (#6CFF00).

Use the Pencil Tool (B) with a 2px tip to draw a white (#FFFFFF) line from the button. Hold Shift to create straight lines.

This is what your image should look like.

Step 10 – Second display, the frequency scanner
This is what you will make.

Create a new group and label it “Freq Scanner.” Create a new layer and call it “background.” Make a selection with a width of 475 and a height of 60. Fill it with a linear gradient using the colours #292929 and #040404. Then use the following Bevel and Emboss options.

Just as we did at the end of step 3, we will create a new layer and label it “shine.” Select the entire background (Ctrl+Click on layer). Use the Pen Teool (P) and draw a path as shown below. Right click on the path and select “Make Selection.” Hold the Shift key and click OK.

Fill the selection with #FFFFFF and set the opacity of the layer to 10-15%. Then blur (Filter > Blur > Gaussian Blur) at about 7-10px.

Create a new layer called “Freq numbers.” Set up the gridlines like you did in Step 3 for the numbers in the first display. The last number is about 3px from the edge of the background.
Use the Pencil Tool with a 4px tip to draw red (#FF0000) numbers. The inactive colour is #490808. The numbers span about 16px horizontally and 28px vertically. There is a 4px space between each number. Note that a decimal would also take the space of a 16×28 rectangle.

Then still using a 2px tipped pencil, create the scanner by drawing vertical lines and connecting them at the bottom.

Use your imagination. This is what my 2nd display looks like.

Step 11 – Another knob
This is what you will make.

Duplicate an existing knob from step 4 and use the following Bevel and Emboss settings.

Then use these Outer Glow settings.

Use the gridlines to determine the centre of the knob. Create gridlines about 4px above the knob and another one about 10px higher than that. Use the Auto Snap option of the ruler to create this arching shape below.

Right click on the path and select “Make Selection.” Fill the selection with white (#FFFFFF). Duplicate this layer and transform it to the following.
- W: -100
- H: -100%

Place the transformed selection at the lower right corner of the knob.

When you copied your knob, you should have copied the volume lines too. Resize the lines so that they fit in the knob.

Change the Exposure (Image > Adjustments > Exposure) to the following setting.
- Exposure: -9,65
- Gamma Correction: 1,00

Step 12 – Middle Section
Here I added a line from the D.SQL button to the knob we just made in Step 11. I wrote ? in the knob. I also added a power button and a “TEST BATT” button. lastly, I rotated one of the power metres to add the BATT LEVEL section.

To create the power symbol, I used the Elliptical Selection Tool (hold Shift to make a perfect circle) and Stroked (Edit > Stroke) it white (#FFFFFF) with a 2px stroke.

Then use the Eraser Tool (E) to erase some portion of the upper section and use the Pencil Tool with a 2px tip to draw a line coming out.

Step 13 – Colourful Display
This is what you will make.

Open a new document with the following settings.

Create a new layer and hide the background. Paint the top half of Layer 1 gray.

Select all and Define the Pattern (Edit > Define Pattern) with a name you like. Then close the document.

Going back to our main image, create a new group and a new layer. Make a selection with a height of 125 and a width of 40. Fill (Edit > Fill) with the pattern you just created.

Use the Pencil Tool with a 3px tip and the colour (#FF0100) to create the following display.

These are the colours used for the 8 different blocks.
- #FF0100 (red)
- #FF5A00
- #FFAD00
- #FFD801
- #FDFE02
- #CFFE00
- #9BFF00
- #6DFF00 (green)

Delete some random squares and place it next to the knob you made in step 11.
![79[1] 79[1]](https://cdn.photoshoptutorials.ws/images/stories/5d5cdb44b0be_375C/791.jpg?strip=all&lossy=1&quality=70&webp=70&avif=70&w=1920&ssl=1)
Step 14 – The bottom
This is what you will make.

The green display is the same as the one created in Step 10, so duplicate the group that contains the green display. Then scale it down (Edit > Transform > Scale). Change the date to any date you want. The rest of the “text” buttons are also duplicate buttons from other steps.
Now, to create the numerical buttons, duplicate one of the buttons and scale the vertical alignment to about 130%. Then use the Text Tool and type the number 0 using the following settings.
- Font Face: Tenby Five
- Size: 60px
- Colour: White
Select (Ctrl + Click) the layer.

For the number 1, Select (Ctrl + Click) the text layer and then the background layer. Then Copy (Edit > Copy) and Paste (Edit > Paste) it so there is another layer. Delete the text layer.

Set the new layer to these Bevel and Emboss settings.
- Style: Inner Bevel
- Technique: Smooth
- Depth: 1%
- Direction: Up
- Size: 0
- Soften: 0
Then add some Outer Glow with these settings.

To make the slanted corners on some of the numbers, create a rectangular selection and rotated it 45 degrees. Then select the layer for the button you wish to alter. Next, hit “Enter” to transform the selection. Last, hit “Delete” to erase the part of the corner.

Apply the same effect to other buttons you wish to alter.
Final Results

2 comments on “Draw a Stargate Timer in Photoshop”
This is not stargate. This is Sliders.