In this Photoshop tutorial, we will learn how to create a picture with two different stories, one: a town on an island and two: the deep and huge body of water below it. We will learn how to blend images perfectly, make an underwater image look realistic through the use of applying brushes in different colors, the eraser tool to soften the edges and the clone stamp tool. We will also learn how to retouch the image to further beautify the image and how to soften the contrast and make the image look dreamy.
Preview of Final Results

Floating Island on Water Photoshop Tutorial
Tutorial Details
- Program: Adobe Photoshop CS2
- Version: 9
- Difficulty: Medium
- Estimated Completion Time: 1 to 1.5 hours
Resrouces
- Sea Background Stock II by ArwenArts (Creative Commons License)
- 36…underwater stock by winkstock (Creative Commons License)
- The Island 2 by Banana-Workshop (Creative Commons License)
- Little Island by mindCollision-stock (Royalty Free License)
- Stormy sky by Michael Vincent Manalo (Creative Commons License)
- Rons Winter collection brushes by Ron (Royalty Free License)
Step 1 – Create the Photoshop document
To begin, let’s create a new image file, go to the Menu bar and click on File > New, and then input the following values on their respective fields:
- Width: 3000 pixels
- Height: 2247 pixels
- Resolution: 300 dpi
- Color Mode: RGB Color; 8bit
- Background Contents: Transparent

Step 2 – Create the town above the sea
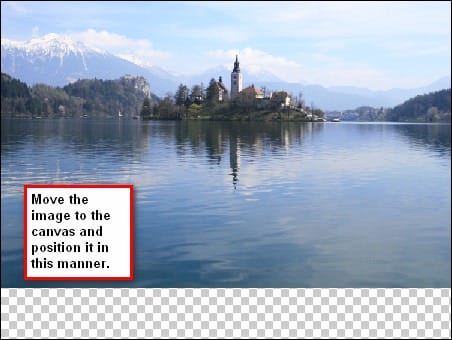
In this step, we will be creating the town situated above the sea. To start, let’s open the stock image: The Island 2. We won’t be doing editing or cutting on this image so let’s activate the Move tool (V) and left-click on the image and drag it to our canvas then rename that layer to “island townâ€. To rename a layer, simply double click on the words “layer 1†and the text edit box would appear and you can now rename the layer.

Now we will be resizing our image for composition purposes – the town above the sea is situated above a huge rock below it as well as the rest of the surrounding islands. Let’s activate the transform tool (Ctrl/Cmd + T) and to resize the image, we just need to click on the little squares that would appear around the image.

Next, we would be removing the sea on the “island town†layer for we will be putting the region under the sea on that part. Activate the Marquee tool (M) and follow the instruction on the image below:

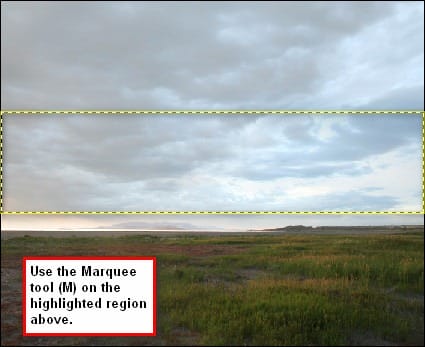
Now we will be changing the sky of this image. Open the Stormy Sky stock image, and then activate the Marquee tool (M). See image below:

After you’ve selected the area let us now transfer that to our canvas using the Move tool (M).

Once on the canvas rename that layer to “skyâ€. Next, we will make the town look dreamy. To do that, we will need the Eraser tool (E). Activate the Eraser tool (E) and use the settings below:
10 responses to “Floating Island on Water”
-
amazing tutorial.
The mysterious island -
this is hard
-
way to go
-
nice
-
Cool im doing it right now
-
I don’t get how you went from “water texture†to cloning that image.
It’s like you skipped a step or two.
-
Nice photoshop manipulation. Top picture “Island” is from Slovenia – lake Bled.
-
Thanks for this tutorial! This is my version
http://silvialorica.tumblr.com/post/59341356745/floating-island-lisola-che-galleggia-made-by-
Thts not yours cheater ..
-
-
im so gonna try this!


Leave a Reply