Learn, how to make this fantasy, warm photomanipulation from free stock images. You will know, how to combine background in your photomanipulation, then you will make shadows and lights, then you will create special effects – like particles or glows.
In this tutorial you will learn basics of Adobe Photoshop – using layers and basics of drawing – by making light and shadows in this photomanipulation. I will show you, how to work with perspective and how to use different layer styles. Sounds interesting? Read this tutorial and find out how easy it is!
Tutorial Resources
- Stolpen 11 – almudena-stock
- Stairs stock – titusboy25
- Autumn 7 – mirish
- Fire HQ – gd08
- dead tree png – gd08
- Tree Sidebar PNG – evelivesey
- Grunge maps Weird 0001 2 (L) – cgtextures
Step 1
Let’s start. Create new file. Go to File > New… and pick 1200x1800px size.

Step 2
Place and transform “Stairs stock”. Drag it from your folder and drop to created file.

Step 3
Then, place “Grunge map”. Transform it (ctrl+T) perspectively, by holding ctrl when you drag points of transform.

Step 4
Add mask to this layer. Click on marked shortcut. Then, choose white canvas next to layer thumbnail. Pick soft round brush and mask edge of texture.

Step 5
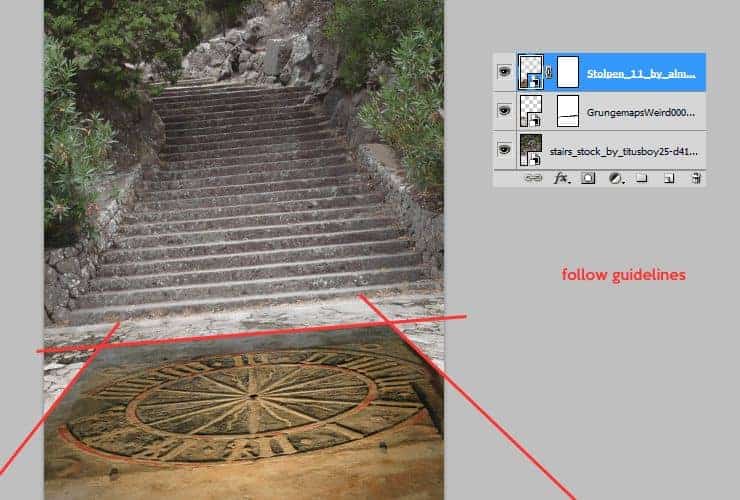
Let’s place “Stolpen 11” stock. Transform it(ctrl+T) perspectively, by holding ctrl when you drag points of transform.

Step 6
Click on marked shortcut. Then, choose white canvas next to layer thumbnail. Pick soft round brush and mask everything except circle of clock.

Step 7
Add some lights and shadows to clock. Add Brightness/Contrast adjustment layer. Right-click on adjustment layer and choose “Create clipping mask” (Alt+Ctrl+G or Layer > Create Clipping Mask). Set it as is shown.

Step 8
You can mask adjustment layer, just like normal layers or Smart Objects. Click white canvas next to layer thumbnail. Pick soft round brush and mask top of the image.

Step 9
Adjust whole stock image to texture on the ground. At first you should decrease saturation. Add Hue/Saturation adjustment layer. Right-click on adjustment layer and choose “Create clipping mask” (Alt+Ctrl+G or Layer > Create Clipping Mask).

Step 10
Decrease contrast – stock with clock is too contrasted in comparison to ground texture. Add Brightness/Contrast adjustment layer. Right-click on adjustment layer and choose “Create clipping mask” (Alt+Ctrl+G or Layer > Create Clipping Mask).
8 responses to “How to Create a Fantasy Photo Manipulation with Fire”
-
thanks for an awesome tutorial. wish i could post what i made of it on here :(
-
The end result is nice, but waaaay too many layers!
So sick of making layers… Need to find better methods.
Thanks. -
why u dont use Photoshop cs6 for this tutorial? It’s hardly to understand while Im using CS6
-
Link of ”Grunge map” had died. I dont understand step 4, how to do it ??
-
Diego Armando
-
link to Grunge maps Weird 0001 2 (L) cgitextures is broken. Tree sidebar PNG is a pay file. Love your tutorial. Thank you
-
amazing
-
Nice


Leave a Reply