Step 37
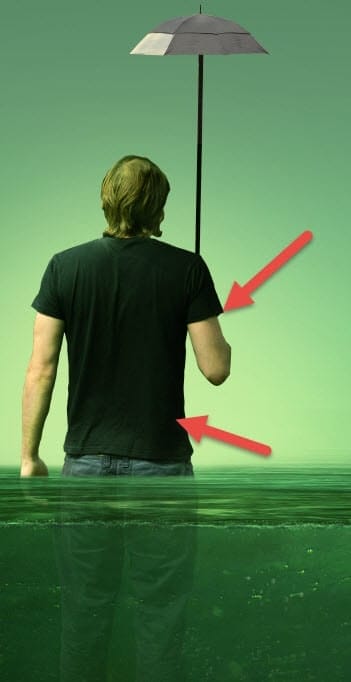
Create a new layer and set the blending mode to Overlay. Clip this layer to the layer guy. Use a round soft brush at 30% opacity to paint with white over the areas indicated below to add some interesting highlights.

Step 38
On a new layer set to Overlay paint with the same round brush with black over the areas shown below to add some shadows. Clip this layer to the guy layer.

Step 39
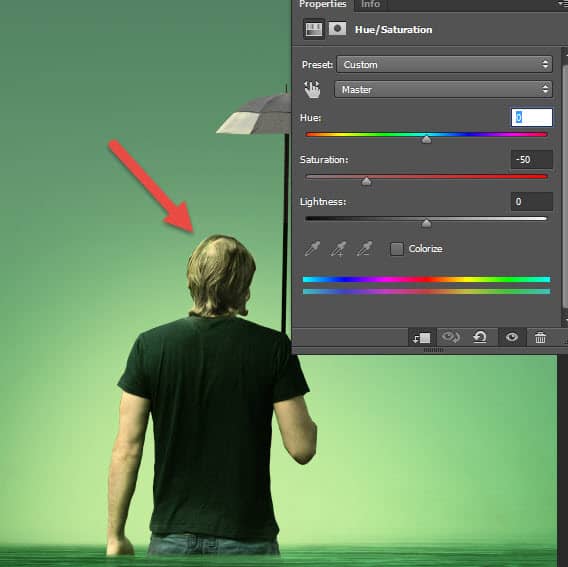
Create a new Hue/Saturation Adjustment Layer with the settings shown below and fill the layer mask with black (click on the layer mask and press Shift + F5). With a white round soft brush paint in the layer mask over the arms and hair of the guy to desaturate those areas. Clip the layer to the guy layer.

Step 40
Create a new Levels Adjustment Layer with the settings shown below and clip it to the guy layer. Fill the layer mask with black and paint with a round soft brush with white in the layer mask to reveal the lightness effect over the hair.

Step 41
The hair is still too saturated for my taste. Create a new a new Hue/Saturation Adjustment layer with the settings shown below and fill the layer mask with black. Paint with white with a round soft brush over the hair and clip this layer to the guy layer.

Step 42
Create a new Color Balance Adjustment Layer with the settings shown below and clip it to the guy layer in order to add some more warm colors to him.

Step 43
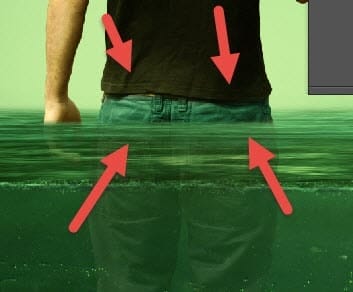
Let’s improve the lightning of the guy’s legs. Create a new layer and clip it to the guy layer. Set the blending mode to Overlay and with a round soft brush (at 20% Opacity) paint with white over the already white areas and with black over the shadowy areas to improve the lighting. Use another layer set to Overlay blending mode if the previous layer wasn’t enough.

Step 44
Create a new layer and set the blending mode to Color. Clip this layer to the guy layer and set the foreground color to #59a26b. With a round soft brush paint with that green color over the section of the jeans that shows above the water surface.

Step 45
Remember the Umbrella group we created at step 33? Let’s get back to it. You should have the small umbrella layer and the duplicated stick layer. Let’s change the color of the small umbrella. Create a new Hue/Saturation Adjustment Layer with the settings shown below and clip it to the umbrella layer.
11 responses to “Create a Melancholic Scene of a Guy Standing in the Rain”
-
Thank you for the fucked up tutorial, you jumped from step 19 to 80, i have lost 2hrs of my time for nothing, just to get stuck, such a waste of time , grrrrr.
-
And you can follow the tutorial until step 19 then you get jumped onto step 80 :D
Alright everyone, surprise surprise, you all got trolled :D
-
I really like this art… reminds me one my favorite 68´s song…everyday people—
Sometimes I’m right and I can be wrong
My own beliefs are in my song
The butcher, the banker, the drummer and then
Makes no difference what group I’m in
I am everyday people, yeah, yeah! -
I can’t find the chalk brush. I downloaded a couple but none of them produce the same results with the settings provided.
Thanks for a great tut, though. I learned a lot.
-
-(((
I don’t know what happened with your site but…
I can’t see any steps in this tuts(((
and an other tuts (2-too)
where is:
step 1
step 2
step 3
,,,
???
hope you understand me and will help me to use your site)))-
Adblock is blocking the article div. Whitelist the div or stop using Adblock and use Adblock Plus or Ghostery instead.
-
-
Excellent tutorial thank you
-
Excellent tutorial, Thank you
-
Beautiful beautiful beautiful
-
Where is the tutorial? I just can see the image.
-
Awesome <3 Vry nice TUT " i'm lovin' it <3 (y)


Leave a Reply