Make your artwork look like they're from an alternate universe. These Cyberpunk presets work with Photoshop (via the Camera Raw filter) and Lightroom. Download all 788 presets for 90% off.
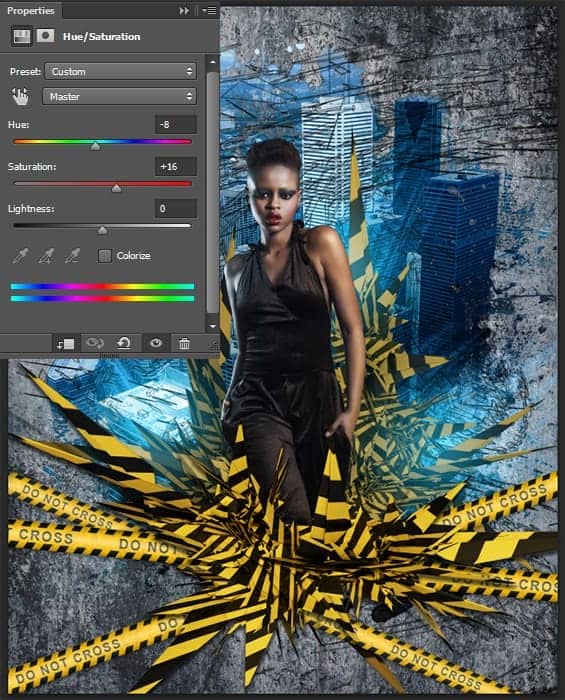
Step 34
Add an image of break glass in the photo manipulation. Use image "Glass" in folder with abstract render. Resize it with Free Transform Tool (Cmd/Ctrl + T or Edit > Free Transform) and position it near foreground abstract render. Change layer Blending Mode to "Screen". You can move glass to another location in the image.
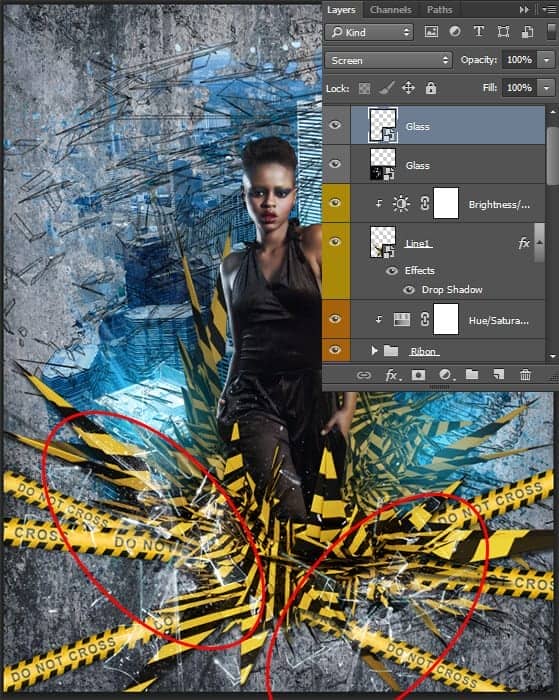
Step 35
Now I will tell you how to create lightning near the model. This is a very interesting effect, which is created by Photoshop. Hold down Opt/Alt key and click on "Create a new layer" icon. Change Blending mode to "Screen", reduce Opacity to 25%, set to default foreground/background colors (D) and go to Filter > Render > Clouds. With Free Transform Tool (Cmd/Ctrl + T or Edit > Free Transform) reduce the size to a small spot.
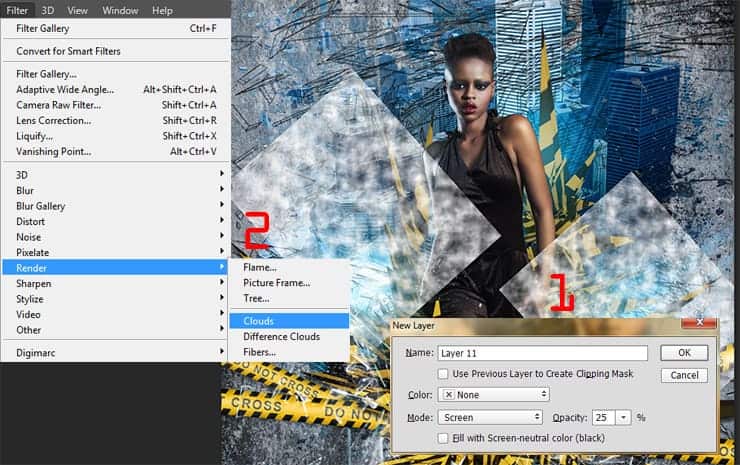
Step 36
Duplicate this layer (Cmd/Ctrl + J or Layer > Duplicate layer...) and move it to the opposite side near the hand model. Merge there two layers into one (Cmd/Ctrl + E or Layer > Merge Layers). Hide all by using inverted layer mask (hold Opt/Alt and click on "Add a layer mask" icon or go to Layer > Layer Mask > Hide All). With soft round brush restore clouds near hands. Try to hide layer edges. This will be the basis of lightning.
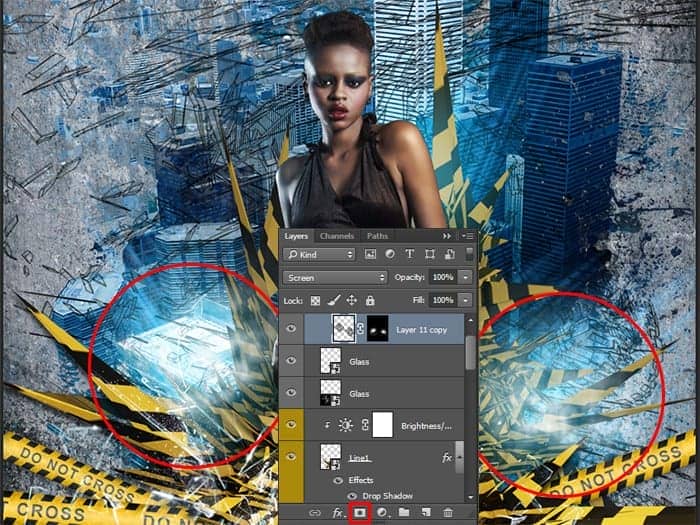
Step 37
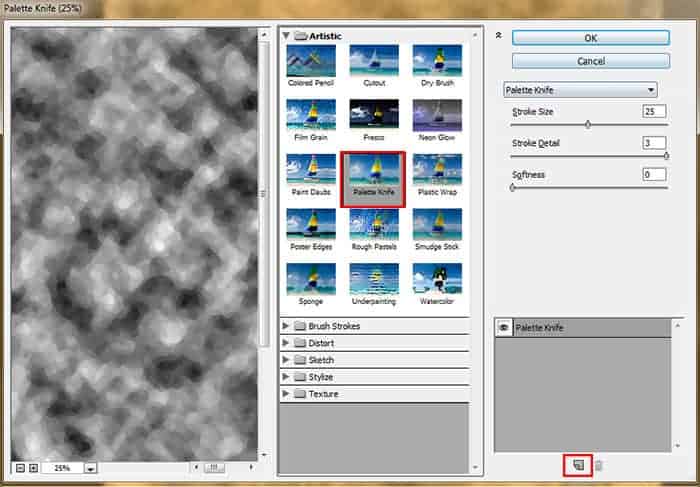
Create a new layer with "Screen" Blending Mode and apply "Clouds" filter (Filter > Render > Clouds). Go to Filter > Filter Gallery. When window appear, choose "Palete knife" filter in "Artistic" folder. Use following settings - Stroke Size: 25, Stroke Detail: 3, Softness: 0. Add new effect layer (button in the form of a sheet at the bottom).
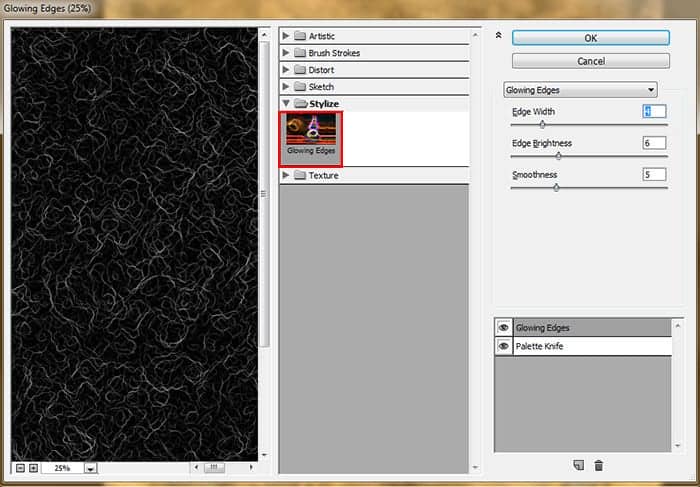
Go to folder "Stylize" and add filter "Glowing Edges" with settings - Edge Width: 4, Edge Brightness: 6, Smoothness: 5. Click OK to apply filter. Play around with there there settings and filters and you will find many more interesting features. You can also change the thickness and density of lightning.
Step 38
Add inverted layer mask to this layer (hold Opt/Alt and click on "Add a layer mask" icon or go to Layer > Layer Mask > Hide All) and as with clouds draw where you want add lightning. I increased area slightly compared to the spot with clouds. Duplicate this layer if you want make lightning brighter.


10 comments on “Create this Poster Design with Abstract Effects in Photoshop”
Thanks on your marvelous posting! I genuinely enjoyed reading it, you might be a great author.I will ensure that I bookmark your blog and will eventually come back someday. I want to encourage yourself to continue your great work, have a nice holiday weekend!
I'm new to photoshop and mentioned in step 10 I'm supposed to look for a brush spot thumbnail, but I don't know what or where it is.
In Step 37 I cannot open Filter > Filter Gallery and I wonder why
Go to the Image > Mode menu and check if your image is in RGB mode and 8-bits/channel color.
Love this lesson, i learnt several new techniques. Made the same and one with different photo's
you can download Kaos Brush Set 2.0 here: http://www.brushking.eu/563/kaos-brush-set-20.html
Very nice !!!!!!!
Brush Kao Set can’t open :(. Please! check link again.
Brush Kao Set can't open :(. Plz, test link again
Great tut, thanks.
But Kaos Brush Set 2.0 – Outof4mmo... the page you were looking for doesn't exist.