Step 6
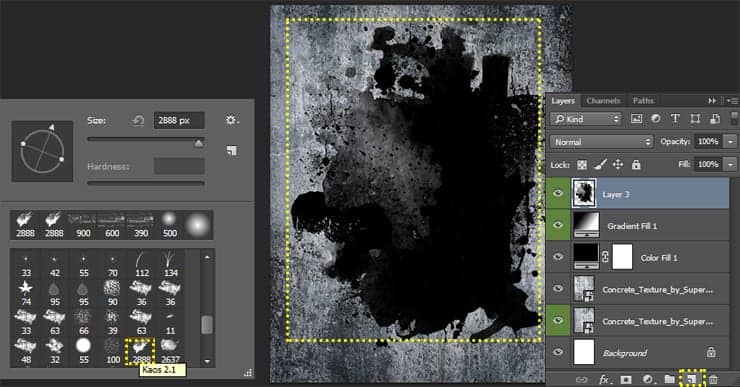
Load “Kaos Brush Set 2.0” by Outof4mmo in Photoshop. Create a new layer (Cmd/Ctrl + Shift + N or use “Create a new layer” icon on Layer panel). Set default background/Foreground colors (D). Take a Brush Tool (B) and with black color and Opacity: 100% draw a big abstract spot. The most important thing is not to go beyond the boundaries of the working field and leave some space around the image. You can use any brush which you will like. I used the brushes “Kaos 2.1” and “Kaos 2.2”.

Step 7
Place City image into working document and resize it around size of brush spot. Unfortunately a lot of noise in the image. To remove it go to Filter > Noise > Reduce Noise. Set Strength: 9, Preserve Details: 20%, Reduce Color Noise: 20%, Sharpen Details: 25% and click OK.


Step 8
Now sharpen details. Convert city layer to Smart Object (right – click on layer > Convert to Smart Object or go to Layer > Smart Objects > Convert to Smart Object). Go to Filter > Sharpen > Smart Sharpen… Set the settings like shown in image below.

Step 9
Duplicate this layer (Cmd/Ctrl + J or go to Layer > Duplicate Layer…), convert it to Smart Object. Go to Filter > Other > High Pass… Set Radius to 5.0 pixels and click OK. Change layer Blending Mode to “Hard Light” and reduce Fill to 30%. Make from this layer a Clipping Mask to City layer (Cmd/Ctrl + Opt/Alt + G or right – click > Create Clipping Mask).

Step 10
Group all city layer by selecting layers and press Cmd/Ctrl + G or use “Create a new group” icon at the bottom of Layer panel. Hold Cmd/Ctrl and click on brush spot thumbnail in Layer panel to create a selection. Add a layer mask to city group to hide all except spot area. Use black hard brush on layer mask to clean up some buildings.

Step 11
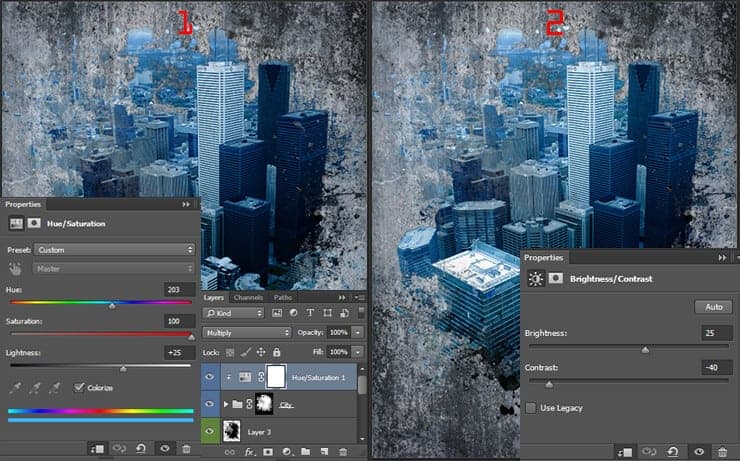
Add a bit of color to the city. Go to Layer > New Adjustment Layer > Hue/Saturation… Check “Colorize” and set Hue: 203, Saturation: 100%, Lightness: +25% and clip this layer to the group. Change layer Blending Mode to “Multiply”. Add another adjustment layer “Brightness/Contrast” with the settings Brightness: +25, Contrast: -40 and clip this layer.
10 responses to “Create this Poster Design with Abstract Effects in Photoshop”
-
Thanks on your marvelous posting! I genuinely enjoyed reading it, you might be a great author.I will ensure that I bookmark your blog and will eventually come back someday. I want to encourage yourself to continue your great work, have a nice holiday weekend!
-
I’m new to photoshop and mentioned in step 10 I’m supposed to look for a brush spot thumbnail, but I don’t know what or where it is.
-
In Step 37 I cannot open Filter > Filter Gallery and I wonder why
-
Go to the Image > Mode menu and check if your image is in RGB mode and 8-bits/channel color.
-
-
Love this lesson, i learnt several new techniques. Made the same and one with different photo’s
-
you can download Kaos Brush Set 2.0 here: http://www.brushking.eu/563/kaos-brush-set-20.html
-
Very nice !!!!!!!
-
Brush Kao Set can’t open :(. Please! check link again.
-
Brush Kao Set can’t open :(. Plz, test link again
-
Great tut, thanks.
But Kaos Brush Set 2.0 – Outof4mmo… the page you were looking for doesn’t exist.


Leave a Reply