Luminar AI lets you turn your ideas into reality with powerful, intelligent AI. Download the photo editor and see how you can completely transform your photos in a few clicks.
Create a creative poster with beautiful visual effects. In this tutorial I'll show you how to quickly and easily create a unique poster using abstract rendering and many interesting effects like lightning, glowing lines and police tape. And all of these effects you can create your own in Photoshop. Read this tutorial and see how easy it is!
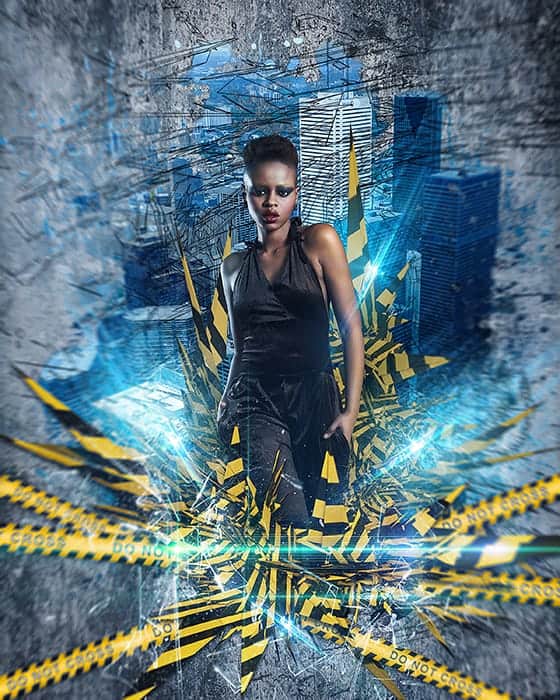
What you'll be creating
I love to experiment with abstract rendering. Their abstract forms, can achieve amazing visual effects. I created this picture with ideas broke stereotypes for today's trends. I'll start the lesson by creating a background and model. We will work with layer masks, and adjustment layers. Then proceed to the effects. In this part I will tell you about the creation of luminous lines in the background will create a cluster of lightning and police tape. At the end I added the details, effects, and a bit of work with color. In this tutorial we will use the filter "Tilt Shift" which is the only in Photoshop CC. You need to download all attachment links, a little logic, a good mood and be sure to have Photoshop beginning with CS version.

Tutorial Resources
- Concrete Texture - SuperStar-Stock
- Model (3744x5616) - Pixabay
- City (3872x2592) - Pixabay
- Kaos Brush Set 2.0 - Outof4mmo
- Cross the line abstract render pack - MariaSemelevich
- Custom Lens Flares Pack - 50 Free High Resolution Transparent Images - Media Militia
Step 1
Create a new document via Cmd/Ctrl + N or File > New at 2400 pixels wide and 3000 pixels height, resolution 300 Pixels/Inch.

Step 2
Place concrete texture into working document via File > Place.../Place Embedded. In Free Transform mode (Cmd/Ctrl +T or Edit > Free Transform) rotate it on 90 degrees and slightly reduce it's size. Hit Enter/Return to apply changes.

Step 3
Duplicate this layer (Cmd/Ctrl + J or Layer > Duplicate layer...) and go to Edit > Transform > Rotate on 180 degrees. Reduce layer Fill to 50%. It's a little to soften the texture and will not distract the viewer from the details.

Step 4
Go to Layer > New Fill Layer > Solid color... or use "Create new fill or adjustment layer" at the bottom of Layer Panel. Set Mode to "Overlay" and color to black (#000000). Reduce Fill to 40%.

Step 5
Create another one gradient fill layer (Layer > New Fill Layer > Gradient...). Set default Black & White gradient, Style: Radial, Scale: 150%, check "Reverse". Change layer blending mode to "Soft Light". It will be our focus point. We will direct the viewer's attention on the center of the image.

Step 6
Load "Kaos Brush Set 2.0" by Outof4mmo in Photoshop. Create a new layer (Cmd/Ctrl + Shift + N or use "Create a new layer" icon on Layer panel). Set default background/Foreground colors (D). Take a Brush Tool (B) and with black color and Opacity: 100% draw a big abstract spot. The most important thing is not to go beyond the boundaries of the working field and leave some space around the image. You can use any brush which you will like. I used the brushes "Kaos 2.1" and "Kaos 2.2".

Step 7
Place City image into working document and resize it around size of brush spot. Unfortunately a lot of noise in the image. To remove it go to Filter > Noise > Reduce Noise. Set Strength: 9, Preserve Details: 20%, Reduce Color Noise: 20%, Sharpen Details: 25% and click OK.


Step 8
Now sharpen details. Convert city layer to Smart Object (right - click on layer > Convert to Smart Object or go to Layer > Smart Objects > Convert to Smart Object). Go to Filter > Sharpen > Smart Sharpen... Set the settings like shown in image below.

Step 9
Duplicate this layer (Cmd/Ctrl + J or go to Layer > Duplicate Layer...), convert it to Smart Object. Go to Filter > Other > High Pass... Set Radius to 5.0 pixels and click OK. Change layer Blending Mode to "Hard Light" and reduce Fill to 30%. Make from this layer a Clipping Mask to City layer (Cmd/Ctrl + Opt/Alt + G or right - click > Create Clipping Mask).

Step 10
Group all city layer by selecting layers and press Cmd/Ctrl + G or use "Create a new group" icon at the bottom of Layer panel. Hold Cmd/Ctrl and click on brush spot thumbnail in Layer panel to create a selection. Add a layer mask to city group to hide all except spot area. Use black hard brush on layer mask to clean up some buildings.

Step 11
Add a bit of color to the city. Go to Layer > New Adjustment Layer > Hue/Saturation... Check "Colorize" and set Hue: 203, Saturation: 100%, Lightness: +25% and clip this layer to the group. Change layer Blending Mode to "Multiply". Add another adjustment layer "Brightness/Contrast" with the settings Brightness: +25, Contrast: -40 and clip this layer.

Step 12
Place model's image into working document (File > Place.../Place Embedded) above background and city. Move layer a little lower that the legs disappeared beyond the boundaries of the working area. Rotate image on 2.38 degrees. Try to position the model in the center of the picture.

Step 13
With Pen Tool (P) create a neat path around model and from this selection make a vector mask. This type of mask is needed in order to be able to remove part of the model on a layer mask. Add a layer mask and with soft round, black, 100% Opacity Brush Tool (B) remove legs until city spot.

Step 14
Before proceeding Photo manipulation, I created lighting on a model. To do this, I created two "Exposure" adjustment layers. For first layer I set Exposure to -0.90 and for second Exposure: +0.58 and clip both layer to a model (for a correct lighting, always use the same value for both layers. In my case it was severely hard transitions of light and shadow, so I do not follow this rule). Fill adjustment layer mask with black color (select layer mask and go to Edit > Fill > Color...). Now, everything is simple. Use a Brush Tool (B) on both layers with white color and different values of Opacity to create lighting. For such a technique can also be used "Curves" and "Levels" adjustment layers.

Step 15
Now time for a render. I created several abstract images in Cinema 4D specifically for this picture. And now I share it with you :). Let's start with wireframes. Place image "3" from folder "Wireframes" below model layer (File > Place.../Place Embedded). In Free Transform Mode resize it like shown in image below. Change layer Blending Mode to "Multiply" and add as clipping mask (Cmd/Ctrl + Opt/Alt + G) adjustment layer "Levels" (Layer > New Adjustment Layer > Levels...). Set for midtones: 0.27. This will help show the lines of wireframe. Play with rotation to find interesting form.

Step 16
Continue adding abstract render. The set includes 7 different images so you can use all of them. Most of all, I used "Line1" and "Line2" images. To create composition in the background I use 3 copy of "Line1" image. Play around Rotation and Scale Tools to create interesting and dynamic composition near the model. To create the depth and volume I have add to the very first image adjustment layer "Brightness/Contrast" with the settings Brightness: -75, Contrast: +40 and clip this layer. I group all images into one group "C4D" (Cmd/Ctrl + G).

Step 17
Place image "Line1" above model layer (File > Place.../Place Embedded) and with Free Transform Tool (Cmd/Ctrl + T or Edit > Free Transform) increase it's size. To accent render the foreground add an adjustment layer "Brightness/Contrast" with the settings Brightness: +34, Contrast: +80 and clip this layer to a render.

Step 18
Add a drop shadow to a foreground render image. Go to Layer > Layer Style > Drop Shadow or use "Add a layer style" icon on Layer panel. Set Opacity: 65%, Distance: 17px, Spread: 9%, Size: 16px and click OK to apply changes. This will make render a more realistic.

Step 19
Now time to effects. The first thing that we can do is glowing lines. They look beautiful and elegant. First you need to create a splatter brush with hard round form. In Brush Presets panel select Hard round brush and go to Brush panel (F5). Use images below to create a brush. After it's done set brush color to white, Opacity: 100 and Size to 30px.

Step 20
Create a new layer (Cmd/Ctrl + Shift + N) under group "C4D" and draw a small cluster of strokes. Go to Filter > Blur > Motion Blur... Set Angle: -50, Distance: 800. Repeat filter several times until lines become smooth (Cmd/Ctrl + F or Filter > Last Filter). By blurring the lines almost invisible, so duplicate this layer a few times (Cmd/Ctrl + J or Layer > Duplicate Layer...) until the texture will be slightly visible.

Step 21
Then will integrate all the layers with the lines in one layer (select layers > Layer > Merge Layers... or Cmd/Ctrl +E). Set Layer blending mode to "Screen". Use Free Transform Tool (Cmd/Ctrl + T or Edit > Free Transform) to resize it that lines become smaller and use Rotate Tool to change direction of lines. Make two more copies of lines and place it around render and model.

Step 22
Merge all layers with lines(Cmd/Ctrl + E). Now add a glow to the lines by using layer styles "Inner Glow" and "Outer Glow" ("Fx" icon at the bottom of layer panel or go to Layer > Layer Style > Inner Glow/Outer Glow). For "Inner Glow" set Blend Mode to "Normal", Opacity to 100%, Color ##77d7ff, Choke to 0% and Size to 10px. In "Outer Glow" tab change Opacity to 100% and add Noise around 25%. Set Color #0077f1, Spread: 2% and Size: 16px.


Step 23
Now add a bit glow around model. Create a new layer above "C4D" group (Cmd/Ctrl + Shift + N) and use Brush Tool (B) with soft round form, large size around 1000px, Opacity: 100% and color #00bdf1. Draw a three big spot on at the intersection of glowing lines and rendering. Change layer Blending Mode to "Screen" and reduce Opacity to 55%.

Step 24
Now back to the model. We already know the color of the image and light sources, so add a little reflection from the rendering and lines on the model. Create a new layer (Cmd/Ctrl + Shift + N) and make a clipping mask from it (Cmd/Ctrl + Opt/Alt + G). Change layer Blending Mode to "Color" and reduce Opacity to 25%. Take a Brush Tool (B) with soft round form, 100% Opacity and colors #2e88b2 and #debc2e. Draw with blue color on left hand and yellow on right.

Step 25
Now, add a ribbon. I created this in Photoshop, but in a folder with the renderer has finished image. If you hurry, or want to continue photo manipulation just place image "do not cross with shadow", position it as you wish, group layers (Cmd/Ctrl +G) and go to Step 33. These few steps I will tell you how to create a police tape, which you can use in your images. First, create a new document (Cmd/Ctrl + N) with settings Width: 8851px, Height: 3000, Resolution: 300 Pixels/Inch. Take Rectangle Tool (U), set fill to "Solid Color" and set up color #ffe400, for stroke set "No color" mode. Draw a shape size Width: 8355px and Height: 316px.

Step 26
Duplicate this rectangle (Cmd/Ctrl + J or Layer > Duplicate layer...). Remove color fill and set stroke color to black, Stroke size to 13,72. Go to Stroke settings and click on button "More Options...". In Stroke options set long lines preset, Align: Inside, Caps: Butt, Corners: Miter. For all lower windows with "Dash" and "Gat" set 2 and click OK.

Step 27
Select both layers with rectangles, make right click > Convert to Smart Object. Use Distort Tool (Edit > Transform > Distort). Select midpoint, hold on Shift and move it on 35 degrees to the right, hit Enter/Return to apply changes. Take a Polygonal Lasso Tool (L), hold Shift and select both edges. Hold Shift to make a straight line at 45 degrees. Hold Opt/Alt and click on "Add layer mask" icon to hide edges.

Step 28
Take a Horizontal Type Tool (T). Place the cursor on the first black line on the left and write "Do Not Cross". In "Character" panel (Window > Character) set Font to "Arial Bold", Size around 37.99 pt, Color to black. Press "All Caps" button to make all letters are capital.

Step 29
With Move Tool (V) and Opt/Alt key duplicate inscription until is no free space on the tape (Or you can use Cmd/Ctrl + J and move inscription). Hold Shift to keep inscription at one line. Select All layers and make from it a Smart Object (right click > Convert to Smart Object). With Move Tool (V) move tape in the document with the photo manipulation.

Step 30
Duplicate ribbon two times (Cmd/Ctrl + J or Layer > Duplicate layer...) and with Free Transform Tool (Cmd/Ctrl + T or Edit > Free Transform) position ribbons as shown in the image below. You can change the location or size of ribbon as you want. Select all ribbon's layers and group them (Cmd/Ctrl + G or Layer > Group Layers).

Step 31
The tape does not look realistic, so I used the layer styles to add gloss and texture. Start from "Inner Shadow" (Layer > Layer Style > Inner Shadow...). Set Opacity: 50%, Distance: 0, Choke: 5% and Size: 51px. Go next, checked "Satin" and there set color: #ffffff, Blend Mode "Screen", Opacity: 90%, Distance: 80 and Size: 65px.


Add a bit of texture. Checked "Pattern Overlay" and make following settings - Blend Mode "Multiply", Opacity: 20%, Scale: 100%. Click on pattern thumbnail go to settings (small gear on right side) and from list load "Texture Fill 2" pack, use "Stucco 3" pattern. At the end add a drop shadow. Set Opacity: 35%, Distance: 12px, Spread: 0%, Size: 13px and click OK to apply layer style.


Step 32
Make Right click on layer with style > Copy Layer Style. Select the remaining two layers and without style and paste it (right click > Paste Layer Style). I strongly do not recommend you to add style to the group, because it will not work on all layers, but only the figure of the ribbons.


Step 33
Color of ribbons slightly differ from the colors on an abstract render so I used an adjustment layer "Hue/Saturation" (Layer > New Adjustment Layer > Hue/Saturation...) with the settings - Hue: -8, Saturation: +16 and be sure to clip this layer to a "Ribbon" group.

Step 34
Add an image of break glass in the photo manipulation. Use image "Glass" in folder with abstract render. Resize it with Free Transform Tool (Cmd/Ctrl + T or Edit > Free Transform) and position it near foreground abstract render. Change layer Blending Mode to "Screen". You can move glass to another location in the image.

Step 35
Now I will tell you how to create lightning near the model. This is a very interesting effect, which is created by Photoshop. Hold down Opt/Alt key and click on "Create a new layer" icon. Change Blending mode to "Screen", reduce Opacity to 25%, set to default foreground/background colors (D) and go to Filter > Render > Clouds. With Free Transform Tool (Cmd/Ctrl + T or Edit > Free Transform) reduce the size to a small spot.

Step 36
Duplicate this layer (Cmd/Ctrl + J or Layer > Duplicate layer...) and move it to the opposite side near the hand model. Merge there two layers into one (Cmd/Ctrl + E or Layer > Merge Layers). Hide all by using inverted layer mask (hold Opt/Alt and click on "Add a layer mask" icon or go to Layer > Layer Mask > Hide All). With soft round brush restore clouds near hands. Try to hide layer edges. This will be the basis of lightning.

Step 37
Create a new layer with "Screen" Blending Mode and apply "Clouds" filter (Filter > Render > Clouds). Go to Filter > Filter Gallery. When window appear, choose "Palete knife" filter in "Artistic" folder. Use following settings - Stroke Size: 25, Stroke Detail: 3, Softness: 0. Add new effect layer (button in the form of a sheet at the bottom).

Go to folder "Stylize" and add filter "Glowing Edges" with settings - Edge Width: 4, Edge Brightness: 6, Smoothness: 5. Click OK to apply filter. Play around with there there settings and filters and you will find many more interesting features. You can also change the thickness and density of lightning.

Step 38
Add inverted layer mask to this layer (hold Opt/Alt and click on "Add a layer mask" icon or go to Layer > Layer Mask > Hide All) and as with clouds draw where you want add lightning. I increased area slightly compared to the spot with clouds. Duplicate this layer if you want make lightning brighter.

Step 39
Group all lightning layers (Cmd/Ctrl + G or Layer > Group Layers...). Change group Blending Mode to "Screen" and add an adjustment layer "Levels" (Layer > New Adjustment Layer > Levels... or use icon at the bottom of Layer panel) with settings for white point 156. Make sure to clip this layer to a group. This will make more vivid lightnings.

Step 40
We are at the end of photo manipulation and now we add highlights to vary composition and add glamor. It is very simple as is the case with the glass. You choose desired flare, change its size and position. Then change Blending Mode to "Screen" and duplicate it several times (Cmd/Ctrl + J) and place in different parts of the picture. Very convenient to use as a basis the brightest spots in the picture. I use image "16" then group all flare layers (Cmd/Ctrl + G) and add an adjustment layer "Hue/Saturation" with Hue: -62, Saturation: +20 and clipping to flare group.

Step 41
Place another one flare "36" at the bottom of photo manipulation and group all flares (Cmd/Ctrl + G). Set group Blending Mode to "Screen". I decided to collect all the glare in a sequence to be able to change their location and color groups. Also very interesting affects on a flares an adjustment layer "Color Balance".

Step 42
To change color of all flares I use adjustment layer "Hue/Saturation" (Layer > New Adjustment Layer > Hue/Saturation...) with Hue: -45 and clip it to a group. You can try using other colors and location glare. In my experiments looked good flares with magenta tint. Flare a large number, so try to use the entire image with glare in the center and not to overdo it with their number.

Step 43
One of the main details of this picture is a blur. This effect creates a dynamic movement and the destruction of the space. I love to use this effect in my works. This new filter which is available only in Photoshop CC. So let's get started! Create a merged copy of image (Cmd/Ctrl + Opt/Alt + Shift + E), Convert it to Smart Object (right click on layer > Convert to Smart Object). Go to Filter > Blur Gallery > Tilt Shift... Set Blur to 15px, Distortion to 100% (this has the effect of particle motion picture), be sure to check "Symmetric Distortion". Rotate guides around 90 degrees and apply filter. Change layer Blending Mode to "Luminosity". If you have another version of the program, as an alternative you can use "Radial Blur" (Filter > Blur > Radial Blur with "Zoom" method), then remove some effect on Smart filters mask.

Step 44
To increase the sharpness of the image. Create a merged copy of image (Cmd/Ctrl + Opt/Alt + Shift + E), Convert it to Smart Object (right click on layer > Convert to Smart Object). Go to Filter > Other > High Pass. Set Radius to 2.0 pixels and click OK. Change Blending Mode to "Linear Light" and reduce Fill to 50% (do not use Opacity).

Step 45
There was only final image color correction. I wanted to make blue color a more bright and defiant. So I use "Color Balance" adjustment layer (Layer > New Adjustment Layer > Color Balance) and made changes only for midtones. Set for Cyan-Red: -15 (more cyan tint on image) and Yellow-Blue: +18 (more blue tint). Change Blending Mode to "Color" to effect only on color in picture and reduce Opacity to 50%.

Step 46
The next and final adjustment layer is needed to increase the saturation of all colors. Go to Layer > New Adjustment Layer > Vibrance... Make Vibrance: +20 and Saturation: +4. I use "Vibrance" layer because is a smart-tool which cleverly increases the intensity of the more muted colors and leaves the already well-saturated colors alone. I was able to gently influence the colors do not overexpose picture. Change Blending Mode to "Color".

Step 47
And now digress from the tutorial. The picture is ready, and I offer a variant of what I told you about the experiments. I just changed the color of flare on the top layer "Hue/Saturation" I move some tapes and created the latest a merged copy of image, rotate in and increase size with Free Transform Tool (Cmd/Ctrl + T). And now, a completely new variant of picture.

Final Results
That's all! Look at the finished result. I hope that you get exactly the picture. Do not be afraid to experiment! It is always justified. Have a question or a comment? Leave it in comment - section below :)

Download the PSD
[vc_column width="1/1" el_position="first last"] [vc_cta_button title="Download" href="https://downloads.photoshoptutorials.ws/Cross the Line.zip" color="btn" size="btn-large" icon="none" target="_self" position="cta_align_right" call_text="Cross the Line.zip | 326 MB" width="1/1" el_position="first last"] [/vc_column]
10 comments on “Create this Poster Design with Abstract Effects in Photoshop”
Thanks on your marvelous posting! I genuinely enjoyed reading it, you might be a great author.I will ensure that I bookmark your blog and will eventually come back someday. I want to encourage yourself to continue your great work, have a nice holiday weekend!
I'm new to photoshop and mentioned in step 10 I'm supposed to look for a brush spot thumbnail, but I don't know what or where it is.
In Step 37 I cannot open Filter > Filter Gallery and I wonder why
Go to the Image > Mode menu and check if your image is in RGB mode and 8-bits/channel color.
Love this lesson, i learnt several new techniques. Made the same and one with different photo's
you can download Kaos Brush Set 2.0 here: http://www.brushking.eu/563/kaos-brush-set-20.html
Very nice !!!!!!!
Brush Kao Set can’t open :(. Please! check link again.
Brush Kao Set can't open :(. Plz, test link again
Great tut, thanks.
But Kaos Brush Set 2.0 – Outof4mmo... the page you were looking for doesn't exist.