Now grab a standard round soft brush (Hardness: 0%) and start painting the sky with the colors you want. Here are some tips while painting the sky:
- Try to use some bright colors
- You’ll want to paint with the opacity at 25~50%
- Try to follow the lines of the galaxies
- You can paint each galaxy with a different color if you want, but try not to use too many colors (try not to use more than 5 different colors)
- If you think that the edges of some area of your painting is too rough, select that area with the tool of your preference (I like to use the Lasso Tool (Shortcut:L) for this), go to Filter > Blur > Gaussian Blur and set the radius to around 50 pixels (remember to leave some space in the selection of the color because the Gaussian blur filter will expand the colors)
Here’s a step by step of my painting:


Step 7: Adjusting the lighting
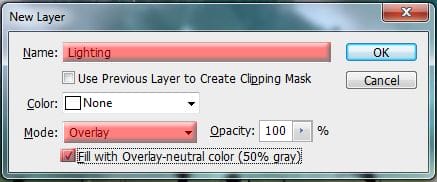
Create a new layer using the Shortcut Ctrl/Cmd+Shift+ N, set the blend mode to Overlay and check the box to fill the layer with 50% gray color. Name this layer “Lighting” and make sure this layer is right below the Trees layer.


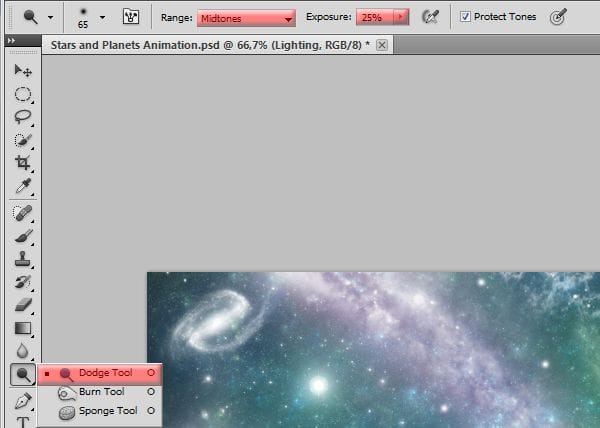
Select the Dodge Tool (Shortcut: 0), set the range do Midtones and the Exposure at 25%.

To change the lighting of our scene we’re going to use the Dodge Tool, and the Burn Tool, here’s how they work:
- The Dodge Tool will make the place you paint brighter
- The Burn Tool will make the place you paint darker
- Always use a brush with 0% hardness
- To quickly change between them hold Alt/Option, this will change the tools as long as you hold the Alt/Option key
- If you made a mistake and it’s too late to undo the changes don’t worry, just select the Brush Tool and paint the area of the layer you want to “reset” with gray again (#808080)
Here’s some tips on how to do the lighting of this scene:
- Increase the glow of the stars (paint around them)
- Increase the glow around the big planet
- Paint with the Burn Tool the areas of the sky that doesn’t have any galaxies or big stars around them
- Make the galaxies brighter
- For the smaller parts, zoom in and decrease the size of the brush
- Lower the Exposure value to around 15% for the details
- re’s my Lighting layer in normal blending mode just so you can compare with yours:

And here’s my final result after painting my scene with the Dodge/Burn Tool:

Step 8: Adding glow to the stars
This is the last step before we start animating our scene. Create a new layer right below the Trees layer (Shortcut: Ctrl/Cmd+Shift+Alt/Opt+N). Name this new layer “Stars Glow”. Select the Brush Tool (Shortcut: B) and with a round white brush (Press D and X to go back to white as your foreground color) paint some light in our stars. Just go around the stars you want to be glowing in the animation and give them a single click with the brush tool around them, just make sure that the size of the star is the same size of the brush. Don’t paint all the stars, stay with the medium/large ones

You may not see the difference now but it will definitely show up when we start animating our scene. Before we starting animating, we’re going to reduce the number of layers we have right now. Let’s start with the ground, select the Border and the Trees layer (hold the Ctrl/Cmd and click them) and press Ctrl/Cmd+E to merge them into a single layer.

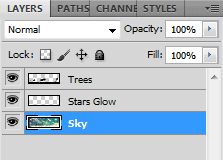
Do the same thing with the layers Lighting, Colors, Galaxies/Planets/Stars and Stars (select them and merge with Ctrl/Cmd+E). Change the name of this new merged layer to Sky and you should have something like this:

Step 9: Starting the animation
Before we start the animation, let’s add some guides to help us with the process. Go to View > New Guide.
11 responses to “How to Create a Stars and Planets Time Lapse in Photoshop”
-
Your image works beautifully with the mask Nancy!This looks like a great tool. I’m going to try it out. Currently.Thanks for sharing these useful information….
-
I made it although i made it and uploaded the video on facebook!
(I uploaded as a video not a .gif)
So here is the link: https://www.facebook.com/photo.php?v=646167675410197&set=vb.100000509100609&type=3&theater
You can see it and if you like it just hit the like button.
Thank you for this tutorial.. im glad i learned a couple things!! -
I have a small problem!!
I dont have the animation timeline you have..
My photoshop has a timeline but i have to make the animation frame by frame and only..
I have adobe photoshop cs6 Version 13.0 x32.. i dont know if that helps -
Nice tutorial. Keep it up Guys!
-
I am trying to save a file, but I don’t have the “QuickTime Export” option. What it might be wrong?
-
I would add some motion blur to it so that it doesn’t look so choppy. Nice to see an animation tutorial :)
-
Very nice! Thank you a lot!
-
Please help me!!! I don’t know how to download the brushes and the other things!!!
-
Took me awhile to find the download link but it’s on the right-side between all the clutter
-
Superb graphic design tutorials and thanks for share….
Awesome and difference articles…thanks to share..


Leave a Reply