Download Lightroom presets and LUTs, absolutely free. Use the presets to add creativity and style to your photos.
Create this loopable time-lapse animation from scratch all inside Photoshop! This tutorial will show you how to create an animated night silhouette scene with a surreal space background full of stars, galaxies, and planets.
Learn how to create a time lapse scene in Photoshop. This tutorial will teach you how to create, animate and export a night scene full of stars, planets and galaxies using only Photoshop.
Preview of Final Results
Tutorial Resources
- Galaxies Brushes – sunira
- Galaxies Brushes 2 – chuloc
- Planet Brushes – sunira
- Tree Brushes – horhew
- Fractal – greenaleydis-stock
Step 1: Create a new document
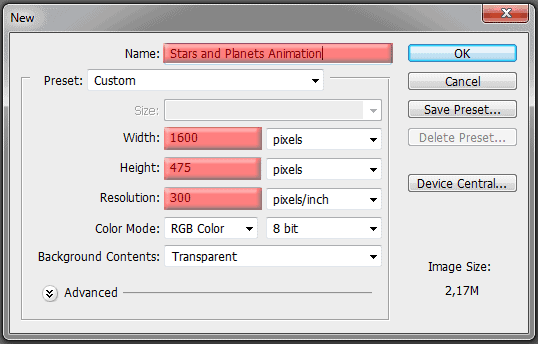
Create a new file in Photoshop (Shortcut: Ctrl/Cmd+N) using these settings:
- Width: 1600px
- Height: 475px
- Resolution: 300px/inch
Step 2: Install the brushes
In this step we’re going to install the four brushes we’re going to use in this tutorial. Download all of them and extract them to your Adobe/Adobe Photoshop(…)/Presets/Brushes folder.

Now go back to Photoshop, select the Brush Tool (Shortcut: B) and right click anywhere in the canvas. Then click in the little arrow at the top of the brush menu (see image below).

Then click in Load Brushes, go to the folder where you extracted them and select “Trees_by_Horhew”.

The tree brushes will now be on the bottom of your brushes panel (Right click anywhere in the screen to see them).
Step 3: Draw the landscape
Go to View > New Guide and set the new guide position to 445px and the orientation to Horizontal.
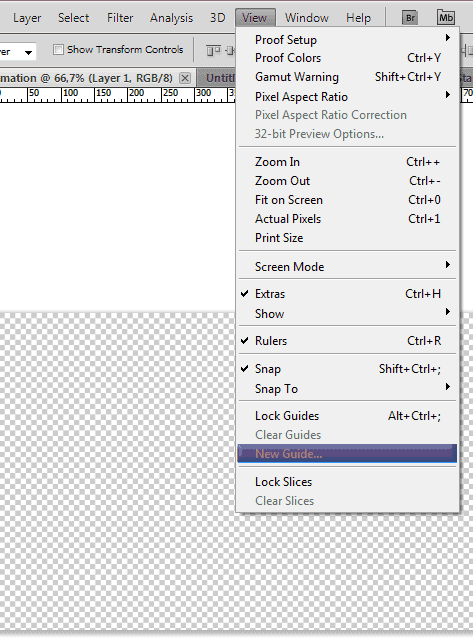

· If you don’t see the guide we just created, press Ctrl/Cmd+; to show your guides (or go to View > Show > Guides). Select the Rectangular Marquee Tool (Shortcut: M) and make a selection of the bottom part of our image (start the selection in the bottom of the image and finish it in the guide we created).


Now press D to return the colors of your palette to black and white, and then hit Alt/Opt+Delete to fill your selection with black.
- You can press Ctrl/Cmd+D to deselect your selection
- You can press Ctrl+; to hide all the guides of your project

Before we start adding the trees, let’s make a new layer to hold them. Press Ctrl/Cmd+Shift+Alt/Opt+N to create a new layer and name this layer ‘Trees’. Since we’re renaming layers, change the name of our first layer to ‘Border’.

Now we’re going to start making the landscape of our animation. Press B to select the Brush Tool, and here’s how we’ll do it:
- Make sure that black is still your foreground color
- Make sure that your brush is set to 100% Opacity
- You can quickly decrease or increase the size of the brush hitting ‘[‘ or ‘]’ respectively
- To make the grass select some high trees and paint with their top part slightly above our black rectangle
- Add 5 or 6 big trees in our project
- Add some bushes near the trees and at other random places (you can also use them to make grass if you decrease their size)
- Try to make some parts of the terrain higher than others
And here’s how I made my landscape, step-by-step.


Your image doesn’t have to be exactly like mine, use your imagination and try to create a unique landscape!
Step 4: Add the Stars
Now let’s add the sky. Open the fractal stock, hit Ctrl/Cmd+A to select all of it, and then copy (Ctrl/Cmd+C) and paste (Ctrl/Cmd+V) it into our project.

Your image should look like this now. Make sure the sky layer is above all the others

Press Ctrl/Cmd+T to use the Free Transform Tool and change the Width and Height values in the top toolbar. Set them to 77%.

Place the image in the right place again (click and drag), and you should have something like this now:

After resizing the stars a little bit, move them like shown in the image below (just click and drag to move).

Now change the name of this layer to Stars and place it below the Trees layer. Click and drag the layers to move them around

Step 5: Improving the Sky
Our sky is looking okay, but we’re going to make it even better. First, load the brushes we installed before (like we did in Step 2). There are three brushes to improve the sky: “Galaxies_bySunira”; “Planets2_bySunira” and “stars and galaxys”. After you load them (one by one), they’ll be appended to the bottom of our brushes (Right Click while using the Brush Tool to view them).

Like we did before, create a new layer (Shortcut: Ctrl/Cmd+Shift+Alt/Opt+N) called ‘Galaxies/Planets/Stars’ and place it between the Trees and the Stars layers.

Now we’re going to paint (like the name of the layer suggests) stars, galaxies and planets in our image. We’re going to paint with white, so press D to return the colors of your pallet to black and white, and press X to swap black with white (white will be your foreground color now). Here are some tips while painting this part:
- Remember to set the opacity of the brush to 100% before start painting
- You can quickly decrease or increase the size of the brush hitting ‘[‘ or ‘]’ respectively
- Be creative in this part, but be careful to not overcrowd the image
- Some brushes have some hard edges, so you’ll have to use the eraser (Shortcut: E) to erase the borders (Opacity:100% / Hardness:0%)
- You can also use the eraser (as mentioned above) to erase some parts of the brush that you don’t want
- A big planet on the bottom of our image will add a good effect to the landscape
- Keep the nebulas and galaxies in the top part of our image (don’t place them too close to the landscape)
- If you want to rotate the brush, go to Window > Brush and change the Angle until you’re happy with the result
- You can also use the standard round brush with 0% hardness to make the stars
- d here’s the step-by-step of my painting in this step:


To finish this step, add some fog near the landscape using one of the nebula brushes (I used Nebula 3). Remember to keep the same settings we used before (100% opacity with white color), and paint something like this:
- Don’t click and drag the brush to create this fog, give a few clicks randomly in the image until you’re happy with the results
- Make sure you lower the size of the brush before start painting (or you can use only the top part of the brush to paint if you want)


Step 6: Painting the sky
Our sky is looking good with all these stars, planets and galaxies, but we’re going to make it even better in this step. Create a new layer (Shortcut: Ctrl/Cmd+Shift+Alt/Opt+N) called “Colors”, set the blend mode to Color and place it between the Trees and the Galaxies/Planets/Stars layers.

Now grab a standard round soft brush (Hardness: 0%) and start painting the sky with the colors you want. Here are some tips while painting the sky:
- Try to use some bright colors
- You’ll want to paint with the opacity at 25~50%
- Try to follow the lines of the galaxies
- You can paint each galaxy with a different color if you want, but try not to use too many colors (try not to use more than 5 different colors)
- If you think that the edges of some area of your painting is too rough, select that area with the tool of your preference (I like to use the Lasso Tool (Shortcut:L) for this), go to Filter > Blur > Gaussian Blur and set the radius to around 50 pixels (remember to leave some space in the selection of the color because the Gaussian blur filter will expand the colors)
Here’s a step by step of my painting:


Step 7: Adjusting the lighting
Create a new layer using the Shortcut Ctrl/Cmd+Shift+ N, set the blend mode to Overlay and check the box to fill the layer with 50% gray color. Name this layer “Lighting” and make sure this layer is right below the Trees layer.


Select the Dodge Tool (Shortcut: 0), set the range do Midtones and the Exposure at 25%.

To change the lighting of our scene we’re going to use the Dodge Tool, and the Burn Tool, here’s how they work:
- The Dodge Tool will make the place you paint brighter
- The Burn Tool will make the place you paint darker
- Always use a brush with 0% hardness
- To quickly change between them hold Alt/Option, this will change the tools as long as you hold the Alt/Option key
- If you made a mistake and it's too late to undo the changes don't worry, just select the Brush Tool and paint the area of the layer you want to "reset" with gray again (#808080)
Here’s some tips on how to do the lighting of this scene:
- Increase the glow of the stars (paint around them)
- Increase the glow around the big planet
- Paint with the Burn Tool the areas of the sky that doesn’t have any galaxies or big stars around them
- Make the galaxies brighter
- For the smaller parts, zoom in and decrease the size of the brush
- Lower the Exposure value to around 15% for the details
- re’s my Lighting layer in normal blending mode just so you can compare with yours:

And here’s my final result after painting my scene with the Dodge/Burn Tool:

Step 8: Adding glow to the stars
This is the last step before we start animating our scene. Create a new layer right below the Trees layer (Shortcut: Ctrl/Cmd+Shift+Alt/Opt+N). Name this new layer “Stars Glow”. Select the Brush Tool (Shortcut: B) and with a round white brush (Press D and X to go back to white as your foreground color) paint some light in our stars. Just go around the stars you want to be glowing in the animation and give them a single click with the brush tool around them, just make sure that the size of the star is the same size of the brush. Don’t paint all the stars, stay with the medium/large ones

You may not see the difference now but it will definitely show up when we start animating our scene. Before we starting animating, we’re going to reduce the number of layers we have right now. Let’s start with the ground, select the Border and the Trees layer (hold the Ctrl/Cmd and click them) and press Ctrl/Cmd+E to merge them into a single layer.

Do the same thing with the layers Lighting, Colors, Galaxies/Planets/Stars and Stars (select them and merge with Ctrl/Cmd+E). Change the name of this new merged layer to Sky and you should have something like this:

Step 9: Starting the animation
Before we start the animation, let’s add some guides to help us with the process. Go to View > New Guide.

Set the Orientation to Vertical and input 500px in the Position.

Then go back to View > New Guide and this time set the Position to 1100px.

Tip: If you want to erase a guide just select the Move Tool (Shortcut: V), click in the guide you want to erase and drag it out of the screen You should have something like this now:

Now with the Trees layer selected, use the Move Tool (Shortcut: V) to move the trees to the right until the end of the trees touches the left guide. Like this: · Hold Shift while using the Move Tool to move in only one axis

With the other two layers selected (Hold Ctrl/Cmd and click them), do the same thing but this time drag them to the left until the border reaches the right guide like this:

Hit Ctrl/Cmd+Alt/Opt+C to bring up the Canvas Size menu. Select pixels, and lower the Width to 600px.

And this is the result:

Go to Window > Animation to bring up the Animation panel.

This is the panel we’re going to use to animate our scene. It may seem a little bit confusing at first but it’s actually really simple. Let’s start with the trees, click in the little arrow on the left of the Trees to expand their animation panel, then click in the stopwatch of the Position, cause that’s what we’re going to animate now.

By clicking in the stopwatch there, we just told Photoshop where our Trees layer will start the animation (Position). Now we just have to grab that blue arrow in the timeline, drag it to the end of the animation, and tell Photoshop where we want the Trees layer to end. Click and drag the blue arrow to the end of the timeline (10:00f).

Select the Move Tool (Shortcut: V) and drag the Trees layer to the left. Drag it until the right side of our layer matches the right border of our scene (Remember to hold Shift while dragging so it only moves in one axis), like this:

If you did everything right, a keyframe will appear in your animation panel, and you can already see what your animation is looking like by pressing the Spacebar.

We’re going to use the exact same steps we used to animate the Trees layer to animate our two other layers, the only difference is that this time we’re going to animate both layers at once. Expand the animation panel of the Sky and the Stars Glow layers. Make sure that the blue arrow is at the beginning of our timeline, and click in the stopwatch of the Position in both of these layers.

Select both of these layers in the layers panel, and move them to the right using the Move Tool (Shortcut: V). Remember to hold Shift while dragging them, and make sure to drag these layers until their left side matches the left border of our scene.

And here is the result (press the Spacebar to view it):
To finish this step, we’re going to animate the glow of the stars. Open the animation panel of our Stars Glow layer, and click in the stopwatch of the Opacity (make sure that the blue arrow is at the beginning of our timeline).

Now drag the blue arrow to 01:00f and lower the opacity of the Stars Glow layer to 0%.

Now select both of the keyframes we just created (click anywhere with the left mouse button and drag a box around them), right click in one of them, and click in Copy Keyframes.

Drag your blue arrow to 02:00f, right click one of the keyframes, and select Paste Keyframes.

And here’s the result:

Repeat these steps three more times, setting the blue arrow at 04:00f, 06:00f and 08:00f, and pasting the two keyframes we copied before in each one of these times (you don’t have to copy again). When you’re done, set the blue arrow at 10:00f and raise the opacity of the Stars Glow layer to 100% again. Here’s how your animation panel should look like now:

And this is the final result, with the glow of the stars fading and reappearing every 2 minutes:
Step 10:Adding some meteors
If you changed the brushes we added before, go ahead and load the Galaxies_bySunira again. Select the Sideview Spiral Galaxy brush.

Create a new layer (Shortcut: Ctrl/Cmd+Alt/Opt+Shift+N) and name it Meteors. Place it right below the Trees layer.

Before creating the meteor, go to Window > Brush and change the angle of the brush to 75º.

Now lower the size of the brush to around 20~30px and paint three meteors with different sizes on the top of the screen. I used 30px/25px/20px for the size of the meteors.

Double click the Meteors layer and add an Outer Glow layer style.

Here is the result:

Using the Move Tool (Shortcut: V), drag the meteors out of the screen while holding the shift key. Drag them in the direction of the arrow below:


With the blue arrow still at 02:00f, click the stopwatch of the Position in our Meteors layer.

Set the blue arrow somewhere between the 03:00f and 15f and using the Move Tool (Shortcut: V), drag the meteors diagonally until they disappear of the scene in the left border (remember to hold Shift).

Here’s the result:
Let’s add another meteor in the end of our scene. Create a new layer (Shortcut: Ctrl/Cmd+Shift+Alt/Opt+N) and name it Meteor. Place it below the Meteors layer we created before.

Right click the Meteors layer and click in Copy Layer Style.

Right click the Meteor layer and click in Paste Layer Style.

Using the same brush we used before, increase its size to around 75px, and draw a single meteor on the top right corner of the screen. · If you’re not sure what brush it is or what angle to use, just look in the pictures above (when we created the Meteors layer)

With the Move Tool (Shortcut: V), hold the Shift key and drag the meteor diagonally out of the screen.

In our timeline, place the blue arrow at 06:00f and set a keyframe of the Meteor position there (like we did before, just click the stopwatch of the position).

Now place the blue arrow at 08:00f and use the Move Tool to drag the meteor diagonally to the bottom of our scene.

Your timeline should look like this:

And here is the final result:
Step 11: Exporting the scene
This is the last step of this tutorial, we’re going to export our scene into a movie format because if we exported it as a gif image we would loose a lot of the colors in the image. In this tutorial I’m going to show you how to export an animation in QuickTime format, but if you have Photoshop CS5 Extended it would be better to export it as a MPEG-4 file. Go to Export > Render Video.

Change the name of the file to anything you want, then select the folder where you want to extract it. In File Options, select QuickTime Export and QuickTime Movie. In Range, make sure the All Frames option is selected. All the settings are maximized by default, so if you don’t want your video file to be around 300MB click in the Settings button (after the QuickTime Export) and lower the quality of your scene.

Then click in Render, and we’re done! Go ahead and see what your animation is looking like in your favorite movie player.
11 comments on “How to Create a Stars and Planets Time Lapse in Photoshop”
Your image works beautifully with the mask Nancy!This looks like a great tool. I’m going to try it out. Currently.Thanks for sharing these useful information….
I made it although i made it and uploaded the video on facebook!
(I uploaded as a video not a .gif)
So here is the link: https://www.facebook.com/photo.php?v=646167675410197&set=vb.100000509100609&type=3&theater
You can see it and if you like it just hit the like button.
Thank you for this tutorial.. im glad i learned a couple things!!
I have a small problem!!
I dont have the animation timeline you have..
My photoshop has a timeline but i have to make the animation frame by frame and only..
I have adobe photoshop cs6 Version 13.0 x32.. i dont know if that helps
Nice tutorial. Keep it up Guys!
I am trying to save a file, but I don't have the "QuickTime Export" option. What it might be wrong?
I would add some motion blur to it so that it doesn't look so choppy. Nice to see an animation tutorial :)
Very nice! Thank you a lot!
Please help me!!! I don't know how to download the brushes and the other things!!!
Took me awhile to find the download link but it's on the right-side between all the clutter
http://imgur.com/ZRCqh
Superb graphic design tutorials and thanks for share....
Awesome and difference articles...thanks to share..