Select both of these layers in the layers panel, and move them to the right using the Move Tool (Shortcut: V). Remember to hold Shift while dragging them, and make sure to drag these layers until their left side matches the left border of our scene.

And here is the result (press the Spacebar to view it):
To finish this step, we’re going to animate the glow of the stars. Open the animation panel of our Stars Glow layer, and click in the stopwatch of the Opacity (make sure that the blue arrow is at the beginning of our timeline).

Now drag the blue arrow to 01:00f and lower the opacity of the Stars Glow layer to 0%.

Now select both of the keyframes we just created (click anywhere with the left mouse button and drag a box around them), right click in one of them, and click in Copy Keyframes.

Drag your blue arrow to 02:00f, right click one of the keyframes, and select Paste Keyframes.

And here’s the result:

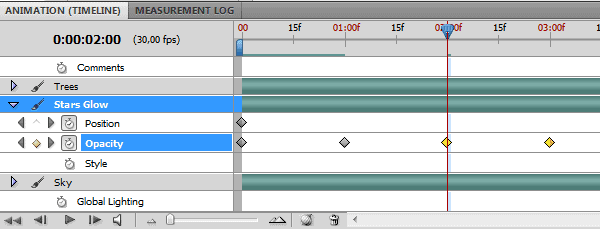
Repeat these steps three more times, setting the blue arrow at 04:00f, 06:00f and 08:00f, and pasting the two keyframes we copied before in each one of these times (you don’t have to copy again). When you’re done, set the blue arrow at 10:00f and raise the opacity of the Stars Glow layer to 100% again. Here’s how your animation panel should look like now:

And this is the final result, with the glow of the stars fading and reappearing every 2 minutes:
Step 10:Adding some meteors
If you changed the brushes we added before, go ahead and load the Galaxies_bySunira again. Select the Sideview Spiral Galaxy brush.

Create a new layer (Shortcut: Ctrl/Cmd+Alt/Opt+Shift+N) and name it Meteors. Place it right below the Trees layer.

Before creating the meteor, go to Window > Brush and change the angle of the brush to 75º.

Now lower the size of the brush to around 20~30px and paint three meteors with different sizes on the top of the screen. I used 30px/25px/20px for the size of the meteors.

Double click the Meteors layer and add an Outer Glow layer style.

Here is the result:

Using the Move Tool (Shortcut: V), drag the meteors out of the screen while holding the shift key. Drag them in the direction of the arrow below:
11 responses to “How to Create a Stars and Planets Time Lapse in Photoshop”
-
Your image works beautifully with the mask Nancy!This looks like a great tool. I’m going to try it out. Currently.Thanks for sharing these useful information….
-
I made it although i made it and uploaded the video on facebook!
(I uploaded as a video not a .gif)
So here is the link: https://www.facebook.com/photo.php?v=646167675410197&set=vb.100000509100609&type=3&theater
You can see it and if you like it just hit the like button.
Thank you for this tutorial.. im glad i learned a couple things!! -
I have a small problem!!
I dont have the animation timeline you have..
My photoshop has a timeline but i have to make the animation frame by frame and only..
I have adobe photoshop cs6 Version 13.0 x32.. i dont know if that helps -
Nice tutorial. Keep it up Guys!
-
I am trying to save a file, but I don’t have the “QuickTime Export” option. What it might be wrong?
-
I would add some motion blur to it so that it doesn’t look so choppy. Nice to see an animation tutorial :)
-
Very nice! Thank you a lot!
-
Please help me!!! I don’t know how to download the brushes and the other things!!!
-
Took me awhile to find the download link but it’s on the right-side between all the clutter
-
Superb graphic design tutorials and thanks for share….
Awesome and difference articles…thanks to share..


Leave a Reply