
In this tutorial we’ll create an awesome photo manipulation of a guy’s face being distorted in space and time. We’ll use lots of native Photoshop filters and some external textures. Both newbies and advanced Photoshop users will learn some useful things and tricks from this tutorial. Let’s begin!
Final Results

Tutorial Resources
Step 1
Open the file “Man Looking in distance”.

Step 2
Duplicate the original layer by pressing Ctrl + J and apply a Crystalize filter with 20 size (Filter > Pixelate > Crystalize).

Step 3
Duplicate the original layer again with Ctrl + J and apply a Crystalize filter with 40 size. Move this layer above the Crystalize layer we created at step 2 (in the layer palette – F7 – click and drag the layer).

Step 4
Now the layer with the big crystals should be the only one visible since it’s on top and covering other layers. Add a layer mask to this layer (Layer > New Layer Mask > Reveal All). Select the standard round soft brush at 100% opacity and paint with black in the layer mask (to hide sections of this layer thus revealing the layers above) over the face.

Step 5
Now we want to show some features of the original face. Group the two crystalize layers (hold Ctrl and click on each layer to select them) by pressing Ctrl + G. Add a layer mask to this group and paint over the eyes and the lips in the layer mask with a round soft brush at 100% opacity.

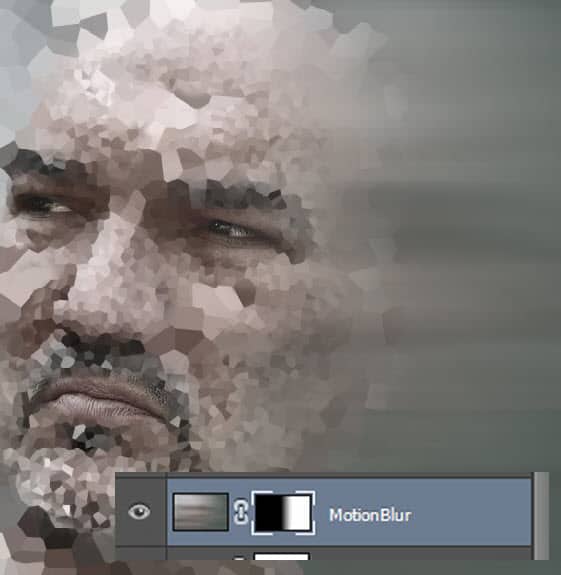
Step 6
Create a new layer from all the visible layers by pressing Ctrl + Shift + Alt + E and apply a Motion Blur effect with the settings shown below (Filter > Blur > Motion Blur).

Step 7
Add a layer mask to the layer we created at step 6 and select the Gradient Tool (G). Set the colors to black and white (D) and click in the layer mask to make it active. Now hold the Shift key and drag from right to left to create a black gradient as shown below. This step will give our scene a motion feeling.
Step 8
Now let’s create some fragments flying away from the face. Select the Polygonal Lasso Tool (L) and create a small selection on the face (in the pixelated area) as shown below.

Step 9
Now press Ctrl + Shift + C to copy merged (to copy from all the visible layers) and Ctrl + Shift + V to paste the selection into a new layer. You should have a fragment of the face on a new layer. With the Move Tool (V) position this fragment somewhere to the right.
2 responses to “Create a Striking Photo Manipulation of a Face Distorted in Space”
-

Page 2 is broken, no instructions on it
-
This is creativity
Leave a Reply to AnonymousCancel reply