Make your artwork look like they're from an alternate universe. These Cyberpunk presets work with Photoshop (via the Camera Raw filter) and Lightroom. Download all 788 presets for 90% off.
The way how you´ll do it is pretty simple. Make all layers except LIGHT BULB invisible (similarly as in previous step). Then go to Select > Color Range... and with the eye dropper click on some white part of the light bulb. The Color Range makes selection based on the color you´ve selected.
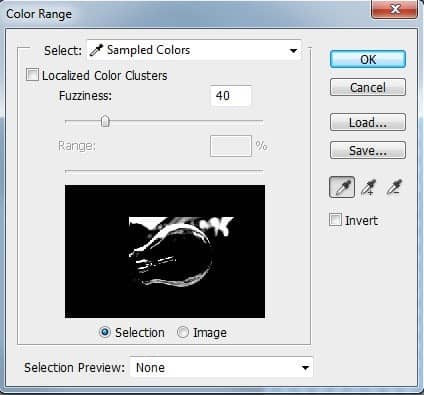
Set the value Fuzziness on 60 and press OK. Now you need to invert the selection. To do it go to Select > Invert or press Ctrl + Shift + I. Then press Delete on your keyboard to delete the selection. Some unwanted parts of the sky still stays. To hide them grab the Eraser Tool (E) and simply erase them. Lower the opacity of this layer on 65% and make all layers visible again.

Step 6 - Adjusting the Light Bulb
The glass should have more orange tones because the light on the scene is very warm because of the sunset. To fix it add new adjustment layer Photo Filter above the layer LIGHT BULB. Choose #BB6F56 reddish color and higher the Density on 60%.
Create clipping mask from the layer.
Step 7 - Adding the Holder
This will be really quick step. Open the picture of the holder in Photoshop. Cut out the background and drag it into the manipulation. Name the layer HOLDER and place it under the LIGHT BULB. Press Ctrl + T and resize it on proper size. Press Enter.

Step 8 - Adjusting the Holder
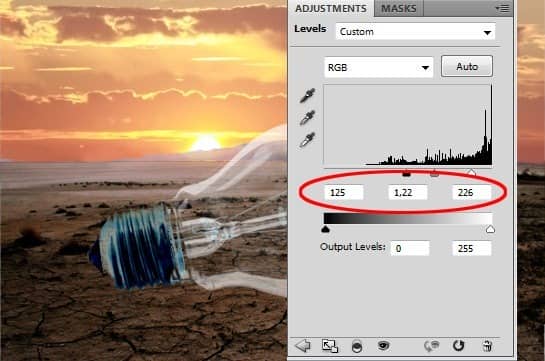
As you may see on the picture above the holder is too bright and should be more orange. You´ll fix it in this step. To increase the contrast add new adjustment layer Levels above the HOLDER and set the Input Levels on 125; 1,22; 226. Create clipping mask from this layer.
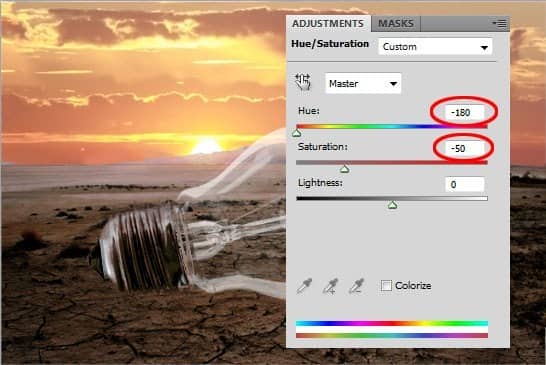
To add more orange color create new adjustment layer Color Balance above Levels and set the value Hue on -180 and Saturation on -50. Create clipping mask from this layer too.
Step 9 - Adding the Shadow Under the Bulb
To make the light bulb looks like it is actually standing on the ground you need to add shadow under it. Create a new layer under the layer HOLDER and name it SHADOW UNDER THE BULB. Grab the Eyedropper Tool (I) and pick some dark brown color from the ground. Then grab the Brush Tool (B) and paint thin line under the light bulb. On the following picture you can see how the shadow could look. (I added the white background so can see the shadow better.)


2 comments on “How to Create an Inspiring Light Bulb Photo Manipulation in Photoshop”
detailed and creative. I,m from Belize CA. I got photoshop cs6 like 6 months ago and it has become my new hobby ever since. this tutorial has excellent tips on blending modes and will certainly improve my skills. keep up the good work and thanks for the inspiration.
Excellent.