
When was the last time you went to an airport? While waiting, you might stumble into an interesting schedule display. Each character board is flipped to reveal the next character. That’s what we want to create here, a mechanical text display. We are going to use only Photoshop in this project. Let’s get started!
Step 1: Preparing Canvas
Start by making a new file for our text. Set its size to 1200 px × 800 px.

Step 2
Add new Adjustment Layer Solid Color.
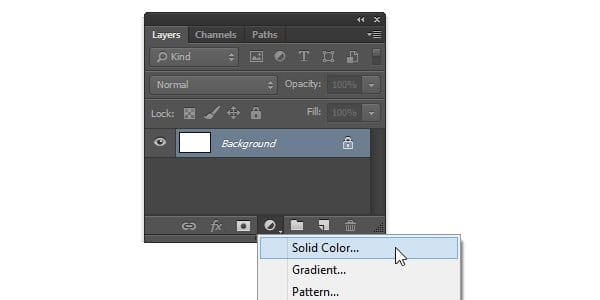
Step 3
Set its color to #26282d. This is going to be background of the text display.

Step 4
We want everything to be organized. One of the simple way to do this is placing elements in its own related set. While the adjustment layer is selected, hit Ctrl + G to place in a group layer. Double click its name to edit it.

Step 5: Start Designing Text Base
Add another group layer with name First Digit.

Step 6
Add a rounded rectangle with color #141213. This is going the base of our text.

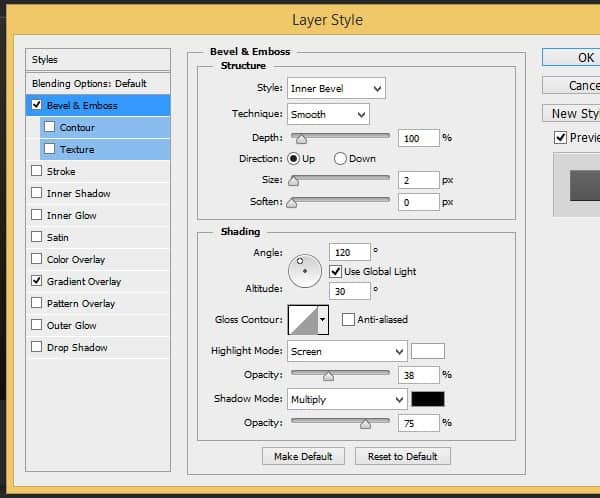
Step 7
Double click the layer shape and then apply Bevel & Emboss and Gradient Overlay. For its settings, see screenshots below.

This is the result we have.

Step 8
Add two rounded rectangles and a rectangle path into the previous shape. Set its mode to Subtract Front Shape.


Step 9
Ctrl-click the shape layer we have just made to make new selection based on its shape.
Step 10
Make new layer. Click Edit > Stroke. Set Width: 1 px, Color: #, and Location: Inside. Photoshop will make a 1 px line along the selection.

Step 11
Remove selection by hitting Ctrl + D.

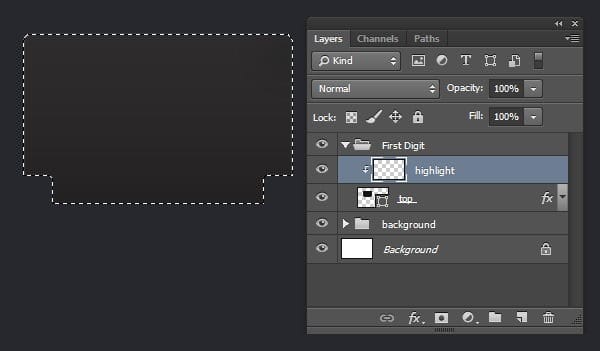
Step 12
Hit Ctrl + Alt + G to convert layer into a Clipping Mask. Click Add layer mask icon in bottom of Layers panel to add layer mask. Fill layer mask with black by clicking D and then Ctrl + Delete. Activate Brush tool and then paint white to reveal some of the stroke line and add highlight into the layer shape.

Step 13
We have just made strong highlight. Now, we want to make softer highlight. Make new layer. Ctrl-click the shape. Perform stroke command to add stroke line. Apply Gaussian Blur filter from menu Filter > Blur > Gaussian Blur.
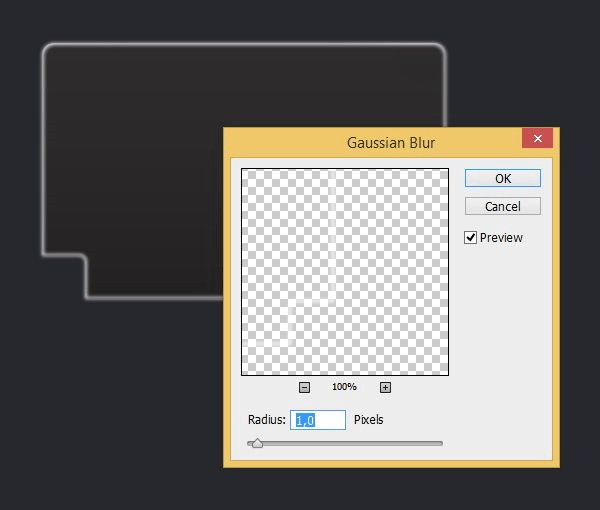
Step 14
Add layer mask and then fill it with black. Paint layer mask with white to reveal softer highlight inside the layer shape. Convert the layer to Clipping Mask (Ctrl + Alt + G).
6 responses to “Draw an Airport Mechanical Text Display From Scratch”
-

text
-
Just Wondering how this is used to create a Airport Signboard – Is it used like a font?
-
The DL link for .zip file is broken.
“Airport Mechanical Display.zip | 3.3 MB ”
F1
Any help?-
Sorry linked fixed :)
-
-
It is like HTC android UI
-
Leave a Reply