Note: Adding vignette is a great way to add dimension to your photo manipulations. But don’t over do it! There should always be very smooth transition between darker edges and central part of the image.
Add adjustment layer Levels on the top of all layers and this time set the Input Levels on 0; 0,7; 255.

You want to darken only the edges of the picture and the central area should remain the same as before this adjustment. To achieve that activate the Elliptical Marquee Tool (M) and select rounded area in the center of the image. Below you can see where I mean.

Make sure the layer mask of this adjustment layer is activated (click on it) and go to Select > Modify > Feather. The path may differ depending on what version of Photoshop you’re using. You can also simply press Shift+F6 to activate it. Set the value Feather on about 50 pixels and press OK.

Feathering makes the edges of the selection more softer.
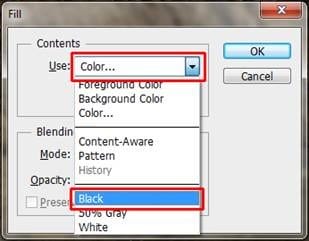
Now press Shift+F5 on your keyboard to activate Fill window and select Black in Use list. Press OK.

Adjustment disappears on the part you’ve filled with black color which means that borders are darken and centre remains the same.
On the following picture you can see how your photo manipulation should look like so far.

Step 6 – Adding Mist
If you read some of my previous tutorials you surely know how much I love using fog in my photo manipulations. It adds great magical atmosphere in a minute.
Download the fog brushes listed in the beginning of the tutorial and install them in Photoshop. The ones I used are paid but feel free to use any fog brushes you’re comfortable working with. If you don’t know how to install brushes into Photoshop you can take a look at this tutorial.
Add new layer on the top of all layers and name it FOG. Grab the Brush Tool (B) and select one of the fog brushes you’ve just installed. Hold Alt on your keyboard to activate the Eye Dropper Tool and pick some very light bluish color from the picture.
Note: Try to avoid using pure white or black in your pictures. Both colors look harsh and rarely look realistic. Try using e.g. very light yellows or dark browns instead.
16 responses to “How to Turn an Ordinary Landscape into a Dramatic Moonscape”
-
Las imagenes para poder seguir el tutorial son muy pequeñas
The images to follow the tutorial are very small
-
I every time spent my half an hour to read this website’s
articles daily along with a cup of coffee. -
Excellent site you have here.. It’s hard to find good quality writing like yours these days.
I honestly appreciate people like you! Take care!!
-
really nice and interesting…
Je hezké tady vidět čecha -
Amazing. . Very nice, this information most important for me.
-
Gracias… muy bueno el tutorial,resultado muy bueno.
-
Sorry but original image was more effective. But I liked the technique. Its useful in many ways!
-
Thank you!
-
It was fun creating it!
-
please i need more of your tutorial to be sent to my email please am need of it i beg you in the name of god
-
Very good! The technique is applicable to many arraignments I have and will be very useful! I believe this to be an art onto itself. For some very, very, strange reason, there are people, (like my sister-in-law), who believe this is “cheating”. I reply with “Cheating what?!”
I am always left dumbfounded as to what people are thinking when they say something like that. I have asked them if they would own/hang the art if the place in question did exist and was photographed in one shutter release?
They actually say they would!! So what part of “art” don’t they understand? Lol It’s very frustrating to argue such an obvious point but trust me when I say that there are people out there that are very confused when it comes to this kind of work.
Thanks for the tip!
Rich -
sorry if I appear stupid, ..how do I download the images ,.. ? anyone ! please, thanks
-
right click on and save image as
-
-
Pekná práca Jarka. Dakujem za tento tutorial a inspiraciu.
-
Kind of dull tbh
-
what image size are you using?


Leave a Reply