To add a bit magical atmosphere lower Opacity of you brush on about 35% and with black color gently paint over the mountains. Thanks to it it will look like they disappear in the thick clouds. You can get the idea of what I mean on the following picture: Paint over the areas highlighted with red color.

After this step your photo manipulation should be similar to the photo below.

Step 3 – Cleaning the Ground
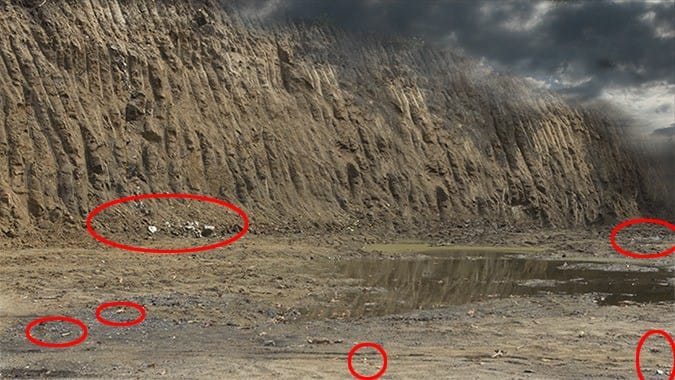
There are some distracting elements on the ground and mountains. You’ll get rid off them in this step. You can see them on the picture below.

Add new layer on the top of all layers and name it CLEANING. Grab the Stamp Tool (S) and start removing the unwanted objects. Use different cloning sources to avoid repetitive patter to get the most realistic result.
Note: You could start cloning on the GROUND layer directly. But if you add new empty layer above you’ll always be able to change or hide anything on that layer. It’s the same “non destructive” philosophy as using layer masks instead of the Eraser Tool (E).
Step 4 – Balancing Lightness
If you look at the photo of the ground you notice the bottom part is lighter than the upper part. It causes that the photo looks flat and perspective isn’t distinctive enough. You’ll fix this problem in this and some of the following steps.
Let’s focus on darkening bottom part of the GROUND. Add new adjustment layer Levels on the top of all layers. (You can find the button “Add adjustment layer” on the bottom part of your Layer palette next to the “Add layer mask” button you’ve used in some of the previous steps.)

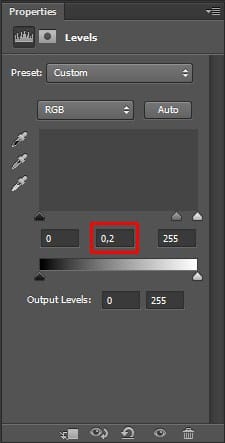
Set the Input Levels on 0; 0,2; 255. Grab the Paint Bucket Tool (G) and fill the layer mask of this adjustment layer with solid black color. It causes that the adjustment becomes invisible.

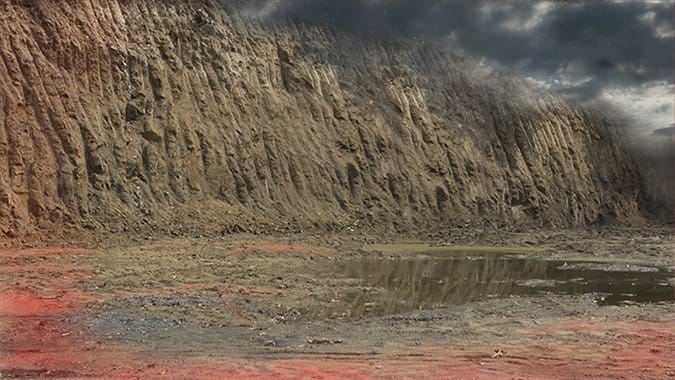
Grab the Brush Tool (B), lower its Opacity on 5%, pick white color and start painting over the areas you want to make slightly darker (by painting with white you’re making the adjustment visible again). On the following photo you can see the areas you should focus on.

Step 5 – Adding Vignette
To add more dimension to your photo manipulation you’ll add vignette in this step.
16 responses to “How to Turn an Ordinary Landscape into a Dramatic Moonscape”
-
Las imagenes para poder seguir el tutorial son muy pequeñas
The images to follow the tutorial are very small
-
I every time spent my half an hour to read this website’s
articles daily along with a cup of coffee. -
Excellent site you have here.. It’s hard to find good quality writing like yours these days.
I honestly appreciate people like you! Take care!!
-
really nice and interesting…
Je hezké tady vidět čecha -
Amazing. . Very nice, this information most important for me.
-
Gracias… muy bueno el tutorial,resultado muy bueno.
-
Sorry but original image was more effective. But I liked the technique. Its useful in many ways!
-
Thank you!
-
It was fun creating it!
-
please i need more of your tutorial to be sent to my email please am need of it i beg you in the name of god
-
Very good! The technique is applicable to many arraignments I have and will be very useful! I believe this to be an art onto itself. For some very, very, strange reason, there are people, (like my sister-in-law), who believe this is “cheating”. I reply with “Cheating what?!”
I am always left dumbfounded as to what people are thinking when they say something like that. I have asked them if they would own/hang the art if the place in question did exist and was photographed in one shutter release?
They actually say they would!! So what part of “art” don’t they understand? Lol It’s very frustrating to argue such an obvious point but trust me when I say that there are people out there that are very confused when it comes to this kind of work.
Thanks for the tip!
Rich -
sorry if I appear stupid, ..how do I download the images ,.. ? anyone ! please, thanks
-
right click on and save image as
-
-
Pekná práca Jarka. Dakujem za tento tutorial a inspiraciu.
-
Kind of dull tbh
-
what image size are you using?


Leave a Reply