![clip_image036[4] clip_image036[4]](https://cdn.photoshoptutorials.ws/images/stories/c9329086a76d_11664/clip_image0364.jpg?strip=all&lossy=1&webp=82&avif=82&w=1920&ssl=1)
Step 17
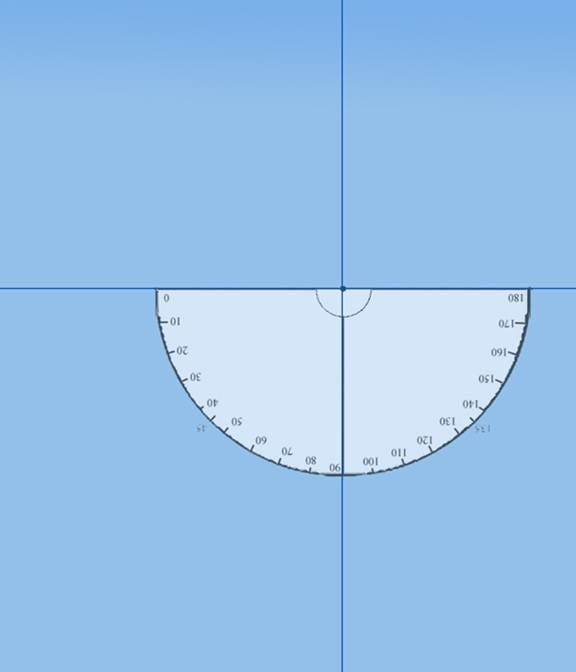
Mark each as its degree mark (starting from the right, 10, 20, 30, 40, 50, 60, 70, 80, (90 degrees), 100, 110. 120, 130,140, 150, 160, 170).
Merge all the layers onto one layer, erase the long 45 degree and 135 degree lines, and your protractor is done!
![clip_image038[4] clip_image038[4]](https://cdn.photoshoptutorials.ws/images/stories/c9329086a76d_11664/clip_image0384.jpg?strip=all&lossy=1&webp=82&avif=82&w=1920&ssl=1)
Step 18
Copy and past the protractor onto your project and set the layer opacity to 60%. Re size it so that you can easily read all the numbers. For now, turn it upside down and line the midpoint up with the vanishing point.

Step 19
Using the line tool with a weight of 5 pixels (color #000000), draw a diagonal line from the vanishing point to a point slightly to the right of the left outer corner. The angle of the line should be approximately 48 degrees.
![clip_image042[4] clip_image042[4]](https://cdn.photoshoptutorials.ws/images/stories/c9329086a76d_11664/clip_image0424.jpg?strip=all&lossy=1&webp=82&avif=82&w=1920&ssl=1)
Step 20
Draw a second line at an angle of 122 degrees.
![clip_image044[4] clip_image044[4]](https://cdn.photoshoptutorials.ws/images/stories/c9329086a76d_11664/clip_image0444.jpg?strip=all&lossy=1&webp=82&avif=82&w=1920&ssl=1)
Step 21
Draw two more lines, one at a 122 degree angle from the vanishing point. Start the other halfway between the right side of the vantage point and draw it to slightly above the right side of the image. Draw both with the 5 pixel line tool.
![clip_image046[4] clip_image046[4]](https://cdn.photoshoptutorials.ws/images/stories/c9329086a76d_11664/clip_image0464.jpg?strip=all&lossy=1&webp=82&avif=82&w=1920&ssl=1)
Step 22
Draw two horizontal lines at approximately 2.5” and 3”. Erase right portion of the top line.
![clip_image048[4] clip_image048[4]](https://cdn.photoshoptutorials.ws/images/stories/c9329086a76d_11664/clip_image0484.jpg?strip=all&lossy=1&webp=82&avif=82&w=1920&ssl=1)
Step 23
Draw another line from the vanishing point at 120 degrees. Draw a straight line down from that to the line below.
![clip_image050[4] clip_image050[4]](https://cdn.photoshoptutorials.ws/images/stories/c9329086a76d_11664/clip_image0504.jpg?strip=all&lossy=1&webp=82&avif=82&w=1920&ssl=1)
Step 24
Erase the extra length of that line and then draw a vertical line from the end of the second line we originally drew. Add a horizontal line connecting that line with the one to its right.
![clip_image052[4] clip_image052[4]](https://cdn.photoshoptutorials.ws/images/stories/c9329086a76d_11664/clip_image0524.jpg?strip=all&lossy=1&webp=82&avif=82&w=1920&ssl=1)
Step 25
Draw a line at an 89 degree angle connecting the bottom right line to the top of the picture.
![clip_image054[4] clip_image054[4]](https://cdn.photoshoptutorials.ws/images/stories/c9329086a76d_11664/clip_image0544.jpg?strip=all&lossy=1&webp=82&avif=82&w=1920&ssl=1)
Step 26
Erase the lines this building overlaps.
![clip_image056[4] clip_image056[4]](https://cdn.photoshoptutorials.ws/images/stories/c9329086a76d_11664/clip_image0564.jpg?strip=all&lossy=1&webp=82&avif=82&w=1920&ssl=1)
Step 27
Draw a vertical line connecting to the right row of buildings at approximately 5.66”.
![clip_image058[4] clip_image058[4]](https://cdn.photoshoptutorials.ws/images/stories/c9329086a76d_11664/clip_image0584.jpg?strip=all&lossy=1&webp=82&avif=82&w=1920&ssl=1)
Step 28
Erase the end of the right line that connects the building strand. In its place draw another line at 130 degrees.
![clip_image060[4] clip_image060[4]](https://cdn.photoshoptutorials.ws/images/stories/c9329086a76d_11664/clip_image0604.jpg?strip=all&lossy=1&webp=82&avif=82&w=1920&ssl=1)
Step 29
Erase the end of the left main line. Draw a rectangle with its longer side at 3.75”, and the top and bottom sides at 2.33” and 5”.
![clip_image062[4] clip_image062[4]](https://cdn.photoshoptutorials.ws/images/stories/c9329086a76d_11664/clip_image0624.jpg?strip=all&lossy=1&webp=82&avif=82&w=1920&ssl=1)
Step 30
Draw a short horizontal line at 4.5” and a connecting Vertical line down to 5”.
![clip_image064[4] clip_image064[4]](https://cdn.photoshoptutorials.ws/images/stories/c9329086a76d_11664/clip_image0644.jpg?strip=all&lossy=1&webp=82&avif=82&w=1920&ssl=1)
Step 31
Draw a horizontal line at 5” that give the rectangle a base. Erase the lines inside this base. Extend the top line by approximately 1/8 of an inch bout to the right and then a second 1/8 of an inch line vertically. Connect the shape to the building to its left with a slight angle. This will give the impression of a slanting roof.
2 responses to “How to Paint Venice in Photoshop”
-
Link is working for my computer
-
can you give a new link to the photo please


Leave a Reply