
In this tutorial, you’ll learn how to create this amazing photo manipulation in Photoshop with plenty of magical details. Also, you will learn how to create a fiery leopard, interesting and useful effects that I created as well as working with the Photoshop tools in getting the desired scene and much more!
First of all we will create background correct perspective and change the floor. Then we will work on the model and the basic details. Let’s create a fiery leopard and add it to the picture. Then start working on small details to harmonize the picture. The final step will be to create and add special effects. I have used Photoshop version CC 2014 to create this work but you can use any version from CS onwards will be fine as well.
Tutorial Resources
- Model 1 – Mahafsoun
- Model 2 – Mahafsoun
Castle Beloeil – pranile(Alternative)- Checkered floor – ocd1c-stock
- Burnt Music Sheets – frozenstocks
- Leopard – HOTNStock
Fire stock – sidestreet-stock(Alternative)- Effects Brushes – ryky
- Book – MariaSemelevich
- Ghosts – MariaSemelevich
- Sparks – MariaSemelevich
Step 1
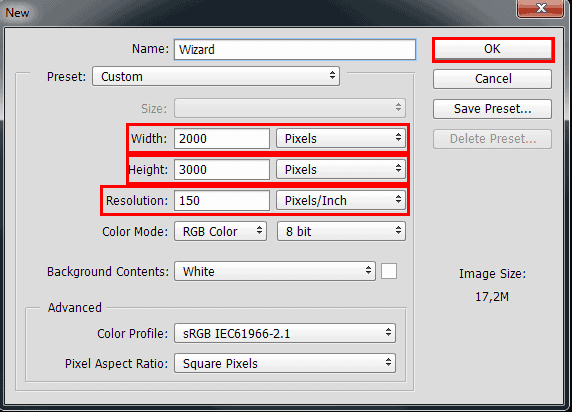
Before you start, I highly recommend you download all the resources in one easily accessible folder and not to close it, and drag the desired photo in Photoshop. Opening Photoshop and get started! Create a new document at 2000 pixels wide and 3000 pixels height, resolution 150 Pixels/Inch.
Step 2
Now, we’re going to create the base of our artwork. Go to File > Place (Place Embedded) and add “Castle Beloeil” in working document image “places415_stock_by_pranile-d78qavk”. Use the Free Transform tool (Ctrl/Cmd+T or Edit > Free Transform) and proportionally resize image (Cmd/Ctrl + Shift). At this stage, it is important place image in the correct position. Try to position so that it looks symmetrical. Almost everything will deceive you but guided by rails. It’s almost the only element that will be visible in the picture.

Step 3
Now a little fix perspective. This is an important step in creating this picture, because I used Perspective Warp tool (Edit > Perspective Warp) but this is available only in Photoshop CC but you can easily substitute it using “Perspective” and “Distort” tools (Edit > Transform > Perspective/ Distort) in transform mode. When aligning perspectives guided to the first flat rung from the bottom.
For Perspective Warp users
Go to Edit > Perspective Warp. In a transform mode, create a rectangle that be a little more than edge of document and image on it. Then switch to Warp mode (button on the property bar) and pull the upper left point slightly upward and to the left so that the left side of the image be a little closer to you. Move upper right point to position slightly to the left to lift the right side of the image. Move bottom right point a little higher and move it to the left that the lower right corner as it drifted away from you. Try to position railings and building blocks and stairs on both sides of image have been aligned.
25 responses to “Create This Charming Magician with Enchanting Effects in Photoshop”
-

Awesome!!!!
-
Amazing tutorial, though some images just won’t load.
-
love this tutorial… thanks!
-
Excellent tutorial. Thanks!
-
wowwww magnificent work its really coooool i love it can u upload PSD file
-
This looks better than in some of the games.
Good work
-
PTS please tell me, thanks.I enjoyed it.
-
Why not have the psd file
-
The “Fire stock” image is deleted from deviantart :(
-
please give the PSD to me,thanks.I very like it.
-
Awesome !!
-
how can i get the full materials, the pictures the exact one
-
Yw
-
Thank you! :)
-
Thank you very much!
-
actually I‘m a Chinese, I think it’s a pretty good tutorial, and unfortunately, as a Chinese I can’t download the materials, thanks a lot. (sob~sob~)
-
-
Very Impressive
-
Good
-
Thank you!
-
-
Nice
-
In love with it <3 <3
-
Thank you very much! I am very pleased!
-
-
amazing magical effect….totally awesome
-
Thank you sooo much! I´m really glad you like it!!
-
wclm…dear
-
Leave a Reply to tempestCancel reply