Make skin look perfect in one-click with these AI-powered Photoshop actions.
Learn how to draw a realistic iPhone 4 from scratch in Photoshop. This drawing tutorial will teach you through step by step instructions the essentials of drawing electronics and introduce techniques on how to work with metal.
Preview of Final Results
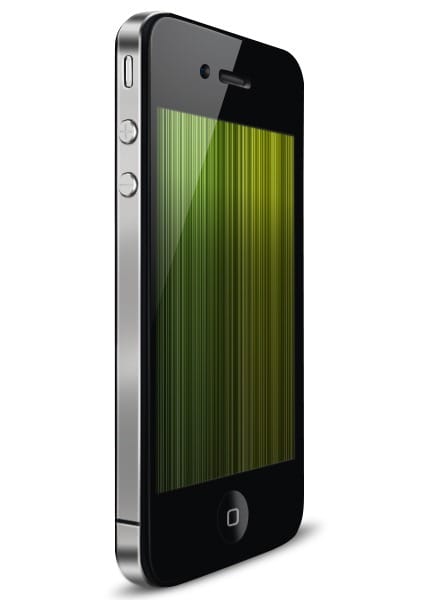
Photorealistic iPhone 4 Photoshop Tutorial
Step 1 – Create a new image file
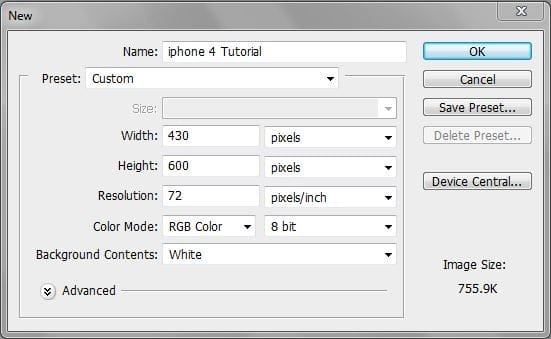
Open Photoshop and create a new image (Ctrl+N or File > New) with the settings shown below.
- Width : 430 pixels
- Height : 600 pixels
- Resolution : 72 pixels/inch
- Background Contents : White
Step 2 – Create the iPhone 4 shape
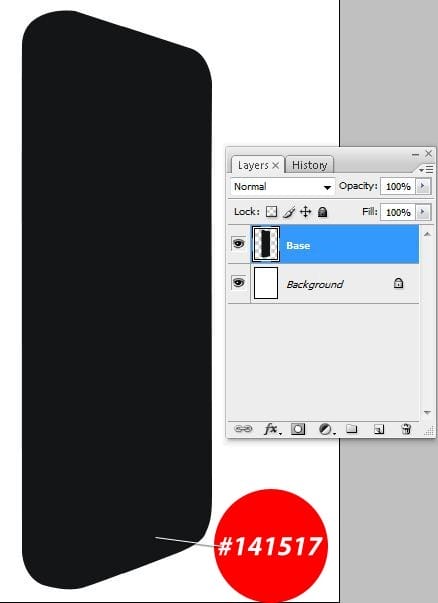
Create a new layer (Ctrl+Shift+N or Layer > New > Layer) above the Background layer. Rename this layer to Base. You can rename the layer by double-clicking on the layer name in the Layers palette (Window > Layers). In the tools palette, select the Pen tool (P) and ensure that the mode is set to Paths shown by the button in the image below.

Create a path like shown in the image below. You can load the image below into Photoshop and trace over it. Getting the shape right is the key to realistic renderings. For other drawings, you can download the photo of the object you are creating and trace over it. It is very difficult to create an accurate shape without tracing.

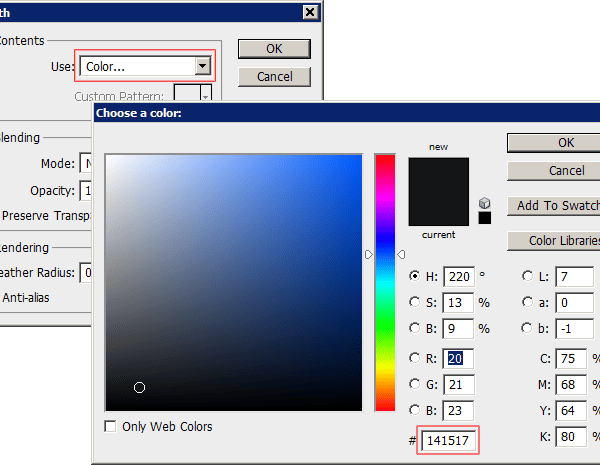
With the Pen tool still selected, right click inside the path then choose Fill. Fill the area with a dark gray color (#141517) to be specific.
Step 3 – Create the metal band
Create another new layer (Ctrl+Shift+N or Layer > New > Layer). Name this layer to “Silver Part”. You can rename a layer by double-clicking on the layer name in the Layers palette (Window > Layers). Create a selection like shown in the image below. You can use any tool to create the selection. If you’d like to use the Pen tool to create this select, start by drawing the path with the Pen tool then right click inside the path and choose Make Selection. Fill the selected area (Shift+F5 or Edit > Fill) with a light gray such as #CFCECC.

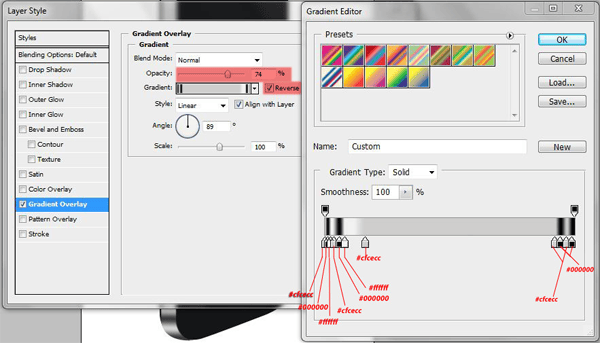
Now add a Gradient Overlay style to the layer. Go to Layer > Layer Style > Gradient Overlay. Create a black and white gradient so that you get a gradient that shows the curvature of the metal band like the image below.

Step 4 – Dodge and burn the metal band
Select the Burn tool (O) then in the option bar, set the settings to the following:
- Master Diameter : 164 pixels
- Range : Highlights
- Exposure : 63% (4A)

Use the Burn tool on the areas indicated in the image below.

Step 5 – Create a bevel for the metal band
Create a new layer rename this layer to “Silver Part Stroke”. Select the Pen tool then create a path like shown in the image below.

This layer will be used to create the edge of the metal band on the iPhone.

Add a Gradient Overlay layer style to this layer by choosing Layer > Layer Style > Gradient Overlay. Apply a gradient like shown in the image below.

This is what your image should look like.

Step 6 – Finish the bevel
Select the Eraser tool (E) then erase the bottom corner of the metal band so that it blends in.

Below is a before and after image of this step. It is a small change but it makes the metal band look like it is wrapping around the whole phone.

Create a new layer and name this layer “Silver Part Stroke 2”. Select the Pen tool then create a path like showin in the picture below. Apply a 2 pixel white stroke. To do this, first select the Brush tool and set the brush size to 2 px and hardness to 100%. Set the foreground color to white then switch back to the Pen tool. Right click on the Path then choose Stroke Path.

Select the Eraser tool and set the hardness of the eraser brush to 50%. You can right-click anywhere in the document window to bring up the eraser brush settings. Erase a little of the top and bottom of the stroke so that the edges fade.

Using the Eraser tool and a large eraser brush (about 50 pixels), use the eraser tool on the stroke to reduce its opacity. You can freehand this to adjust the results.

Step 7 – Create the iPhone vibrate on/off switch
Select the Rounded Rectangle tool (U) then apply the option bar settings shown in the image below.

Create a new layer then rename it to “button1”. Use the Rounded Rectangle tool (U) to create a shape like shown in the image below.

Step 8 – Add a bevel to the vibrate on/off switch
Create another new layer then rename this layer to “Button 1 stroke”. Select the Pen tool (P) and create a path like shown in the image below. Select the Brush tool and set the brush size to 1 px and foreground color to white. Switch back to the Pen tool (P), right click on the path, then choose Stroke Path.

Select the Eraser tool and erase over the ends to fade the stroke.

Using a larger eraser brush, erase around the outer edge of the stroke to reduce the opacity.

Step 9 – Create the other side of the bevel for the vibrate on/off switch
Create a new layer and name this layer “button1 (second part)”. Set the foreground color to #D5D4D2 then select the Rounded Rectangle tool (U) and create a shape like the image below.

Choose Layer > Layer Style > Stroke then create a stroke with the settings shown in the image below. Note that the stroke fill type we’re using this time is a Gradient. Once you set the fill type to Gradient, you can create the gradient shown in the image below.

This is what your iPhone should look like so far.

Step 10 – Finishing touches for the vibrate on/off switch
Create a new layer then rename it to “button 1 stroke 2”.

Select the Pen tool (P) to create an image like shown in the image below. Add a 1 px white stroke by selecting the Brush tool to set the brush size to 1 pixel and foreground color to white. Then switch back to the Pen tool (P), right click on the path, then choose Stroke Path.

Step 11 – Create the shape for the volume up button
Create a new layer then name it “button 2”. Select the Elipse tool (U) and create an oval shape like show in the image below. Use the Paint Bucket tool (G) to fill the selection with a dark gray color (#343331).

With the selection still active, right click on the selection and choose Stroke. Set the stroke size to 2 px and color to white.

This is what the button should look like.

Step 12 – Fade in the button stroke
Select the Eraser tool (E) with these option bar settings:
- Master Diameter: 56 pixels
- Mode: Brush
- Opacity: 100%
- Flow: 100% (12A)

With the Eraser tool (E), erase the outer edge of the stroke to fade it in.

Step 13 – Create the top of the volume up button
Create a new layer and name this “button 2 top”. Select the Elipse tool (U) to create a shape like shown in the image below. Use the Paint Bucket tool (G) to fill the selected area with a light gray (#D5D4D2).

Create a new layer then use the Pen tool (P) to create a path like shown in the image below.

Right click on the path then choose Fill and fill the path with a dark gray color (#343331).

Step 14 – Dodge and burn the volume up button
Select the Dodge tool (O) and apply the following settings in the option bar.
- Master Diameter: 8 pixels
- Range: Highlights
- Exposure: 100% (14A)

Use the Dodge tool in the areas shown in the image below.

Choose Layer > Layer Style > Stroke and use the settings shown in the image below.
- Size: 1 pixel
- Position: Outside
- Blend Mode: Normal
- Opacity: 37%
- Fill Type: Color
- Color: #000000(black) (14C)

Step 15 – Create the reflection for the volume up button
Create a new layer then name this layer “Layer Properties”. Select the Pen tool (P) and create a path around the button like shown in the image below.

Select the Brush tool then set the brush size to 3 pixels and stroke to white. Right click on the path then choose Stroke Path. This time, enable the Simulate Pressure option.

Step 16 – Create the volume up sign
Create a new layer then rename it to “plus”. Select the Pen tool (P) and create a path over the button like show in the image below. Select the Brush tool and set the brush size to 1 px and foreground color to a gray. Switch back to the Pen tool (P) then right click on the path and select Stroke Path.

Go to Layer > Layer Style > Inner Shadow and apply the settings shown below.
- Blend Mode: Multiply black
- Opacity: 25%
- Angle: 173*
- Distance: 1 pixel
- Choke: 0%
- Size: 1 pixel

Step 17 – Put the button layers into a group
Select all the layers related to the volume up button then press Ctrl+G or choose Layer > New > Group from Layers. This will put all the layers into a group.


Rename this group to “Button 2”.

Step 18 – Duplicate the button and convert it to a volume down button
Select the “Button 2” group then duplicate the group (Ctrl+J or Layer > Duplicate Group). Select the Move tool (V) then move the button below where the volume down button should be.

Transform the plus sign to a minus sign using the Eraser tool. Make sure you have your hardness set to 100%. Rename the layer to minus.

Step 19 – Create the metal band divider
Create a new layer then use the Pen tool (P) to create a path like shown in the image below.

Add a 3 pixel black (#1A1C1B) stroke like shown in the image below. If you got this far, you should remember how to do this. In case you don’t, select the Brush tool (B) then set the brush size to 3 px and foreground color to black (#1A1C1B). Select back the Pen tool (P), right click on the path, then select Stroke Path.

Select the Dodge tool (O) and dodge the the right side of the stroke to lighten it.

Step 20 – Create the bevel at the metal band divider
Create a new layer and name it “stroke 2”. Add a 2 pixel white stroke like shown in the image below. We’ve done this a few times already and it is the same process as before. Create the path using the Pen tool (P), select the Brush tool (B) and set the brush size to 2 px and foreground color to white, then switch back to the Pen tool to stroke the path (Right-click on the path then choose Stroke Path).


Step 21 – Use the Dodge tool on the metal band
Select the “Base” layer then create a rough selection like shown in the image below. You can use the selection tools or use the Pen tool (P). If you’re using the Pen tool, create the path then right click on it and choose Make Selection.

Select the Dodge tool (O). Apply the following settings in the option bar:
- Master Diameter: 49 pixels
- Range: Highlights
- Exposure: 100%

Dodge the upper area of the selection to lighten the corner.

Step 22 – Create a reflection on the metal band corner
Create a new layer and name it “stroke 4”. Select the Pen tool (P) to create a path like shown in the image below.
![22a[3] 22a[3]](https://cdn.photoshoptutorials.ws/images/stories/4896530f36e1_112DE/22a3.jpg?strip=all&lossy=1&quality=70&webp=70&avif=70&w=1920&ssl=1)
Add a 1 pixel black stroke then choose Filter > Blur > Gaussian Blur.

Set the Radius to 0.3 pixels in the Gaussian Blur window then click Ok.

Select the Eraser tool (E) and erase a little bit of the top and bottom of the stroke to fade the stroke out.

Step 23 – Create a bevel for the front face of the iPhone
Create a new layer and name it “stroke 5”. Select the Pen tool (P) to create a path like shown in the image below.

Add a 1 pixel black stroke to this path.

Choose Filter > Blur > Gaussian Blur and apply a 0.3 pixel blur.

Step 24 – Add a reflection to the front face bevel
Create a new layer then rename it to “stroke 6”. Select the Pen tool (P) and create a path like shown in the image below.
![24a[3] 24a[3]](https://cdn.photoshoptutorials.ws/images/stories/4896530f36e1_112DE/24a3.jpg?strip=all&lossy=1&quality=70&webp=70&avif=70&w=1920&ssl=1)
Add a 2 pixel white stroke to the path.
![24b[3] 24b[3]](https://cdn.photoshoptutorials.ws/images/stories/4896530f36e1_112DE/24b3.jpg?strip=all&lossy=1&quality=70&webp=70&avif=70&w=1920&ssl=1)
Select the Eraser tool (E) with the following option bar settings:
- Master Diameter: 121 pixels
- Mode: Brush
- Opacity: 100%
- Flow: 100%
![24c[4] 24c[4]](https://cdn.photoshoptutorials.ws/images/stories/4896530f36e1_112DE/24c4.jpg?strip=all&lossy=1&quality=70&webp=70&avif=70&w=1920&ssl=1)
Erase the area above the stroke to blend it in.

Step 25
Create a new layer and name it “Screen”. Select the Pen tool and create a rectangle path like shown in the image below.
![25a[9] 25a[9]](https://cdn.photoshoptutorials.ws/images/stories/4896530f36e1_112DE/25a9.jpg?strip=all&lossy=1&quality=70&webp=70&avif=70&w=1920&ssl=1)
Right click on the path then choose Fill Path. Fill it with a gray color. It doesn’t matter what color you pick because this is only for us to see the shape of the screen and will not show up in the final results.
![25b[9] 25b[9]](https://cdn.photoshoptutorials.ws/images/stories/4896530f36e1_112DE/25b9.jpg?strip=all&lossy=1&quality=70&webp=70&avif=70&w=1920&ssl=1)
Step 26 – Create the gap between the glass and LCD
Create a new layer and name it “stroke 7”. Select the Pen tool and create a path like shown in the image below.
![26a[3] 26a[3]](https://cdn.photoshoptutorials.ws/images/stories/4896530f36e1_112DE/26a3.jpg?strip=all&lossy=1&quality=70&webp=70&avif=70&w=1920&ssl=1)
Create a 1 px white stroke on the path.
![26b[3] 26b[3]](https://cdn.photoshoptutorials.ws/images/stories/4896530f36e1_112DE/26b3.jpg?strip=all&lossy=1&quality=70&webp=70&avif=70&w=1920&ssl=1)
Reduce the opacity to 17%.

Step 27 – Create the iPhone wallpaper graphic
Select the layer “Screen” then use the Hue/Saturation tool (Ctrl+U or Image > Adjustments > Hue/Saturation) and reduce the lightness to –100 to make the screen black.
![27a[3] 27a[3]](https://cdn.photoshoptutorials.ws/images/stories/4896530f36e1_112DE/27a3.jpg?strip=all&lossy=1&quality=70&webp=70&avif=70&w=1920&ssl=1)
Load a selection of the layers contents (Ctrl+click on the layer thumbnail or Layer > Load Selection). Select the Brush tool and set the foreground color to any color you like. This will be used to create the abstract graphic on the screen. Click once on the top left then select another color and click again on the top right of the screen.
![27b[3] 27b[3]](https://cdn.photoshoptutorials.ws/images/stories/4896530f36e1_112DE/27b3.jpg?strip=all&lossy=1&quality=70&webp=70&avif=70&w=1920&ssl=1)
Choose to Filter > Noise > Add Noise and apply a 25% noise filter.
![27c[4] 27c[4]](https://cdn.photoshoptutorials.ws/images/stories/4896530f36e1_112DE/27c4.jpg?strip=all&lossy=1&quality=70&webp=70&avif=70&w=1920&ssl=1)
Now choose Filter > Blur > Motion Blur and apply the following settings:
-
Angle: 90°
-
Distance: 999 pixels

Step 28 – Add a glow to the upper area of the wallpaper graphic
Create a new layer then set the foreground color to white. Load the selection of the “Screen” layer (Ctrl+click on the layer thumbnail or Layer > Load Selection). Use the Brush tool (B) to paint the top area with white.
![28a[3] 28a[3]](https://cdn.photoshoptutorials.ws/images/stories/4896530f36e1_112DE/28a3.jpg?strip=all&lossy=1&quality=70&webp=70&avif=70&w=1920&ssl=1)
Change the blending mode of the current layer to Overlay.
![28b[4] 28b[4]](https://cdn.photoshoptutorials.ws/images/stories/4896530f36e1_112DE/28b4.jpg?strip=all&lossy=1&quality=70&webp=70&avif=70&w=1920&ssl=1)
Choose Filter > Blur > Motion Blur and apply the following settings:
-
Angle: 90°
-
Distance: 125 pixels

This is what your image should look like.

Step 29 – Add contrast to the base layer
Select the “Base” layer then open the Brightness/Contrast tool (Image > Adjustments > Brightness/Contrast). Make sure that the “Use Legacy” option is off. Set the contrast to +85 then click OK.

Step 30 – Draw the front iPhone camera
Now we’ll draw the camera used for the FaceTime feature on the iPhone 4. Create a new layer then use the Elliptical Marquee tool (U) to create an oval like the image below. Fill it with gray.
![30a[4] 30a[4]](https://cdn.photoshoptutorials.ws/images/stories/4896530f36e1_112DE/30a4.jpg?strip=all&lossy=1&quality=70&webp=70&avif=70&w=1920&ssl=1)
Select the Burn tool then apply the following settings in the option bar.
- Master Diameter: 10 pixels
- Range: Shadows
- Exposure: 7%
![30b[4] 30b[4]](https://cdn.photoshoptutorials.ws/images/stories/4896530f36e1_112DE/30b4.jpg?strip=all&lossy=1&quality=70&webp=70&avif=70&w=1920&ssl=1)
Select the Lasso tool (L) to create a rough selection of the bottom left half of the oval like shown in the image below. Choose Select > Modify > Feather and feather the selection by 1 px.
![30c[3] 30c[3]](https://cdn.photoshoptutorials.ws/images/stories/4896530f36e1_112DE/30c3.jpg?strip=all&lossy=1&quality=70&webp=70&avif=70&w=1920&ssl=1)
Select the Burn tool (O) to burn the edge so that your camera looks like the image below.

Step 31 – Add a lens reflection to the front camera
Select the Brush tool then apply the following settings in the option bar:
- Master Diameter: 6 pixels
- Hardness: 50 %
- Mode: Normal
- Opacity: 100%
Set the foreground color to #002149.
![31a[4] 31a[4]](https://cdn.photoshoptutorials.ws/images/stories/4896530f36e1_112DE/31a4.jpg?strip=all&lossy=1&quality=70&webp=70&avif=70&w=1920&ssl=1)
Create a new layer.
![31b[3] 31b[3]](https://cdn.photoshoptutorials.ws/images/stories/4896530f36e1_112DE/31b3.jpg?strip=all&lossy=1&quality=70&webp=70&avif=70&w=1920&ssl=1)
Add a blue spot using the Brush tool (B) on the edge the front iPhone camera like shown in the image below. Choose Layer > Layer Style > Gradient Overlay and apply the settings shown in the image below.

Step 32 – Create the speaker
Create a new layer.
![32a[3] 32a[3]](https://cdn.photoshoptutorials.ws/images/stories/4896530f36e1_112DE/32a3.jpg?strip=all&lossy=1&quality=70&webp=70&avif=70&w=1920&ssl=1)
Use the Rounded Rectangle tool (U) to create a shape like shown in the image below. Use the Rotate tool (Edit > Transform Path > Rotate) to get it aligned with the iPhones perspective. Right click on the path then choose Make Selection.
![32b[3] 32b[3]](https://cdn.photoshoptutorials.ws/images/stories/4896530f36e1_112DE/32b3.jpg?strip=all&lossy=1&quality=70&webp=70&avif=70&w=1920&ssl=1)
Use the Dodge and Burn tools (O) to create a bevel like shown in the image below. To do this, use a small brush with a hardness of around 50%. The brush size should be about the width of the speaker. Dodge the bottom area then burn the top area. Finish it off by selecting the Brush tool with a hardness of 75% and painting a gray stripe in the middle of the speaker.

Step 33 – Create a bevel on the speaker
Create a new layer then use the Pen tool to add a 1 pixel black stroke like shown in the image below.
![33a[3] 33a[3]](https://cdn.photoshoptutorials.ws/images/stories/4896530f36e1_112DE/33a3.jpg?strip=all&lossy=1&quality=70&webp=70&avif=70&w=1920&ssl=1)
Use the Eraser tool (E) to erase around the edge to fade the stroke out.
![33b[3] 33b[3]](https://cdn.photoshoptutorials.ws/images/stories/4896530f36e1_112DE/33b3.jpg?strip=all&lossy=1&quality=70&webp=70&avif=70&w=1920&ssl=1)
Select the Lasso tool to create a selection like shown in the image below.
![33c[3] 33c[3]](https://cdn.photoshoptutorials.ws/images/stories/4896530f36e1_112DE/33c3.jpg?strip=all&lossy=1&quality=70&webp=70&avif=70&w=1920&ssl=1)
Switch to the Dodge tool (O) to add some highlights to the speaker.

Step 34 – Create the glass reflection
Create a new layer then rename it to “light”. This will hold the reflection for the iPhone. Creating the reflection is easy. Start by creating a selection like shown in the image below. It is easiest to do this using the Pen tool (P) then right clicking on the path and selecting Make Selection.
![34a[3] 34a[3]](https://cdn.photoshoptutorials.ws/images/stories/4896530f36e1_112DE/34a3.jpg?strip=all&lossy=1&quality=70&webp=70&avif=70&w=1920&ssl=1)
Select the Gradient tool (G) then apply the option bar settings shown in the image below.
![34b[4] 34b[4]](https://cdn.photoshoptutorials.ws/images/stories/4896530f36e1_112DE/34b4.jpg?strip=all&lossy=1&quality=70&webp=70&avif=70&w=1920&ssl=1)
Create a gradient from top to bottom to create a reflection like shown in the image below. It may take a few tries. Just undo (Ctrl+Z) and create the gradient again until you get it right.

Reduce the opacity of the current layer to 43%.

Step 35 – Create a reflection for the upper left area of the bevel
Create a new layer and name it “stroke 9”. Make a path like shown in the image below.
![35a[3] 35a[3]](https://cdn.photoshoptutorials.ws/images/stories/4896530f36e1_112DE/35a3.jpg?strip=all&lossy=1&quality=70&webp=70&avif=70&w=1920&ssl=1)
Create a 2 pixel white stroke.
![35b[3] 35b[3]](https://cdn.photoshoptutorials.ws/images/stories/4896530f36e1_112DE/35b3.jpg?strip=all&lossy=1&quality=70&webp=70&avif=70&w=1920&ssl=1)
Like before, use the Eraser tool to erase the edges so that the edges fade out. This is what your image should look like.

Step 36 – Create the iPhone home button
Select the “Base” layer then use the Elliptical Marquee tool (M) to create an oval like shown in the image below.
![36a[3] 36a[3]](https://cdn.photoshoptutorials.ws/images/stories/4896530f36e1_112DE/36a3.jpg?strip=all&lossy=1&quality=70&webp=70&avif=70&w=1920&ssl=1)
Select the Dodge tool (O) and dodge the right side of the button.
![36b[3] 36b[3]](https://cdn.photoshoptutorials.ws/images/stories/4896530f36e1_112DE/36b3.jpg?strip=all&lossy=1&quality=70&webp=70&avif=70&w=1920&ssl=1)
Create a new layer then name it “stroke10”. Right click on the selection then choose Stroke Path. Add a 1 pixel white stroke.
![36c[3] 36c[3]](https://cdn.photoshoptutorials.ws/images/stories/4896530f36e1_112DE/36c3.jpg?strip=all&lossy=1&quality=70&webp=70&avif=70&w=1920&ssl=1)
Reduce the opacity of the current layer to 5%.

Step 37 – Create the home button icon
Create a new layer then use the Rounded Rectangle tool (U) to create a white rounded rectangle like shown in the image below.
![37a[3] 37a[3]](https://cdn.photoshoptutorials.ws/images/stories/4896530f36e1_112DE/37a3.jpg?strip=all&lossy=1&quality=70&webp=70&avif=70&w=1920&ssl=1)
In the Layers palette (Window > Layers), set the Fill of this layer to 0%. The Fill setting is located underneath the Opacity setting. Now go to Layer > Layer Style > Stroke and apply the settings shown below:
- Size: 2 px
- Position Inside
- Blend Mode: Normal
- Opacity: 100%
- Fill Type: Color
- Color: White
![37c[4] 37c[4]](https://cdn.photoshoptutorials.ws/images/stories/4896530f36e1_112DE/37c4.jpg?strip=all&lossy=1&quality=70&webp=70&avif=70&w=1920&ssl=1)
Move the rectangle to the center of the home button then use the Warp tool (Edit > Transform > Warp) to distort it so that it fits into the home button. Reduce the opacity of the current layer to 49%.

Step 38 – Add a shadow
Now we’ll create a shadow for the iPhone. Create a new layer then rename it to “shadow”. Position this layer below the base layer.
![38a[3] 38a[3]](https://cdn.photoshoptutorials.ws/images/stories/4896530f36e1_112DE/38a3.jpg?strip=all&lossy=1&quality=70&webp=70&avif=70&w=1920&ssl=1)
Select the Lasso tool (L) and create a selection like shown in the image below. Fill the selected area with black.
![38b[3] 38b[3]](https://cdn.photoshoptutorials.ws/images/stories/4896530f36e1_112DE/38b3.jpg?strip=all&lossy=1&quality=70&webp=70&avif=70&w=1920&ssl=1)
Choose Filter > Blur > Motion Blur. Apply the following settings:
- Angle: 12°
- Distance: 50 pixels
![38c[4] 38c[4]](https://cdn.photoshoptutorials.ws/images/stories/4896530f36e1_112DE/38c4.jpg?strip=all&lossy=1&quality=70&webp=70&avif=70&w=1920&ssl=1)
Choose Filter > Blur > Gaussian Blur and set the radius to 4 pixel.

Final Results

2 comments on “How to Draw a Photorealistic iPhone 4 in Photoshop”
I realy like your site and get what i looking for thank you very much.
thank yhu