
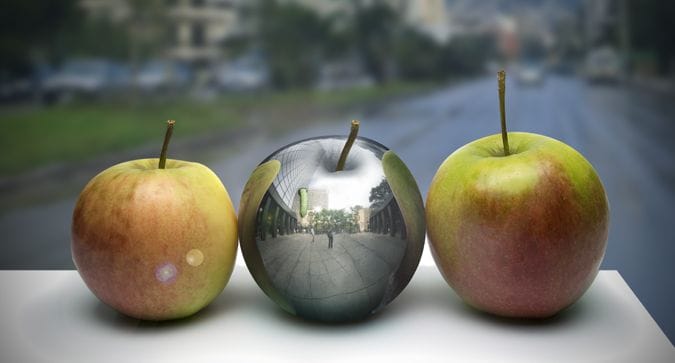
Learn how to create a metallic apple with reflections. This tutorial will show you how to warp objects, dodge/burn, and add reflections to metal.
Preview of Final Results
Tutorial Resources
Step 1
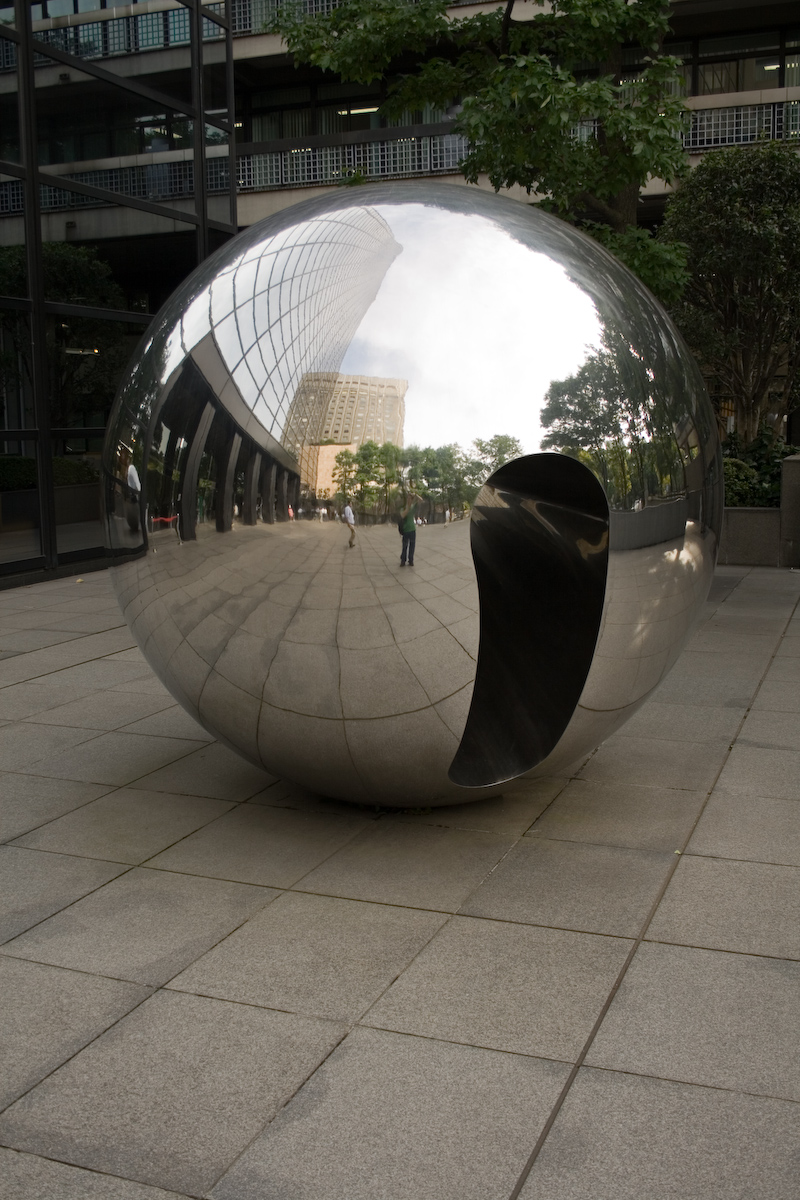
Open file “Metal Ball”. Select the Elliptical Marquee Tool and make a selection of the ball. Hold shift while dragging to keep the selection a perfect circle. After you’ve selected the ball press Ctrl + C to copy and Ctrl + N to create a new document. Photoshop it’s smart enough to calculate the dimensions of the selection and input those variables into document creation window so all you have to do it’s to press Ok. Paste the image (Ctrl + V).

Step 2
Now we have the ball selected into a new document and the reason for this it is that the door in the middle of the ball kind of ruins the whole aspect of it. We need a nice, round metallic ball and this is the only decent image of a chrome ball I could find, except it has an ugly entrance of some sort that’s ruining its symmetry. Notice that the door it’s mainly in the right half of the image while the left half looks good. The solution to this it is to use the good half to correct the bad one. This technique I am about to use it’s useful when you are retouching or correcting symmetrical objects and it also works great on human faces.
Let’s begin by selecting the Rectangular Marquee Tool and make a selection of the left half of the ball.

Step 3
Click on the ball layer to select it and press Ctrl + J to copy the selection on a new layer. I turned of the visibility of the ball layer temporarily so you can see the half ball layer.

Step 4
While on the half ball layer press Ctrl + T to enter Free Transform. Right-click and choose Flip Horizontally. Hold Shift and drag the half ball to the right to position over the original right half.

Step 5
Add a layer mask to the half ball layer (Layer > Layer Mask > Reveal All) and Alt-click between the half ball and the original ball layer in the Layer palette to clip the upper half ball layer to the lower original ball layer. This means that the half ball layer will be visible only through visible pixels below, so if you did not placed the half of the ball exactly over the right half of the ball in step 4 you don’t need to worry about it now.
27 responses to “How to Create a Photo-Realistic Metal Apple in Photoshop”
-

boo boo bam
-
Hi I couldn’t download the Metallic Ball. I received an” Imagine could not be loaded” message. Is there another way to download this image?
-
Mrs. Johnston? you probably don’t remember me but I think I am one of your 4th grade students.
-
-
I tried to download the metallic ball and was told Image could not be found..
-
I like me!
-
Enjoyed it!
-
Great tutorial, I learned a lot!
-
THX! I did an awsome metallic cherry :)
-
Amazing. . Very nice, thanks for sharing…………….
-
Nice tutorial. Only think I didn’t like is that you kept forgetting to tell us when to add layer masks…
-
techniques and ideas was great
-
The detail in this is amazing
-
This is fantastic!
-
forgot to fix the white triangles at the bottom of the apples curve
-
amazing work!
-
Great!
-
Great! I learned from it..
-
Very nice tutorial..
khupach chhan explain kelele ahe -
fantastic!
-
This is really good thank you sir.
-
Nice, but the light sides (non-adjacent) of two non-metallic apples was left unfixed thus it didn’t jibe to the light source ‘you’ have indicated.
-
no
-
-
Exvellent tutorial!!! I like the fact that you are focusing on details!
-
Impressive tutorial, Adrian!
-
Good..!
-
how do you un-desaturate
-
Leave a Reply to Lisa LampeCancel reply