- Brightness/Contrast
- Brightness: -150
- Contrast: -50
- Use Legacy: Uncheck

The image should be looking like this now:

Step 6: Add the fish
In this step we will be adding the fish that is floating in the sky and looking at the swing. To start, open the image “Fish Stock 0008” by phantompanther stock and then activate the Polygonal Lasso Tool (L) and create a selection area around the fish shown below:

Once you’ve created a selection area around the fish, activate the Move tool (V) and drag the selected fish to our canvas.
Once on the canvas, rename it “Fish”. Make sure to put this layer within the “Through the window” group. Put this layer above the “Cloud” layer.
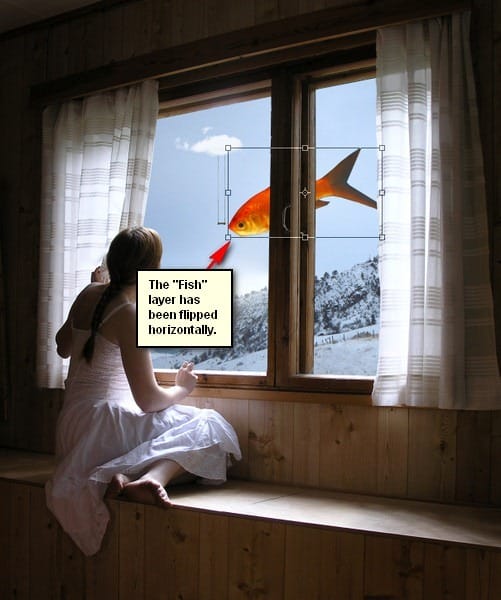
Next, activate the Transform tool (Ctrl/Cmd + T) and then right click on the image to activate the contextual menu and once it is active, click on Flip Horizontal.
The result:

Next, we will resize this fish so activate the Transform tool (Ctrl/Cmd + T) and then resize it as shown below:

Now, we would want the fish to look at the swing and to do that, we would need to rotate the fish. Activate the Transform tool (Ctrl/Cmd + T) and then right click on the canvas to show the contextual menu and once it is shown, click on Rotate.

Now, let’s rotate the fish to the angle shown on the image below:

Now, to move it to the position of the fish above, we would need to activate the Move tool (V). With that tool activated, drag the fish to the position of the fish shown on the image below:

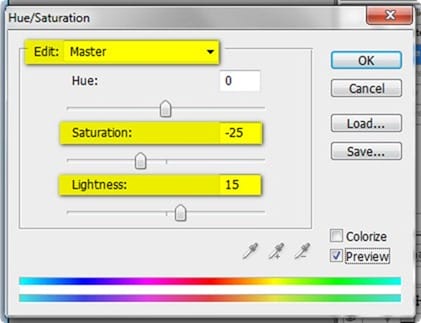
Let us now fix the hue/saturation of the fish. To do that, make sure the “fish” layer is selected and then go to Image > Adjustments > Hue/Saturation and once it opens, input the following:
- Edit: Master
- Hue: 0
- Saturation: -25
- Lightness: 15

The result of that would be like this:

Now, there is a story in our picture but it still lacks some little details and we would be adding that in the next steps.
Step 7: Create the Teddy Bear
Now we will be adding a cute teddy bear which has been put away from the girl since she got bewildered by what she saw out her window. To start, open the image “bear” by kristal29. Once open, activate the Polygonal Lasso Tool (L) and create a selection area around the teddy bear. See image below:
One response to “Dreamy Photo Manipulation of a Girl Looking Out a Window”
-
you are professional with Photoshop and really I liked lessons so I put your website in my favorite to learn from your tutorial
thank you very much


Leave a Reply