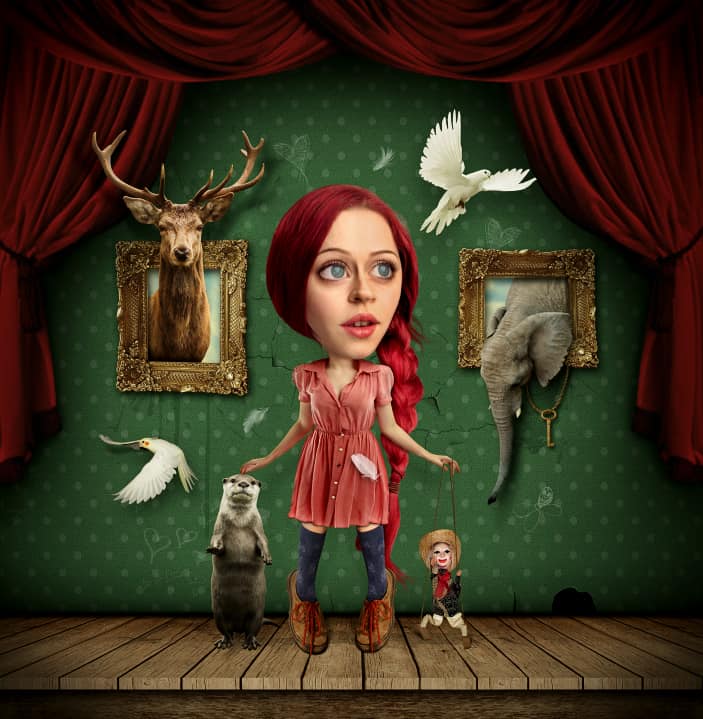
Transform a Portrait Into a Caricature Artwork

Transform a Portrait Into a Caricature Artwork

Sometimes it's good to have fun with Photoshop, and today, we are going to learn step by step how to create an amusing cartoon character using some photo manipulation techniques retouching, and many others. There are of course many ways to do it, but you may find a lot of useful tricks and techniques in this tutorial, and with a little bit of imagination, you can use it to create your own unique character. So, let's get started!

Final

Tutorial Resources

Step 1

Let's start by creating a new canvas of 2800 x 2800 px and resolution of 72 px/inch. Always try to work on a large dimension because it gives us the advantage to adjust the image to a larger or smaller size without losing its quality. Now grab Paint Bucket Tool and fill the background with black.

01

Step 2

The first thing we need to do is to create a background. Go to File > Place and select a Paper Texture image. This will automatically turn the layer into a Smart Object. Because the Paper image is smaller than our canvas, we need to duplicate the layer a few times to cover up our canvas horizontally. Then add a Layer Mask to the duplicated layer, and by using a Gradient Tool, draw a Gradient on its edges to make the texture seamless horizontally. Hold down the Shift key to constrain the gradient to a perfect horizontal.

To cover the canvas vertically, just duplicate the layers and flip it vertically. The result will look like this.

02

Step 3

We need to create another texture on top of our Paper layers to make it stand a bit more. First, add a new layer on top of everything and fill it with black. Then go to > Filter > Noise > Add Noise, and set the Amount around 300%. You don't have to be precise with the number here, as long as it looks good for you, go for it. Let your own eye be the judge.

Now go to Filter > Stylize > Emboss. Leave the default settings as it is and click OK. To brighten up this texture a little bit, add a Levels Adjustment Layer from the Layers Panel and move the Highlights slider to 165, but first we have to make sure a clipping mask is applied to the layer. Then set the Noise layer's Blending Mode to Multiply and the Opacity to 28%.

03a
03b

Step 4

Select the Brush tool (B) then set the brush size to 100 pixels and hardness to 50%. Paint over the object shown in the image below.Let's now give a color to our texture. Go to the Layers panel, add a Hue/Saturation Adjustment Layer and set the Hue to +105, Saturation to -22, and Lightness to -29. Then add a Levels Adjustment Layer to darken it a bit by move the Shadows slider to 36 and Midtones to 0.89. You can see all the settings below.

04a
04b

Step 5

To add a pattern to our texture is a bit tricky here. Firstly, we need to create a new canvas with the size of 140 x 140 px with black as a background. Then, using a hard-edge brush with the size of 45 px, draw a white circle in the middle of the canvas and also on one of each corner just like in the image shown below.

Go to > Edit > Define Pattern, rename the pattern "Polka Dot" and click OK. Now go back to our main canvas, create a new layer and press Ctrl+A to select all, then go to Edit > Fill, choose Pattern from the Content dropdown menu, and select our pattern we've just created. Set the layer's Blending Mode to Screen and the Opacity to 9%.

05a
05b

Step 6

Next, we're going to create a vignette effect, to add a bit of depth and to make the center of the image stand out. First, create a new layer, then grab an Elliptical Marquee Tool and draw a big circle in the middle of our canvas. Go to Select > Modify > Feather and set the Radius to 150 px. Press Ctrl+Shift+I to inverse the selection and fill it with black. We need also lower the layer's Opacity down to 21%.

Now duplicate the layer, press Ctrl+T, scale it up about 137% larger and set the Opacity to 41%.

06a
06b

Step 7

Add a new layer and grab a Gradient Tool. Use a linear black to transparent gradient to draw a small gradient in the bottom of our texture, then set the layer's Blending Mode to Multiply and the Opacity to 25%. Repeat the process, but this time, make the gradient shorter than previously and set the Opacity to 35%.

Now add another new layer, and using a Brush Tool with the size of 25 px and 0% Hardness, create a line along the width of our canvas. Hold down the Shift key while dragging to get a perfect straight line. Then go to Filter > Blur > Motion Blur, set the Angle to 90, Distance to 23 and turn down the layer's Opacity to 64%.

Select all the layers, press Ctrl+G to group them together and name it "Wall".

07a
07b

Step 8

We're done with the wall. The next step would be creating a floor. First, open the Wood Texture image and go to Image > Image Rotation > 90 CW. Double click to unlock the background layer, then go to Image > Canvas Size, set the Width to 4096 px, with the Relative option checked, and leave the middle left anchor selected.

Duplicate the Background layer twice, and place the image next to each other. See the result as shown in the image below. If you got it right, go to Layers Panel menu and flatten all the layers down.

08a
08b

Step 9

Drag the Wood Texture image to our main canvas. Press Ctrl+T to bring up the transform box, right-click and choose Distort. Refer to the image below and see how to transform this image to create a perspective-look as shown.

Apply a Color Overlay using Layer Style in the Layers Panel. Set the color to #906522, Blend Mode to Multiply and Opacity to 44%.

09

Step 10

To add a shading in the floor, duplicate the layer and press Ctrl+L to call up the Levels window and set the Shadows slider to 65, Midtones to 0.86, and White Output slider to 226.

Apply a Layer Mask and using a Gradient Tool, drag from just above the bottom of the canvas to the top edge of the Wood image. Press down Ctrl+Alt+G all at the same time to create a clipping mask. Our shading should now be clipped to the Wood image below it.

Now create a new layer and draw a straight line on the top edge of the Wood image using a 25 px Brush Tool with the Hardness of 0%, and also clip the layer to the Wood layer. The layers should now look like the image below.

10

Step 11

Open and drag the Wood Texture image to our canvas once again. Rename this layer to "Bevel". Press Ctrl+T and stretch the image until the dividing line match with the floor. Just try to make it as close as possible.

Grab a Rectangular Marquee Tool and make a selection around the dividing line. Select a Move Tool and drag the line until it coincides exactly with the floor above. Hold down the Alt+Shift key while dragging.

Add a Levels Adjustment Layer and set the Shadows to 10 and Midtones to 1.58. Lastly, In the Layers panel, right click the Wood texture layer and select Copy Layer Style, then right-click Bevel layer and select Paste Layer Style. This should apply the same Wood's Color Overlay effect to the Bevel layer.

11

Step 12

Open the Wood texture image once again and select a part of the texture and paste it to our main canvas. Copy the Layer Style from the Wood Texture layer, then add a Levels Adjustment Layer and set the setting as shown in the image below. Now create a new layer, grab a Gradient Tool and using a linear black to transparent gradient, draw a small gradient from the very top to the middle of the texture. Then group all the layers and name it "Floor".

12a
12b

Step 13

OK, we're done with the floor. Let's switch to adding Curtain now. Firstly, place the Curtain image into our main canvas, resized it to about 400%, and using a Pen Tool, start tracing over the part of the image we need. When you're satisfied with your selection, right-click on the path, choose Make Selection and use the Layer Mask to mask off the part of the Curtain we don't need.

The first thing that strikes me is that the image is way too dark and a bit underexposed. So, using a Levels Adjustment Layer, set the settings as shown below to brighten up the image. We also need to add a Hue/Saturation Adjustment Layer and reduce the Saturation to -27 to soften the color. Make sure the adjustment layers are clipped to the Curtain layer.

13

Step 14

Let's now add a shadow below the curtain. The first shadow layer will be the softer one and we'll cast it a little bit further from the curtain. Add a new layer and put it underneath the Curtain layer. Now grab a Brush Tool with the size around 400 px and start painting. Then go to Filter > Gaussian Blur and set the Amount around 100 px.

Now time to add a deep shadow and stick closer to the wall. Add a new layer, set the brush size to 80 px and Hardness to 0%. See the 2nd image below. Red arrows indicate where to put a strong shading. When you're done painting, set the layer's Opacity to 36%. Repeat the process to the other Curtain.

14a 14b
Step 15

Alright, enough with the background, now time to put on the main character. Open the Model 1 image, and what we need to do is to extract the dress from the background. Using the Pen Tool, draw a path around the Model. You can skip the head of the model as we will replace it with another image later. After you're done, turn the path into a selection and hit Ctrl+Shift+I to inverse the selection, then hit Delete.

Press Ctrl+T to enter the Free Transform Mode. We need to resize and squeeze down the image to make it more suitable for this caricature idea. With the transformation mode still active, right-click and choose Warp to distort its shape a bit.

15a
15b

Step 16

Now we're going to adjust the tone of the dress to blend with the background. First, add a Levels Adjustment Layer and set the setting as below. Also reduce the Saturation to -23 using the Hue/Saturation Adjustment Layer. Add a Color Overlay Layer Style with the color of #ffd200, set the Blend Mode to Color, and Opacity to 12 %.

Next, we need to decrease the highlight of the dress. Duplicate the Dress layer and the adjustment layers, then merge it together. Hold down the Ctrl key and click on the layer's thumbnail to load a selection. Then go to Select > Modify > Contract, and set the Amount to 6 px. Again, go to Select > Modify > Feather, set the Radius to 5 px, and hit Delete. Set the layer's Blending Mode to Multiply.

16a
16b

Step 17

Open the Model 2 image. Grab a Pen Tool and start tracing over her right leg. When you're done with it, turn the path into a selection, and paste it underneath the Dress layer. Using a Warp Transform, try to reshape it a bit.

Now add a new layer, and by using a soft-edged Brush, carefully paint under her skirt to create a shadow. Then clip the layer and lower the Opacity to 75%. Repeat the process for the other leg.

17a
17b

Step 18

This step is basically the main feature of this tutorial. Extract Model's face using a Pen Tool, and bring it to our main canvas. First, we need to neutralize the highlight areas on her face. To do that, duplicate the layer, and change the layer's Blending Mode to Multiply with 80% Opacity. Then add a Layer Mask and erase the other half of her face using a soft-edged brush. Lastly, apply a Hue/Saturation Adjustment Layer, reduce the saturation to -36, then merge the layers together.

OK, this is the fun part, go to Filter > Liquify. This will call up the Liquify options window. Pick a Bloat Tool, set the Brush Size to about 200 px, and click a few times on her eye to make it bigger. Then move to the other eye and repeat the process.

Now grab a forward Warp Tool, and start pushing parts of the image around to make the initial shape of the head. Vary your brush size and don't hesitate to zoom way in for best results. Use smaller dimension for the tighter areas and inside details.

Tips: Use Ctrl+Alt+Z to undo steps or hold down Alt key and brush over your image to gradually undo each change you've made.

18a
18b

Step 19

To fix the transition between her neck and her head, use a Stamp Tool with 40-50% Opacity on a new layer. Make sure the Sample is set to "Current & Below". Start painting it carefully click by click, don't hold your mouse button while doing this, as it tends to become very ugly that way.

We also need to fix the left side of her collar by making a duplicate from the right one. In order to do that, grab a Lasso Tool and start making a selection around the collar. Press Ctrl+J to duplicate that selected area to a new layer, then flip the layer horizontally.

Add a Levels Adjustment Layer and set the settings as indicated in the 2nd image below. Now grab an Eraser Tool, and with the soft-edge brush, carefully erase the part we don't need.

19a
19b

Step 20

Open the Hair image. Using a Lasso Tool, select the part we're interested in and paste it in our main canvas. Now we're going to change the color and the lightness of the hair to match up with the original red color. Press Ctrl+U to call up the Hue/Saturation options window, set the Hue to -30, Saturation to +13, and Lightness to -9.

Try to find a good placement for it, like you see in the 2nd image below, and reshape it a bit using a Warp Transform. Now grab a Brush Tool and start painting using 0% Hardness. See the image below. Green arrows indicate where to put the shadows. When you're done with it, turn down the layer's Opacity to 45%.

20a
20b

Step 21

So far I'm happy with how it looks, but the color of her eyes looks a bit dull. There are many ways to fix this, but using a Color Blending Mode is a common way for simple recoloring like this. First, draw a selection around the iris (the colored part of the eye), then go to > Select > Modify >Feather. Enter a 10px Radius and click OK.

While the selection still active, go to Layer Panel, add Adjustment Layer and choose Solid Color. Set the color to #22adcb, change the layer's Blending Mode to Color and reduce the Opacity to 19%.

21

Step 22

OK, this is getting even more fun now. Bring the Marionette image to our canvas, extract it using a Pen Tool and mask it off using a Layer Mask. Then, add a Levels Adjustment Layer and set the setting as shown below. Also add a Color Overlay Layer Style with the color set to #ffd200 and the Opacity to 15% to match its color with the scene. Now grab a Burn Tool, set the Range to Shadow and Exposure to 20 % and start painting over the darker areas to enhance the contrast.

Now we're going to create strings for the Marionette. Open the Rope image, and go to Image > Canvas Size, set the Width to 4656 px, with the Relative option checked, and leave the middle left anchor selected. Then duplicate the layer and place the image next to each other to extend the Rope.

Merge the layers together and place it to our canvas. Add a Color Overlay Layer Style with the color of #2c2312 and Opacity to 52%. Duplicate the layer, and press Ctrl+T to rotate it just like in the image shown below.

22a
22c
22b

Step 23

Now to make sure everything has its own place in this illustration you need to take care for shadows. So, grab a Brush Tool with soft settings (Flow at 2% and Hardness set to 0%). Create a new layer below the Model group and start painting a tiny shadow under her shoes.

Press Ctrl+] to increase the size of your brush and paint under her arms and legs as indicated by red arrows in the image below. Change your diameter of your brush constantly, and vary the opacity depending on the areas you're painting.

23a
23b

Step 24

Now we can move to the next part. We will add several elements to make the illustration a bit more interesting. Place the Frame image to our canvas (File > Place) and put it above the Wall group. Add Hue/Saturation Adjustment Layer and then reduce the Saturation to -42. Using Magic Wand Tool, select the black background and mask it off with the Layer Mask.

Apply Layer Style > Drop Shadow to a layer with the settings as shown in the image below. Now open the Sky image, and using the Rectangular Marquee Tool, select the part of the sky you're interested in and pasted underneath the Frame layer. Raise the Saturation to +47.

Group the layers and the adjustment layers, and name it "Frame 1". To create the other frame, just duplicate the Layer Group, scale it up slightly, and rotate it to 90 CCW. Rename the group to "Frame 2".

24a
24b

Step 25

Open the Elephant image. First, we need to do a little bit of touch up on and remove the black spots on its forehead.

Add a new layer and grab a Stamp Tool, Press Alt+click to define a sampling point, then simply paint over in the area you want to remove. Use about 20-30% Opacity, it's good at softening areas while still leaving detail, and make sure the Sample is set to "Current & Below".

Once you're done retouching, extract the Elephant using a Pen Tool and put it above the Frame Layer. Place it exactly just like you see in the image shown below, click on the Frame layer's thumbnail to load selection, and use a Layer Mask to get rid of the excess area we don't need.

25a
25b

Step 26

In order to remove the blue color in its snout, apply an Adjustment Layer > Selective Color, and set the settings as shown below. Also add a Levels Adjustment Layer and move the Shadows slider to 10, Midtones to 0.93, and White Output slider to 246.

Apply Drop Shadow and Color Overlay Layer Style with each setting as below. Now grab a Brush Tool, and draw a straight line on a new layer above the elephant just like in the image below. Then clip the layer to the Elephant layer below it.

As for the shadow, load the selection of the Elephant layer, create a new layer underneath it, and fill the selection with black. Press Ctrl+D to deselect, then go to > Filter > Blur > Gaussian Blur and set the Radius to around 15 px. Again, go to Filter > Blur, but this time choose Motion Blur. Set the Angle to 90 and Distance to 122 px. Finally, lower the Opacity of the shadow layer to 44%.

26a
26b
26c
26d

Step 27

Repeat the process of the step 22 to create a rope, and bring it to our canvas. Now go to > Edit > Puppet Warp. This is a nice feature that can be very useful to twist and bend an object with ease. Click on the mesh to add pins at the points where we want the element to bend around.

In this case, we need to add 5 pins: at the very top, the middle, the very bottom of the Rope, and those in between them. These pins act like joints. Moving one pin moves the pixels around it in relation to the other. Once all the pins have been placed, grab the middle pin and drag it up. See the image below.

Next, place the Key image (File > Place), and add a Levels Adjustment Layer with setting as the 3rd image below. Load the selection (Ctrl+click) of the Rope layer and using a hard-edged brush, mask off the area of the Key layer that overlap with the Rope. Then apply a Drop Shadow Layer Style using the same settings as the Rope layer.

27a
27b

Step 28

This time we're going to add the Deer into the scene. I believe everything was just said in the previous step, so please refer to step 25 and 26. As for the shadow, go to the Layers panel, recall the selection of the Deer layer (Ctrl+click on the layer's thumbnail). Fill this selection with black, and use Distort Transform to start pulling two upper corners just like the 2nd image below. Lower the Opacity to 44%, then go to Filter > Blur > Gaussian Blur and set the Radius to 16.8 px.

28

Step 29

Continue adding various elements. Place the image of a Bird now (File > Place) and apply a Levels Adjustment Layer with the settings as below. Go to Layers Panel, right-click the Marionette layer and select Copy Layer Style. Still in the Layers Panel, right-click on the Bird layer and select Paste Layer Style. This should apply the same Marionette's Color Overlay effect to the Bird layer.

Place another Bird to our canvas, flip it horizontally, and then repeat the process to adjust the tone and the contrast. Also refer to the step 28 to create a shadow.

29

Step 30

We should now bring the Otter into the scene. Use the Pen Tool to cut it out, and place it into our canvas. First, we need to eliminate the highlight on its left side using the technique we've used on the dress earlier. Duplicate and merge the Otter and the adjustment layer together, then hold down the Ctrl key and click on the layer's thumbnail to load a selection. Go to Select > Modify > Contract, and set the Amount to 6 px. Again, go to Select > Modify > Feather, set the Radius to 5 px, and hit Delete. Set the layer's Blending Mode to Multiply and erase the left part to let it look like it's lightened from the left.

Again, go to Filter > Liquify, and using a Bloat Tool, click a few times on its face to to make it look more bulbous.

30a
30b

Step 31

It's the right time to add some brushes. We need 3 brush sets to complete this illustration. I use these 3: Feather brushes, Ink Splatter, and Cracks brush for the wall. Grab a Brush Tool and start load our brushes. Use the [ key to decrease the brush diameter. Rotate and put it in various places to see what it looks like in different positions. Make sure you use each brush on its own separate layer, that way you can move each layer around to line them up, and play with their Opacities.

To create a mouse hole in the wall, just add a new layer above the Pattern layer and draw kind of an oval shape using a Brush Tool with 100% Hardness. You can reshape it using an Eraser Tool, so it doesn't need to be perfect. Go to Layers Panel and add an Outer Glow Layer Style with the settings as shown in the image below.

31a
31b

Step 32

OK, we're now going to start adding some drawn elements. Open some of the elements you want to add to our canvas, and Press Ctrl+I to invert the color. Put them above the Wall group, set the Blending Mode to Screen and lower the Opacity down.

32

Step 33

Now we're reaching the final of this tutorial. As for the final touch, flatten all the layers down and go on the top of Layers Panel and add a Color Balance and Levels adjustment layers with the settings as shown below. This will unify the illustration and blend the color together.

Refer to step 6 to create a vignette effect to focus the attention on the center of the image. Now duplicate the layer, press Ctrl+U to desaturate the color, then go to Image > Adjustment > Shadow/Highlight and leave the settings as it is. Set the Blending Mode to Soft Light and the Opacity to 30%.

Next, to add a bit of contrast and keep the edge details, just duplicate the layer again, go to Filter > Other > High Pass and set the Radius to 3.0. Then set the Blending Mode to Overlay with the 30% Opacity.

Lastly, add a Hue/Saturation Adjustment Layer on top of everything, and set the Saturation to +5.

33a
33b
33c
33d

Final Results

Final

Download the PSD

[vc_column width="1/1" el_position="first last"] [vc_cta_button title="Download" href="https://downloads.photoshoptutorials.ws/Caricature.zip" color="btn" size="btn-large" icon="none" target="_self" position="cta_align_right" call_text="Caricature.zip | 45.0 MB" width="1/1" el_position="first last"] [/vc_column]

Tutorial by Ariga Yada

Thanks for reading the tutorial. If you have any further questions, you can reach me on my Twitter.

- Ariga Yada

Download Free Presets
Sponsored

Download Lightroom presets and LUTs, absolutely free. Use the presets to add creativity and style to your photos.

12 comments on “Transform a Portrait Into a Caricature Artwork”

  1. Hello, your tutorial sucks. It gives no context to what I am actually doing, and it just expects me to know things not explained. I don't care about what you are going to say to this because my opinion is already formed that this tutorial is no good.

    1. 1. Create a new layer (Layer > New > Layer).
      2. Select the Elliptical Marquee Tool (Press Shift+M until the icon in the toolbar turns into a circular marquee).
      3. Go to Select > Modify > Feature. Set the Radius to 150px.
      4. Go to Select > Modify > Inverse.
      5. Press Shift+Backspace. Set the contents to black.
      6. Lower the current layer's opacity to 21%.
      7. Duplicate the layer by pressing Ctrl+J (Cmd+J on Macs).
      8. Go to Edit > Transform > Scale. Scale it up by around 137% or larger.
      9. Lower the current layer's opacity to 41%.

Leave a Reply

Your email address will not be published. Required fields are marked *

cross