Photoshop makes it easy to pixelate with the mosaic filter but it’s boring and overused. Thankfully, there’s an easy trick that lets you pixelate using triangles instead of squares! This tutorial is incredibly easy so give it a try.
Final Results


Step 1
Start by opening any photo you want into Photoshop. You should resize the image to your final output size before you continue. This is the photo that we’ll be using.

Step 2
Duplicate your background layer twice.

Step 3
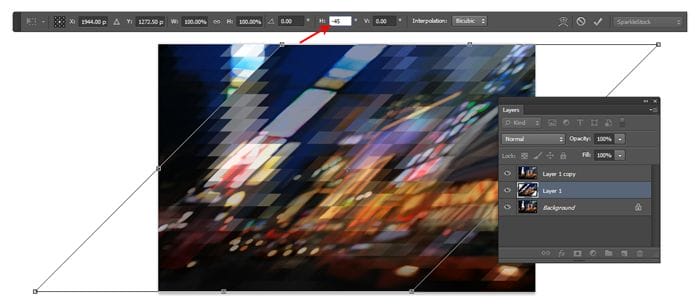
Activate the Transform tool (Ctrl/Cmd+T or Edit > Free Transform) then set the horizontal skew value to 45º. The horizontal skew setting is located in the options bar when you have your Transform tool activated. Press Enter to apply the transformation.

Step 4
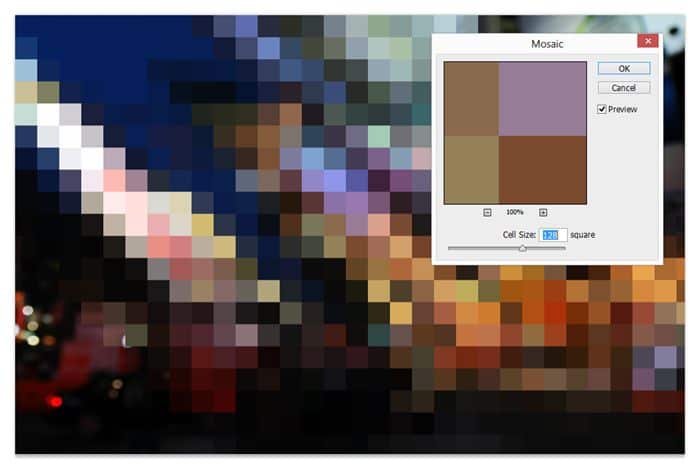
Go to Filter > Pixelate > Mosaic. Adjust the cell size setting to anything you like then click OK.

Step 5
Next, we’re going to transform it the opposite way. Activate the Free Transform tool (Ctrl/Cmd+T or Edit > Free Transform) then set the horizontal skew setting to –45º. Press enter to apply the transformation.

Step 6
Set this layers opacity to 50% then select the middle layer. We’re going to be doing the same steps but with transformations done

Step 7
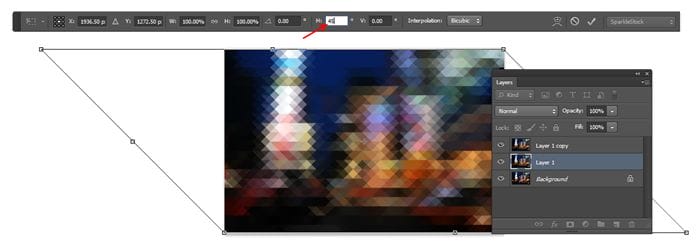
With the middle layer selected, activate the Free Transform tool (Ctrl/Cmd+T or Edit > Free Transform) then set the horizontal skew to –45º.

Step 8
Apply the same mosaic filter again. You can do this quickly by pressing Ctrl/Cmd+F or by going into the filter menu and selecting the first filter in the menu. Photoshop automatically places your last used filter on the top of this menu.

Step 9
Use the Free Transform tool (Ctrl/Cmd+T or Edit > Free Transform) to transform the layer back to its original shape by setting the horizontal skew value to 45º.

Step 10
We’re pretty much done but if you zoom, you can see that the edges don’t really line up. To fix this, press the left or right arrows on your keyboard to nudge the layer until the intersections align.


Here’s how the image looks like so far.

Final Results
If you’ll be using this as a background, you might want to apply a faded/vintage film effect. We used the Vesper effect from the Instagram Video Photoshop actionsand completed the look with some text using the Abolition font.
39 responses to “Quick Tip: How to Create a Triangle Pixelation Effect in Photoshop”
-
Help me. How can I make the triangles align so I can make this into a Photoshop action?
-
Thank you
-
I was looking for a perfect mosiac tutorial as I always turn the picture too blurry. This tutorial helped me a lot to understand how it actually works. The tutorial is broken down into several parts which helped me to deeply understand everything. Thanks to you for making such amazing tutorials.
-
Thank You for sharing such a nice article. Worth reading it.
-
awesome..
-
Amazing photoshop tutorial.Thanks for sharing with us.
-
Very effective photoshop tutorial.
-
You are the best !!!
-
i like that really
-
very cool i like that
-
great! easy n effective result.
-
Hi .. im apparently using cs3 .. it is possibly to that kind of output on cs3 ..?
-
Wonderful tutorial..Thanks for sharing.
-
awesome
-
Great, thks for sharing
-
Old tutorial but still amazing. Thanks!
-
If anyone is any smart, they wouldn’t think this is any good, its cheap JUNK with no texture. It isn’t possible for a “professional” to create these scrubby creations.
Must be a bunch of kids, looking for something to do besides digging holes.
-
Really Impressive !
-
Great tutorial, great effect.The look like really befitting & attractive.
-
Wow… so easy and so nice effect. Thank you!
-
Really great. I’m going to try this tonight.
But aside from the tutorial, is there a way you can use that Before/After slide affect on other sites? It’s really great. Awesome presentation. -
Very informative, thanks for sharing, it helps a lot.
-
Nice Thanks For This neat trick
can you tell me where to get the pic effect to slide from side to side viewing 2 images in the same frame :D
& Thanks -
I’ve applied this technique to all kinds of images since reading this tutorial! I look for certain colors for a look I want, or whatever. Most are really quite a surprise! Good surprise! Never knew this ‘design’ was so easy! Thank you very much!
Su
-
thanks dear for giving a new piece of effect in desiging its is easy and effective. i like your tutorial
-
Tnx for share..
-
Thanks a lot. I hope understand.
-
-
Thank you. Excellent effect and very simple.
-
They look like really wonderful. I have one web page and I want to use this kind of effect for my page pictures. Can somebody look my page for give to me one idea? this is my page. Really I need to take attention from peoples. Please help.
-
Great results from this tutorial. thnx!
-
it didn’t work
-
Great tutorial, great effect. Easy to turn into an action as well. Thanks.
-
Could you possibly share that action? Would be a huge time saver!
-
Sure thing! We just made it into an action and you can find it here: https://www.photoshoptutorials.ws/downloads/photoshop-actions/freebie-pixelate-pixelator/
-
wow
I’ve read your tutorial regarding to create triangle pixelation effect in photoshop and its was really amazing!
Really fantastic… thx 4 share
-
Woow amazing tip and so easy! thanks a lot!


Leave a Reply