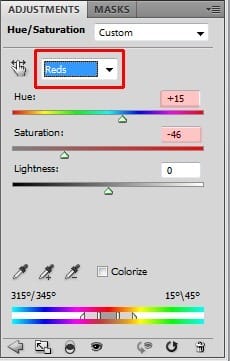
KNIGHT is too saturated and too red which doesn´t fit to the rest of the image. To fix it add new adjustment layer Hue/Saturation and set it as shown below.

Step 9 – Global Color Adjustment
It´s time for some more color adjustments. The manipualtion would look better with higher contrast. To increase it add new adjustment layer Levels on the top of all layers and set the Input Levels on 14; 1,00; 250.
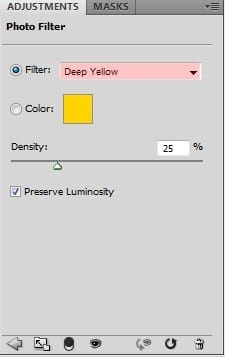
The picture would also look better with more yellow tones. You can easily add them by adding adjustment layer Photo Filter on the top of all layers. Choose Deep Yellow Filter.

Step 10 – Cropping
It shows up that the square format of the picture doesn´t work very well for this picture. It would look better cropped. To do that grab the Crop Tool (C), set the Width on 2 cm and Height on 3 cm and crop it.

Step 11 – Final Touch
There are two more things which need to be done before finishing the picture – adding vignette and shaprening.
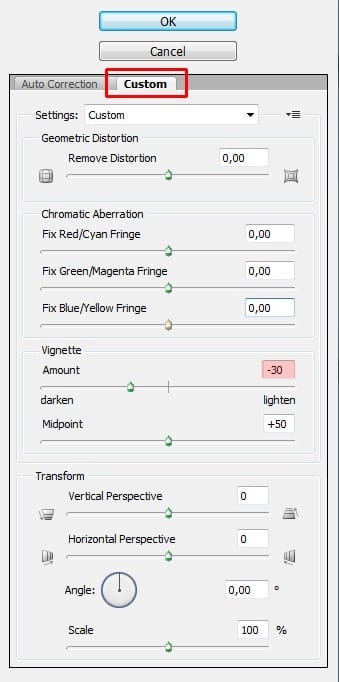
Let´s begin with vignette. Add new layer on the top of all layers and name it VIGNETTE. Grab the Brush Tool (G) and fill it with solid white color. Now go to Filter > Lens Correction (the path may vary in different versions of Photoshop, if you can´t find it simply press Shift + Ctrl + R on your keyboard) and set the window as shown below.

Change the Blending Mode of this layer on Multiply.
To sharpen the image press Ctrl + A to select the whole picture and then Ctrl + Shift + C to copy it merged. Paste the merged image on the top of all layers and name it SHARPENING. Go to Filter > Other > High Pass and set the value Radius on 1,0 pixel. Press OK and change the Blending Mode of this layer on Overlay.
One last thing – move with the BOOK and BOOK SHADOW under the boys hand. It will look better.
Final Results
![preview[1] preview[1]](https://cdn.photoshoptutorials.ws/images/stories/743ec1ea8469_2C1B/preview1.jpg?strip=all&lossy=1&webp=82&avif=82&w=1920&ssl=1)
Download the PSD
Blending in Photoshop.zip | 3 MB
Authors Comment
3 responses to “A Photo Manipulator’s Guide to Blending”
-
Lol
-
can you give a video tutorial please :3
-
110% work, thanx for inpiration


 Congratulation. You’ve just finished the tutorial. I really hope that it was useful reading for you, that you’ve discovered new ways of blending images and learnt some new methods of adjustment. I´d love to see links on pictures created based on this tutorial in the comments! You can see more Photoshop tips written by me on
Leave a Reply