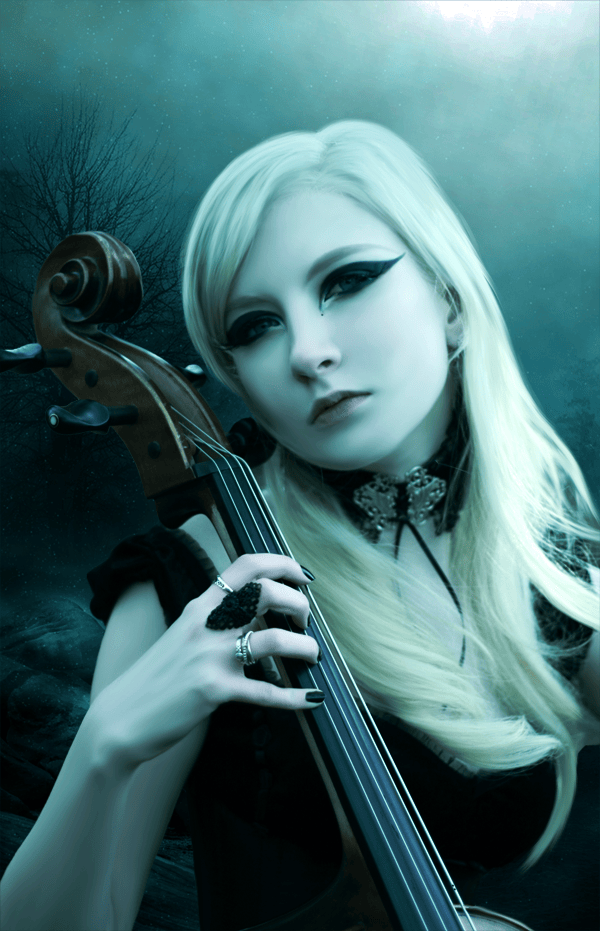
This is so far the result after smudging skin and hair.

Step 5 – Adjusting Colors
Add a Hue/Saturation Adjustment layer (only for the lady):
Red (Saturation -45) Yellow (Saturation -28)

Add a Color Balance Adjustment Layer (only for the lady):
- Shadows: -20 +4 -8
- Midtones: -12 +13 +9
- Highlights: -19 +2 0

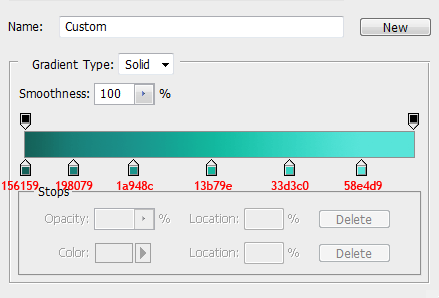
Add a Gradient Map Adjustment Layer (only for the lady) (Set to Overlay – Opacity 80% – Fill 80%)

And you’ll have this:

Add a Gradient Map Adjustment Layer (for the whole manipulation, above everything) (Soft Light – Opacity and Fill 50%)

and you’ll have

Step 6 – Light behind the lady
To fit the lady inside our work let’s add some light behind her. Create a layer under the lady. Take a soft white brush and paint close to the edges.

Apply Gaussian Blur (I used 100px). This is the result.

Step 7 – Stars
Create a layer below the one you just made for the light behind the lady. Put here the Stars (Fireworks) stock. Now press CTRL+T to scale the image, rotate it (90 CW), and flip it horizontally.

Set the layer to Screen – Opacity and Fill 80%. If you look you will see that the edge of the image is visible. Select the Eraser Tool and choose a soft brush to delete this line (I chose 150px with Opacity 40%)

Add a Curves Adjustments Layer above the Stars. Put ‘Increase Contrast’ from the presets and set the layer to Luminosity. Then add a Brightness/Contrast Adjustment Layer with Brightness -10 above everything.

This is what we have right now.

Step 8 – Moon
Create a layer below the Lady. Load the Moon brushes and paint with white color the moon (I deleted the left part of the moon because I didn’t like it).

Step 9 – Desaturation
Add a Hue/Saturation Adjustment Layer and set Saturation at -15.

Step 10 – Lights
We need to add some light now and we are going to do it with two layers. Let’s start with moonlight. Paint some rays of light from the moon to the lady with a hard round brush using a light color (not pure white). Apply Gaussian Blur (65px) and set the layer to Soft Light – Opacity and Fill 80%

Create another layer and set it Soft Light (Opacity and Fill 70%). Pick the color #96dce0 and paint some lights at the bottom of the manipulation. (Below you can see where exactly). This time you have to use a soft brush since we’re not going to add any blur.
11 responses to “Create a Emotional Midnight Photo Manipulation with Painting-Like Effects”
-
Amazing work.. Loved it
-
That’s good!Thanks for sharing
-
Your image works beautifully with the mask Nancy!Thanks for sharing.
-
Thanks this is the result of this tutorial!
-
I agree with alicia, in the last part of the tutorial, many
passages was not specified in which layer we have to apply the layers/effects. Another thing I notice is that, even if
I downloads the lady photo from the same link,
my image have a bad resolution compared to the photo of the lady of the tutorial.. is very strange, I wish I could work with the same picture’s quality of this tutorial…
someone have notice this too?
But thanks for this tutorial, I really enjoy it ! -
Thank you so much for this tutorial! Very helpful and easy to follow even for beginners!
-
Hey guys there is a video of the tutorial on youtube showing you in a video format, you can have best of both worlds with the written and video, all respects payed to the creator.
Link to the video is: https://www.youtube.com/watch?v=bzIvBfJsj-g
-
The only problem I have with this is when you went to step 12 Dodge and Burn , You didnt state if that layer is behind the lady or on the lady or what
-
Who cares? And cellist play left handed as well. Rare as it is it happens.
-
way, way cool. I do gratus work for friends who cant afford the high cost of student photography. I always look for something that sets the bar higher for the underprivledged families I help. I want them to get a unique photo set others would pay highly for. This tut will go far for some of the folks Im helping. Thank you, and Lord bless you.


Leave a Reply