
Use the Burn Tool (O) for create shadow and Dodge Tool (O) to create a light and shadow. Set the settings to each tool like shown in the image below. On this layer draw light and shadow, in accordance with the weather conditions, view a specific location (such as yellow trees. They look too bright). Especially pay attention to the lotus flowers. To facilitate your task, use the gray image and retry the shadows and light (you will not have an image in gray) in my example. Use different size brush to darken the big places.


Here is my result. I made the picture more contrast in the sky temple roof and yellow trees. Lighten very dark areas in the mountains and places for future light.

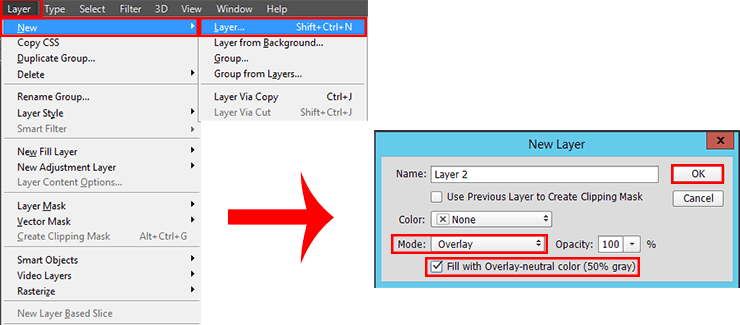
Step 33
Now introduce some dark tones to the mountains to make them more realistic, and the contrast. Use Soft Round Brush with Size: 300px, Hardness:0% Opacity: 100%, color #253647. Draw a spot on a a mountain in the middle of the image, the woods on the left and right, on the yellow trees. Layer Opacity: 20%. For Second layer use same brush but change Size: 850px and color #253547. Draw a spot between Huangshan and Patagonian mountains. Layer Opacity: 35%.

So work with the mountains over. Now a bit of light and mist I added on lotuses (Size: 300px, Opacity: 50%, color: # f5e4c3). Draw spots on the middle left edge and at the seam of textures. Layer Opacity: 15%.

Step 34
Create the sun and light effects from it. Create a new layer, set background color to black (press D, then X on keyboard) and fill layer (Cmd/Ctrl + Del). Convert this layer for Smart filters (Filter > Convert for Smart Filters) Add a filter “Lens Flare…” (Filter > Render > Lens Flare…). Set Lens type: “105mm Prime” and Brightness: 50%. Try to position flare on the edge of the mountain on the right side. Not much close to the edge of the document and not much higher than the mountains. That is why comfortable convert layer for Smart filters, double-click on the filter and you can change all settings :).
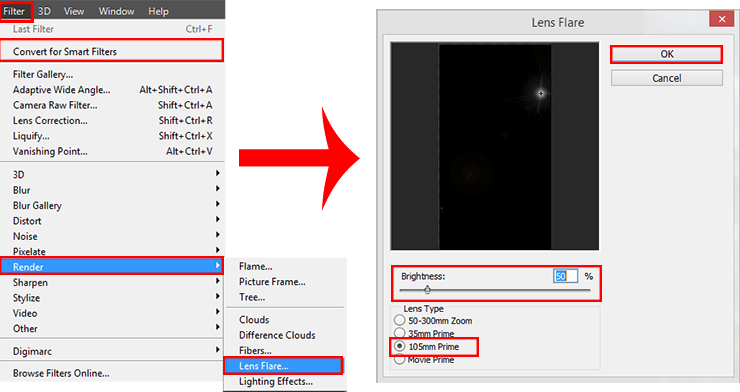
Duplicate flare layer (Cmd/Ctrl + J) and change Lens Type to “50-300mm Zoom” and Brightness: 40%. Do not change the position of the flare, not to get the wrong form of the sun.
31 responses to “How to Create a Mysterious Matte Painting Landscape in Photoshop”
-

AAAA Amazing
-
also me
-
This looks so cool. You know what would make it even better?? ATMOSPHERIC PERSPECTIVE. But that can be a personal job for readers. Nice work
-
this is good thanks
-
kms
-
this actually sucks
-
this sucks
-
bro I be watching dr duke all day keep up the amazing vids man
-
-
good job!
-
Great!!
-
That’s the most hideous photo that I have ever seen.
-
perfect
-
“an amazing” NOT “a amazing” !
-
takes to long
-
Great tutorial! I’ve learned a lot. Here is my outcome: http://oi66.tinypic.com/2a5gqbr.jpg
Thanks
-
Possibly the best tutorial I have done. Absolutly awesome image, and I love the way you explain how you see it & why. It is like a noval.
Please do more ! -
Thanks you! Maria
I had finished this tutorial.
Amazing!!! -
Thanks for sharing…. :-)
-
Nice
-
Amazing tutorial, now I have to go back and do the rest of your stuff. :D
A tip for Step 38: just select your top layer, go to Edit -> Select all (ctrl/cmd + A)
then Edit -> Copy merged (shift + ctrl/cmd + C)This will copy all the visible layer (inside your selection), now you just have to paste it,
Edit -> Paste (ctrl/cmd + V) or Paste special -> Paste in place (shift + ctrl/cmd + V).
-
wow, what a wonderful great tutorial.
Very well explained so even a “beginner” to work with.
Thank you also for the material and links to the trouble to write it all. Once again, simply grandiose.
Kind Regards-
Easy to follow. But I have some problems with making it exactly the same you have showed. I would have to search in http://google.com for photoshop basic tools documentation.
However, thanks!
-
-
awesome
-
Absolutely georgeous.
-
Nice
and AMAZING! -
TAKES SO LONG, but the outcome is amazing!
-
one of the finest…what a refreshing work to see..
-
Near to natural !
-
wooow!!!
it’s so realistic pic -
great work, i like it :)
-
this is great i love and need turt specially on building back grounds and Invirements
Leave a Reply