
Step 35
I painted some orange tones on the flares to give some vividness. Create two new layers. One front flare layers with light color # f2ecc6 (layer Opacity: 27%) with dark color # f2d9b1 (layer Opacity: 15%) behind the flares (Soft Round Brush, Size: 500px, Opacity: 100%). Try make that brush center and flare match, then the form will be better.

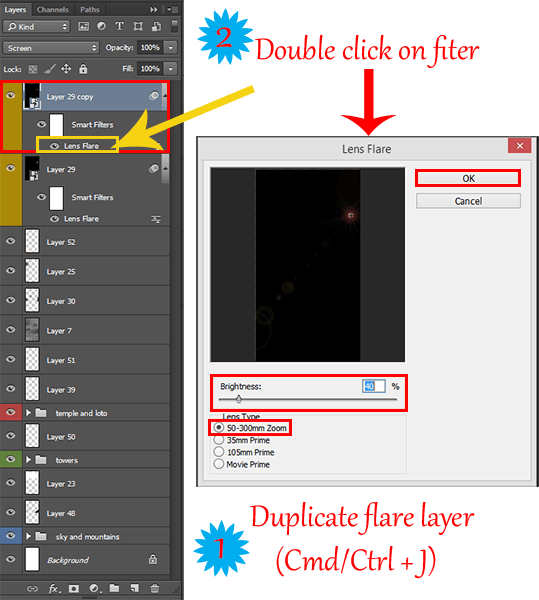
Step 36
Create a new layer. Take Polygonal Lasso Tool (L) and draw a shape similar to a wrong crystal or just a way of movement of the sun rays (Sun – roof of left tower – right towers – sun). Fill this figure with color #ffedba, deselect it (Cmd/Ctrl + D). Go to Filter > Blur > Gaussian Blur… Set Radius: 200px. Done! Set Opacity for this layer 40%.


Step 37
We make the rays of the sun by using Photoshop filters. Fill black color a new layer. Go to Filter > Render > Fibers. In dialog box set Variance: 20, Strength: 20 and click OK.
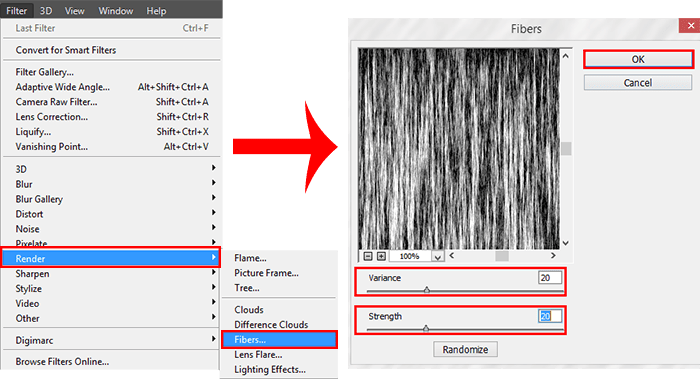
Rotate this layer on 39 degrees (Cmd/Ctrl + T or Edit > Transform > Rotate). Set Blending Mode “Screen” and Opacity: 15%. Add a layer mask and with soft brush remove all except the space in the center of the image, where we did the incident light. A little more to add to the mountains and the sky (just do not overdo it).

All layers of the sun safely hidden in the yellow group with same name :). It remains to improve the clarity of small details and do a little color correction.

Step 38
Please make the correction of noise and sharpness. You have two options for how to do it. You can merge all the layers now (Cmd/Ctrl + Shift + E) (without the possibility of returning to the layers. In this case you will have to make a duplicate of this layer) into one or duplicate them (Cmd/Ctrl + J), and then will merge it (Cmd/Ctrl + E). In any case (I chose the second option) convert layer for Smart Filters and add Filter “Reduce noise”.
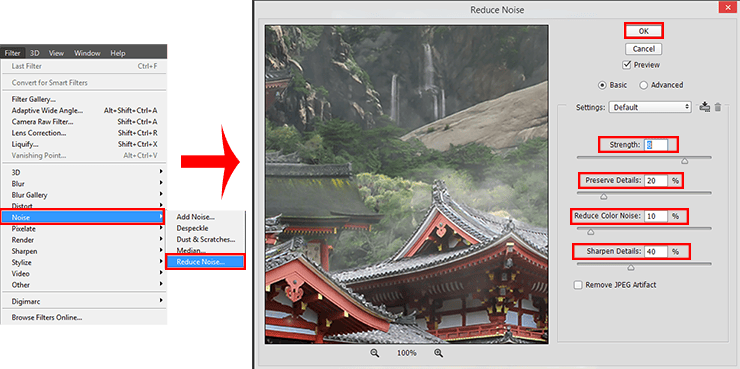
And add a second filter – “Sharpen” (Filter > Sharpen > Sharpen…). Nothing happens, but in Layer panel, on this layer appears “Sharpen”. Make double-click on settings icon on the right-side; in window, that appears, set Opacity: 55%.
31 responses to “How to Create a Mysterious Matte Painting Landscape in Photoshop”
-

AAAA Amazing
-
also me
-
This looks so cool. You know what would make it even better?? ATMOSPHERIC PERSPECTIVE. But that can be a personal job for readers. Nice work
-
this is good thanks
-
kms
-
this actually sucks
-
this sucks
-
bro I be watching dr duke all day keep up the amazing vids man
-
-
good job!
-
Great!!
-
That’s the most hideous photo that I have ever seen.
-
perfect
-
“an amazing” NOT “a amazing” !
-
takes to long
-
Great tutorial! I’ve learned a lot. Here is my outcome: http://oi66.tinypic.com/2a5gqbr.jpg
Thanks
-
Possibly the best tutorial I have done. Absolutly awesome image, and I love the way you explain how you see it & why. It is like a noval.
Please do more ! -
Thanks you! Maria
I had finished this tutorial.
Amazing!!! -
Thanks for sharing…. :-)
-
Nice
-
Amazing tutorial, now I have to go back and do the rest of your stuff. :D
A tip for Step 38: just select your top layer, go to Edit -> Select all (ctrl/cmd + A)
then Edit -> Copy merged (shift + ctrl/cmd + C)This will copy all the visible layer (inside your selection), now you just have to paste it,
Edit -> Paste (ctrl/cmd + V) or Paste special -> Paste in place (shift + ctrl/cmd + V).
-
wow, what a wonderful great tutorial.
Very well explained so even a “beginner” to work with.
Thank you also for the material and links to the trouble to write it all. Once again, simply grandiose.
Kind Regards-
Easy to follow. But I have some problems with making it exactly the same you have showed. I would have to search in http://google.com for photoshop basic tools documentation.
However, thanks!
-
-
awesome
-
Absolutely georgeous.
-
Nice
and AMAZING! -
TAKES SO LONG, but the outcome is amazing!
-
one of the finest…what a refreshing work to see..
-
Near to natural !
-
wooow!!!
it’s so realistic pic -
great work, i like it :)
-
this is great i love and need turt specially on building back grounds and Invirements
Leave a Reply