
Step 26
Add the sky in working document “Sky_17_by_sacral_stock” and position it so that the bottom edge completely disappeared behind the mountains. Make a copy of this layer (Duplicate layer Cmd/Ctrl + J) and place it before mountains layer and move it a little higher ( to approximately half the height of mountains and taking into account the color of the sky to make the transition of colors). Add a layer mask to duplicated layer and remove some sky to make visibility foggy mountains. Use Brush tool (B) (Size: 60-150px, Hardness: 0%, Opacity: 20-65%) to create a soft overlay of clouds (it strongly affects to realism).


Step 27
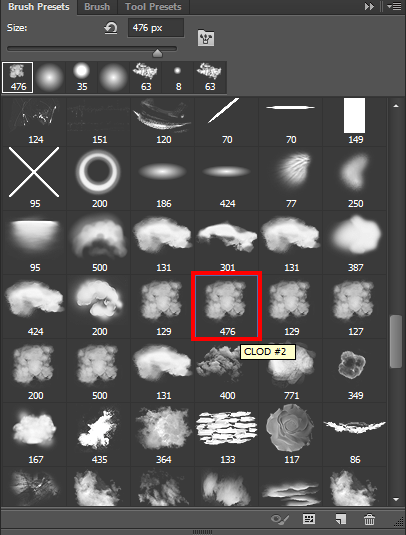
When you align the sky, you can add a little fog in the bottom of the mountain to separate plans, create depth and perspective. Load Brushes “effects_brushes_by_vincdesign-d4mwjs4” in Photoshop create a new layer (Cmd/Ctrl + Shift + N) above the layer with the highest mountain and make it as Clipping Mask. Use brush “CLOD #2” (Size: 300px, Opacity: 60%) from this pack and set foreground color # 000000 Black (press D on keyboard) and draw on left side of the mountains to make shadow from clouds. Set Opacity: 22% for this layer.

Step 28
Create a new layer (Cmd/Ctrl + Shift + N) make it as Clipping Mask in this time use foreground color: White (press D, then X on keyboard) and draw between the two main mountains to create depth. Set Opacity: 29% for this layer.

Now add two new layers beneath Huangshan Mount. On the first layer draw fog with the bottom of the mountains and a little higher (Brush Tool (B), Size: 200px, Opacity: 100%; brush does not change – “CLOD #2”, color – White). Set Opacity: 25% for this layer. For the second layer, repeat the same, but use layer Opacity: 33% and paint fog slightly lower.

Step 29
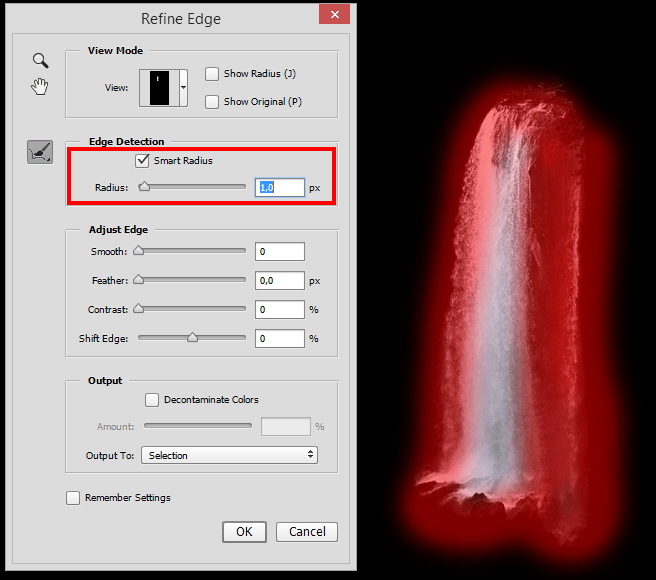
Create a new group under group “Towers” and add on it image of waterfall “Waterfall___Full”. Select waterfall, used Quick Selection Tool (W) and on Refine Edge remove all unnecessary with brush, set Radius 1.0px. Add a layer mask.
Use Transform Tool (Cmd/Ctrl + T) to resize, stretch different sides more or less, flip the waterfall horizontally. Duplicate waterfalls ((Cmd/Ctrl + J ) make it easier, use Opt/Alt + Move Tool (V)) and modify them to make them a lot. Try siting them harmoniously. Most importantly, the top of the waterfall approached form the rock (aka waterfall will look dangling in the air). Add a layer mask to the group and with soft brush (Size: 100px, Opacity: 30%), make the distant mountains and ends of waterfall a bit transparent.
31 responses to “How to Create a Mysterious Matte Painting Landscape in Photoshop”
-

AAAA Amazing
-
also me
-
This looks so cool. You know what would make it even better?? ATMOSPHERIC PERSPECTIVE. But that can be a personal job for readers. Nice work
-
this is good thanks
-
kms
-
this actually sucks
-
this sucks
-
bro I be watching dr duke all day keep up the amazing vids man
-
-
good job!
-
Great!!
-
That’s the most hideous photo that I have ever seen.
-
perfect
-
“an amazing” NOT “a amazing” !
-
takes to long
-
Great tutorial! I’ve learned a lot. Here is my outcome: http://oi66.tinypic.com/2a5gqbr.jpg
Thanks
-
Possibly the best tutorial I have done. Absolutly awesome image, and I love the way you explain how you see it & why. It is like a noval.
Please do more ! -
Thanks you! Maria
I had finished this tutorial.
Amazing!!! -
Thanks for sharing…. :-)
-
Nice
-
Amazing tutorial, now I have to go back and do the rest of your stuff. :D
A tip for Step 38: just select your top layer, go to Edit -> Select all (ctrl/cmd + A)
then Edit -> Copy merged (shift + ctrl/cmd + C)This will copy all the visible layer (inside your selection), now you just have to paste it,
Edit -> Paste (ctrl/cmd + V) or Paste special -> Paste in place (shift + ctrl/cmd + V).
-
wow, what a wonderful great tutorial.
Very well explained so even a “beginner” to work with.
Thank you also for the material and links to the trouble to write it all. Once again, simply grandiose.
Kind Regards-
Easy to follow. But I have some problems with making it exactly the same you have showed. I would have to search in http://google.com for photoshop basic tools documentation.
However, thanks!
-
-
awesome
-
Absolutely georgeous.
-
Nice
and AMAZING! -
TAKES SO LONG, but the outcome is amazing!
-
one of the finest…what a refreshing work to see..
-
Near to natural !
-
wooow!!!
it’s so realistic pic -
great work, i like it :)
-
this is great i love and need turt specially on building back grounds and Invirements
Leave a Reply