

And now use Quick Selection Tool (W) select the sky, inverse selection (Cmd/Ctrl + Shift + I) and adjust mountains contour in Refine Edge (Cmd/Ctrl + Opt/Alt + R). Set Radius: 3.0px and, of course, “Smart Radius”. Use brush in this dialogue box to remove remaining sky in trees. And as always, add a layer mask :). And let me remind you that we are moving down through layers, so it will be lower layers.

Step 24
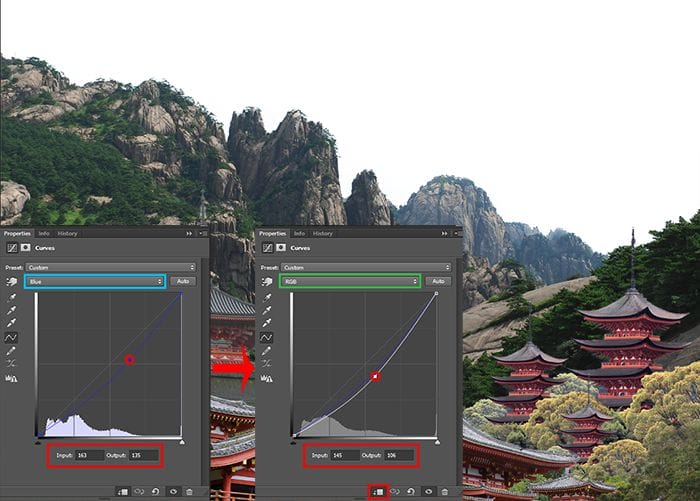
As you can see in this image (I mean the mountain) is dominated by blue tint, and distant mountains in general as much shine, so I corrected it with adjustment layer “Curves” (Layer > New Adjustment layer > Curves…). As blue on a mountains a lot, so we need blue channel; on it make one point with Input: 163 and Output: 135. In the process I turn down the brightness a bit. On RGB channel make one point with: Input: 145 and Output: 106. Don’t forget clip this adjustment layer.
Next, take a Brush Tool (B) (Size: 250px, Hardness: 0, Opacity: 50%,) set foreground color #111315, create a new layer (Cmd/Ctrl + Shift + N or use icon on Layer panel) and paint over too light mountains (they only). Make this layer as Clipping Mask (Cmd/Ctrl + Opt/Alt + G) and set Opacity: 25%. So much better. In this way we compensate a little bit of flare mountains and returned to their texture.

Now even small but important task. Hide all layers except duplicated mountain layer (eye icon next to the layer) and on layer mask, remove all except a small portion of the forest as in the image below. In Refine Edge set Radius: 1.7px (checkbox on Smart Radius), draw on the edges of forests. Place this layer above the layers with the mountain.


Step 25
It is time to add the last mountain in our work. Repeat Step 23 for image “patagonian_landscape_07_by_fuguestock-d76299x” the only difference that you need Flip Horizontal (Edit > Transform > Flip Horizontal) this image and place it so that only hide valley of the previous mountains (this layer below them) and leave most of the mountains visible.

Again the same problem with the blue, but this time we will reduce the color quite a bit. Add adjustment layer “Curves” (Layer > New Adjustment layer > Curves…) wit there settings: Red – Input: 121, Output: 129; Green – Input: 158, Output: 154; Blue – Input: 114, Output: 102.
31 responses to “How to Create a Mysterious Matte Painting Landscape in Photoshop”
-

AAAA Amazing
-
also me
-
This looks so cool. You know what would make it even better?? ATMOSPHERIC PERSPECTIVE. But that can be a personal job for readers. Nice work
-
this is good thanks
-
kms
-
this actually sucks
-
this sucks
-
bro I be watching dr duke all day keep up the amazing vids man
-
-
good job!
-
Great!!
-
That’s the most hideous photo that I have ever seen.
-
perfect
-
“an amazing” NOT “a amazing” !
-
takes to long
-
Great tutorial! I’ve learned a lot. Here is my outcome: http://oi66.tinypic.com/2a5gqbr.jpg
Thanks
-
Possibly the best tutorial I have done. Absolutly awesome image, and I love the way you explain how you see it & why. It is like a noval.
Please do more ! -
Thanks you! Maria
I had finished this tutorial.
Amazing!!! -
Thanks for sharing…. :-)
-
Nice
-
Amazing tutorial, now I have to go back and do the rest of your stuff. :D
A tip for Step 38: just select your top layer, go to Edit -> Select all (ctrl/cmd + A)
then Edit -> Copy merged (shift + ctrl/cmd + C)This will copy all the visible layer (inside your selection), now you just have to paste it,
Edit -> Paste (ctrl/cmd + V) or Paste special -> Paste in place (shift + ctrl/cmd + V).
-
wow, what a wonderful great tutorial.
Very well explained so even a “beginner” to work with.
Thank you also for the material and links to the trouble to write it all. Once again, simply grandiose.
Kind Regards-
Easy to follow. But I have some problems with making it exactly the same you have showed. I would have to search in http://google.com for photoshop basic tools documentation.
However, thanks!
-
-
awesome
-
Absolutely georgeous.
-
Nice
and AMAZING! -
TAKES SO LONG, but the outcome is amazing!
-
one of the finest…what a refreshing work to see..
-
Near to natural !
-
wooow!!!
it’s so realistic pic -
great work, i like it :)
-
this is great i love and need turt specially on building back grounds and Invirements
Leave a Reply