

Step 16
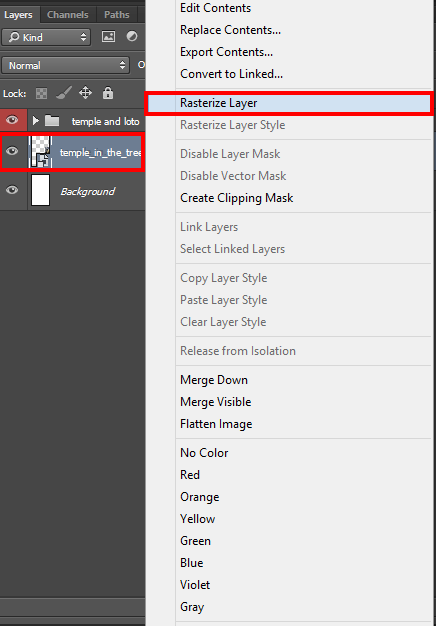
First, let’s remove the blessings of civilization in the form of cable throughout the tower. For do this, make right click on tower layer and select “Rasterize Layer”. Take a Clone Stamp Tool (S) (Size: 6px, Hardness: 0, Opacity: 100%) and very very carefully, paint over cable. The source of the cloning choose adjacent region to avoid differences in color. If you are careful and attentive, then you get everything perfect.

Step 17
Use Pen Tool (P) to circle the tower and trees. Make selection from path (right click on image > Make selection) and go to Refine Edge (Cmd/Ctrl + Opt/Alt + R). In Refine Edge Set checkbox on “Smart Radius”, Radius: 0.5px, Shift Edge: -10% (this option will help squeeze a little contour that will prevent possible unnecessary details). Use a brush in this window to clean the contour of trees. After all, add a layer mask to remove background. Small crossbar on both sides of the tower, I cleaned manually use small hard brush on a layer mask.

Step 18
Duplicate this tower two times (Cmd/Ctrl + J), resize each tower that all three towers are various sizes and place them side by side in harmony, closing the empty spaces and making landscape soft. Keep in mind that the last tower of the smallest and closes the absence of background and to resize proportionally (Ctrl/Cmd+T), hold Shift. It is very important to keep proportion and try to find for each tower right place.

Now add the last temple ( File > Place (Place Embedded), image “japan_vacation_XXV_by_mimose_stock”). After all the left edge of the image noticeably closer to the viewer, and if adding small tower can turn violation of the composition. Like all the previous times I recommend that you select the temple, using Pen Tool (P), make selection and add a layer mask. I decided to add a little larger building to balance perspective. Remove all the sky and mountains. In this case, the background is have not useful elements.

Step 19
The building is too dark for our purposes, so I added an adjustment layer “Hue/Saturation”. Go to Layer > New Adjustment layer > Hue/Saturation… or click on icon on a Layer panel). Set Saturation: +46, Lightness: +4. Be sure to clip adjustment layer to lower layer. So much better! Now go to a little tedious part, but a very short.
31 responses to “How to Create a Mysterious Matte Painting Landscape in Photoshop”
-

AAAA Amazing
-
also me
-
This looks so cool. You know what would make it even better?? ATMOSPHERIC PERSPECTIVE. But that can be a personal job for readers. Nice work
-
this is good thanks
-
kms
-
this actually sucks
-
this sucks
-
bro I be watching dr duke all day keep up the amazing vids man
-
-
good job!
-
Great!!
-
That’s the most hideous photo that I have ever seen.
-
perfect
-
“an amazing” NOT “a amazing” !
-
takes to long
-
Great tutorial! I’ve learned a lot. Here is my outcome: http://oi66.tinypic.com/2a5gqbr.jpg
Thanks
-
Possibly the best tutorial I have done. Absolutly awesome image, and I love the way you explain how you see it & why. It is like a noval.
Please do more ! -
Thanks you! Maria
I had finished this tutorial.
Amazing!!! -
Thanks for sharing…. :-)
-
Nice
-
Amazing tutorial, now I have to go back and do the rest of your stuff. :D
A tip for Step 38: just select your top layer, go to Edit -> Select all (ctrl/cmd + A)
then Edit -> Copy merged (shift + ctrl/cmd + C)This will copy all the visible layer (inside your selection), now you just have to paste it,
Edit -> Paste (ctrl/cmd + V) or Paste special -> Paste in place (shift + ctrl/cmd + V).
-
wow, what a wonderful great tutorial.
Very well explained so even a “beginner” to work with.
Thank you also for the material and links to the trouble to write it all. Once again, simply grandiose.
Kind Regards-
Easy to follow. But I have some problems with making it exactly the same you have showed. I would have to search in http://google.com for photoshop basic tools documentation.
However, thanks!
-
-
awesome
-
Absolutely georgeous.
-
Nice
and AMAZING! -
TAKES SO LONG, but the outcome is amazing!
-
one of the finest…what a refreshing work to see..
-
Near to natural !
-
wooow!!!
it’s so realistic pic -
great work, i like it :)
-
this is great i love and need turt specially on building back grounds and Invirements
Leave a Reply