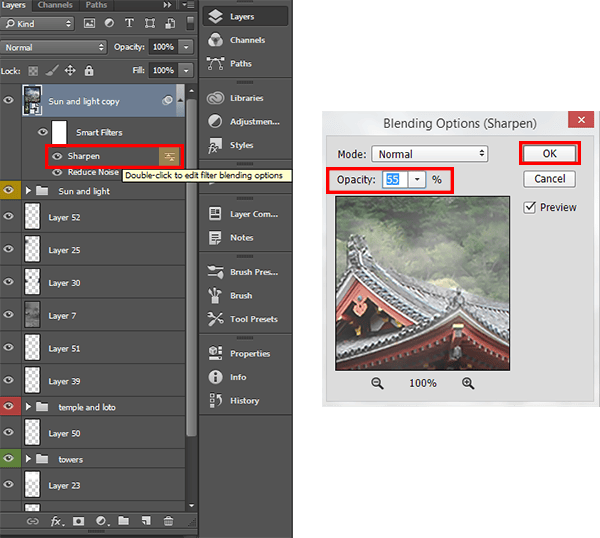
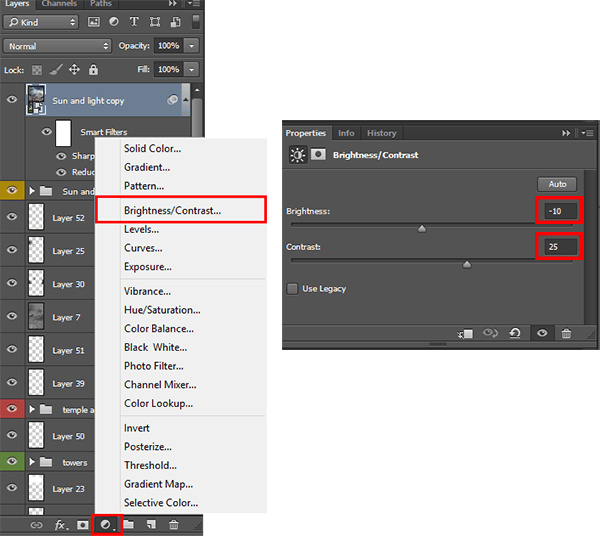
Step 39
As I promised to begin the correction. This is not the hardest part, but very useful and last. Now I will only add adjustment layers and the first to be a “Brightness/Contrast” (Layer > New Adjustment Layer > Brightness/Contrast… or click on icon on a Layer panel). Set Brightness: -10, Contrast: +25. Set Opacity for this layer 22%.
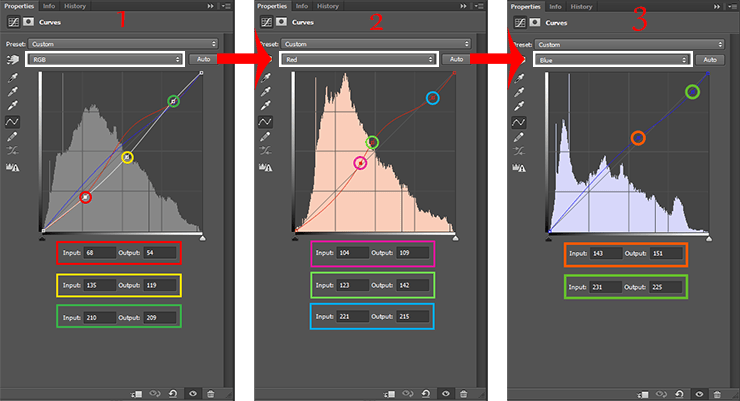
Step 40
Next adjustment layer is “Curves” (Layer > New Adjustment layer > Curves…). I increased the light and dark tones on the RGB, Red and Blue channels. Use the image below to accurately construct a curves. Opacity for this layer 43%.

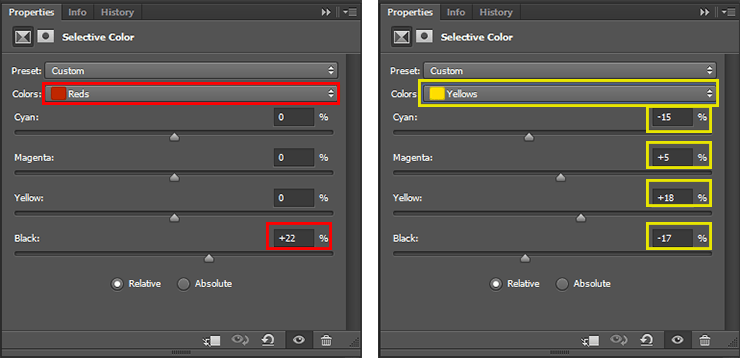
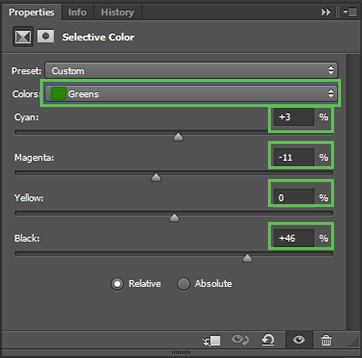
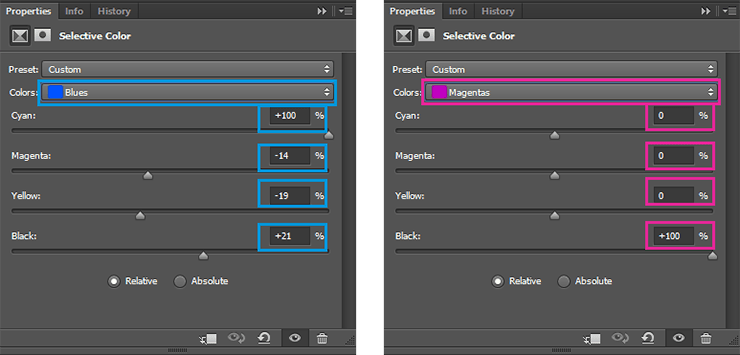
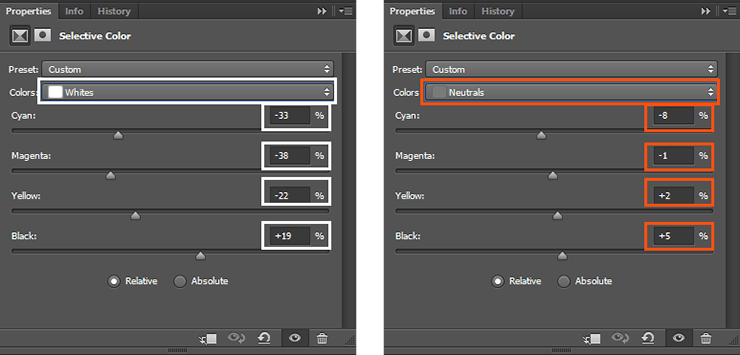
Step 41
Next adjustment layer is “Selective Color”. This layer will help me to change each color separately. Here and try to change the tone of almost all colors. It helped me to achieve a balance of color, and places such as yellow trees successfully fit into the picture. List a little big, so I ask you to take attention to pictures below.

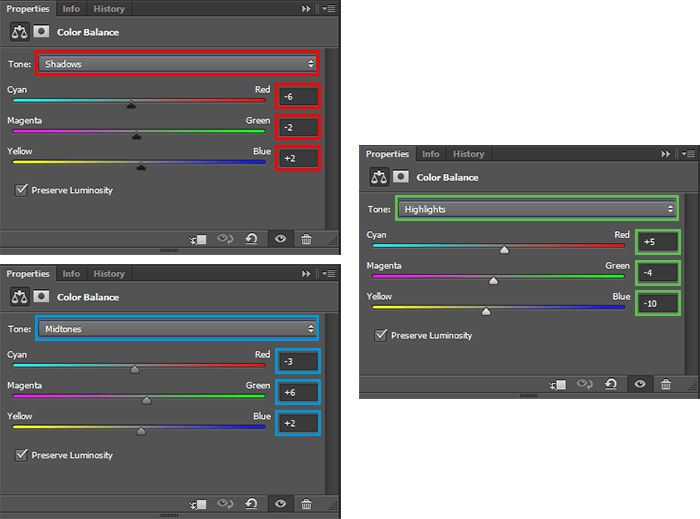
Step 42
That’s is the last Step and final adjustment layer “Color Balance”. Make settings as in image below. On this layer I balanced red and magenta tones on shadow, add these tones to highlights, to the midtones, I added a bit of blue and green. Opacity for this layer 82%.
Final Results
Done! I am satisfied with my result. I hope that you are satisfied your result too and have a good time. You can achieve great results by combining photos and painting. I hope you enjoyed it! Take a look at the final image.

Download the PSD
Tutorial by Maria Semelevich
Thank you very much for taking the time to study this tutorial! I hope you benefited it! I wish all lucked in your future achievements! I thank the authors of resources for their excellent work and good quality! Thank you very much! If you have questions or need help, please contact me. I look forward to your feedback and creative works! You can contact me by e-mail – [email protected] or Facebook Deviantart Behance. I am open to suggestions and cooperation! With best wishes!
– Maria Semelevich.
31 responses to “How to Create a Mysterious Matte Painting Landscape in Photoshop”
-

AAAA Amazing
-
also me
-
This looks so cool. You know what would make it even better?? ATMOSPHERIC PERSPECTIVE. But that can be a personal job for readers. Nice work
-
this is good thanks
-
kms
-
this actually sucks
-
this sucks
-
bro I be watching dr duke all day keep up the amazing vids man
-
-
good job!
-
Great!!
-
That’s the most hideous photo that I have ever seen.
-
perfect
-
“an amazing” NOT “a amazing” !
-
takes to long
-
Great tutorial! I’ve learned a lot. Here is my outcome: http://oi66.tinypic.com/2a5gqbr.jpg
Thanks
-
Possibly the best tutorial I have done. Absolutly awesome image, and I love the way you explain how you see it & why. It is like a noval.
Please do more ! -
Thanks you! Maria
I had finished this tutorial.
Amazing!!! -
Thanks for sharing…. :-)
-
Nice
-
Amazing tutorial, now I have to go back and do the rest of your stuff. :D
A tip for Step 38: just select your top layer, go to Edit -> Select all (ctrl/cmd + A)
then Edit -> Copy merged (shift + ctrl/cmd + C)This will copy all the visible layer (inside your selection), now you just have to paste it,
Edit -> Paste (ctrl/cmd + V) or Paste special -> Paste in place (shift + ctrl/cmd + V).
-
wow, what a wonderful great tutorial.
Very well explained so even a “beginner” to work with.
Thank you also for the material and links to the trouble to write it all. Once again, simply grandiose.
Kind Regards-
Easy to follow. But I have some problems with making it exactly the same you have showed. I would have to search in http://google.com for photoshop basic tools documentation.
However, thanks!
-
-
awesome
-
Absolutely georgeous.
-
Nice
and AMAZING! -
TAKES SO LONG, but the outcome is amazing!
-
one of the finest…what a refreshing work to see..
-
Near to natural !
-
wooow!!!
it’s so realistic pic -
great work, i like it :)
-
this is great i love and need turt specially on building back grounds and Invirements
Leave a Reply