Create a new layer and place it anywhere underneath the Small Planet layer.


And this is how your image should be looking like after all this painting:

Step 13: Adding the family
We’re going to draw the family in a new layer so start by adding a new layer to the top of our layer stack.

Load the people silhouette brushes we downloaded into Photoshop and select the family brush (highlighted below).

Set the brush size to 50px and draw a small family on the left side of our image.

Make a copy of this layer by dragging it to the “Create a new layer” button (or selecting the layer and pressing Ctrl/Cmd+J).

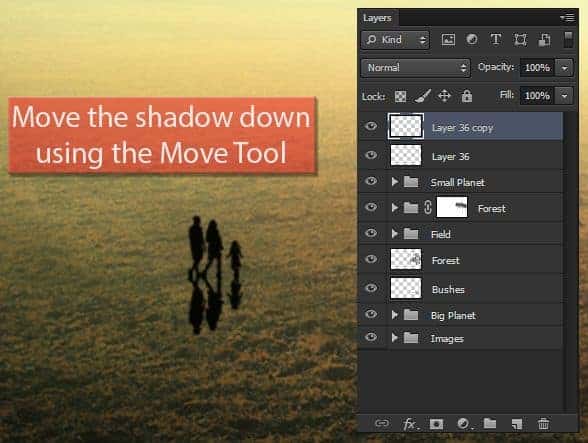
With the copy of the family layer selected, go to Transform->Flip Vertical.

Now use the Move Tool (Shortcut: V) to drag the shadow underneath the family.

Hit Ctrl/Cmd+T or go to Edit->Free Transform to use the Free Transform Tool. Right click inside the highlighted rectangle and chose Distort.

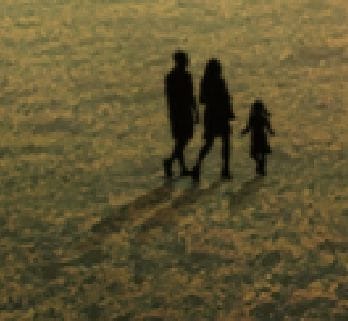
Now drag the bottom left and right corners a little bit to the left like shown in the image below:

Reduce the opacity of this layer to 50%.

And we have some shadows!

Now create a layer mask in the shadow layer by clicking on the “Add layer mask” button.

Using the brush tool (shortcut: B) with 0% hardness and opacity around 50%, paint with black the areas highlighted below:

The result should be a smoother shadow (more realistic).

And this is how your image should be looking like right now:

Step 14: Final Adjustments
Last step of our manipulation, let’s add some adjustments to improve the final result of our image. Start by merging all our previous layers using the shortcut Ctrl/Cmd+Shift+Alt/Opt+E. Remember to select the first layer in your layer stack before merging the layers.

Now apply a Gaussian Blur (Filter->Blur->Gaussian Blur – you should know that by now) in it, with a Radius of 60px.

Change the blending mode of this layer to Screen and reduce the opacity to around 20%.

Make a copy of this layer by dragging it to the “Create a new layer” button or using the shortcut Ctrl/Cmd+J.

Change the blending mode of this new layer to Multiply, and reduce the opacity to 10%.
16 responses to “Create a Mysterious Scene with Planets”
-
wow this is so emotionally amazing
-
How can I get the video tutorail
-
Very great job…………..keep it up :)
-
Hey great tutorial it help me a lot make this http://beauduval.deviantart.com/art/Clocks-425499015 thank you
-
HOW CAN I GET THE BIG BLUE PLANET AND THE BUSHES? I’M PRESSING ON THE RESOURCES BUT I CAN’T FIND THEM? KINDLY, REPLY FAST.
-
There’s no lighting effects for 64 bit systems :(
-
great stuff, thank you for sharing.
-
It says I have to buy the field image from the website. Is there anyway I could get it without a purchase?
-
When you are making custom brush, before you press define brush preset, do this – ( your shape will be automatically changed to grayscale mode when you’ll define it as brush preset) so go to black and white and adjust object cause you won’t have that opportunity after brush is created.
-
Hi, nice tutorial, but… I have one question.
How do you make the brush like you use in this tutorial?
it is almost without shape, some kind of transparency. Perfect to work with, especially this type of pictures.-
U open picture then go to Edit -> Define Brush
If its grayed out then image size it to 2500px max width & height -
Play with the opacity and brush shape. Make sure the hardness is at 0%. He is using a tablet I think, so unless you have a tablet also you will not be able to get the brushstrokes that perfect (at least, I couldn’t).
-
-
Very clear tutorial with some great techniques to learn from. Thank you.
-
good work
-
nice
-
Either the trees are too big or the humans are too small. Layers are messy too.


Leave a Reply