You will reach at this……

Do the same steps for the right side but move the control point towards the top side. Here you need not move all the points to the top guide as you did in the left side of the ribbon.

You will reach at this….

Press ‘Enter’ to apply the transform, then double click the ‘zoom’ tool on the tool box to return to the 100% view.

Now enter an amount in the little zoom box by which you can have a better view of the left side of the design.
And use the slider to move the view.

Then press ‘Ctrl+T’ and select ‘warp’.
Then move the horizontal control lines of the warp tool upwards.

Play with the sensitive tool to make the curve smooth and identical………

Stop when you are satisfied….
Do the same procedure to the right side but towards the bottom.

Make the curve smooth. You can use the ‘vertical control line’ to control the movement.

Keep an eye on the width of the shape………..

Now move the right end point of the shape to a little bit towards the centre.

Spend enough time to adjust the curve of the ribbon. Try to get perfect curves. You can move various control lines and points to make the curve perfect. If you are totally satisfied with the ribbon, then press ‘Enter’ to apply the transform and double click the ‘zoom’ tool to 100% view.

Voila, the hard part is over. In the next step we are going to create an effect using the ribbon.
Step 12 – Add a gradient effect to the ribbon
Ok now let us add some colour to the ribbon.
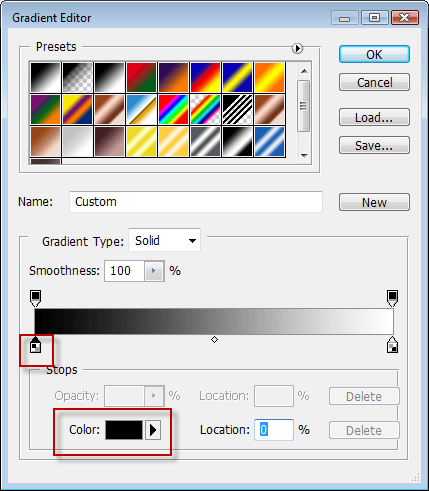
Select ‘gradient tool’ and click on the colour box in the tool bar.

Which opens the colour picker window.
Ok. There are two colour stops. The first colour stop and its colour are shown in red boxes.

We need some more colour stops.You can insert new colour stops by clicking anywhere just below the colour bar.

Now click to add four colour stops,

Click the first colour stop and change its colour to r-191,g-223,b-249

Then…for second colour stop-r-127,g-215,b-247
for third colour stop-r-171-g-229,b-250
for fourth colour stop-r-136,204,233
for fifth-142,216,248
for the last stop-195,229,250
Now we are going to change the location of each stop.
3 responses to “AVIAN Studios Logo”
-
merama ben şaban konak
-
Merciii bcp ; thanks a lot (Y)
-
I think you made some parts harder for yourself then it needs to be. You always have the center tool and low tolerance magic wand. :)


Leave a Reply