Learn how to create this graphic text wallpaper using a collection of graphics. This tutorial will teach you masking techniques, text editing, and using stock photography to enhance your work.
Preview of Final Results

Tutorial Resources
- Grass Photo – Dreamstime
- Paint Tossing – Media Militia
- Butterflies – Shoofly-Stock
- Aspidistra – WammyP
- Giant Ivy Leaf – Wammy P
- Flower Pack – Ailedda
- Yellow Flower – Pralinkova-princezna
- Flower Pack – Monika-es-stock
- Small Birds – Fairiegoodmother
Step 1
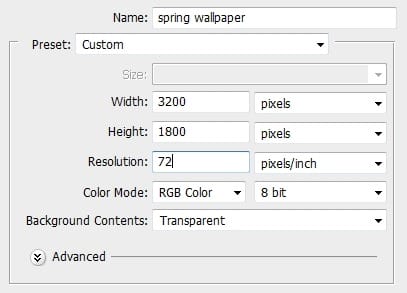
Open Photoshop. ChooseFile > New then create a document 3200px wide and 1800px high as we’re planning to make it 16:9 wallpaper size. Of course if you’ve got different display aspect ratio, you can as well pick for example 3200×2400 pixel workspace for 4:3. Remember to select Transparent background.

Step 2
We’re now going to create our base gradient background. In order to do that, select Layer 1, change it’s name to “background” (right-click on layer name, then select Layer properties and type it). Now click the Gradient tool (if it’s not visible on the main toolbar, go to Paint bucket tool, right-click it and go to Gradient tool).

Step 3
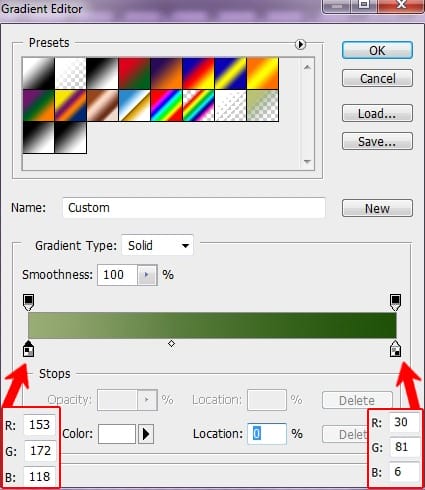
Click on gradient preview (from the Gradient Toll option Bar) and Gradient Editor window pops out. Click on the bottom left colour marquee under the gradient preview bar and enter RGB colour parameters: 153/172/118, then click on the right to marquee and make it RGB: 30/81/6. Click OK

Remember to pick radial gradient in option bar.

Step 4
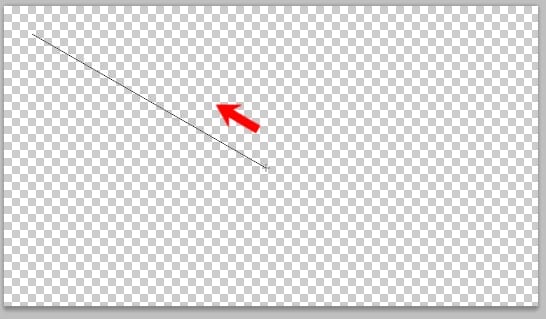
Now place the crosshair cursor in the centre of the image and draw a line towards the edge of the document. It should look something like this.

Step 5
In the layer panel, click on Create a New Group icon on the bottom, and name it “Spring”.


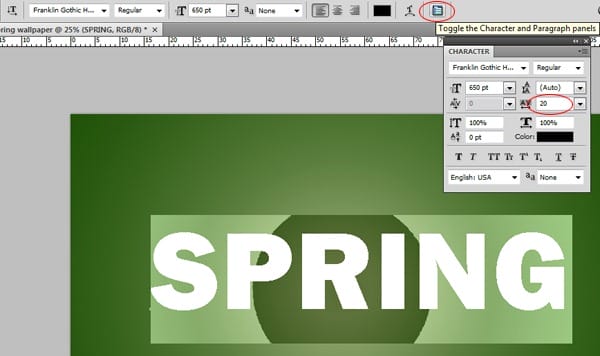
Then select the Text tool and place the cursor somewhere in the centre of the document, select “Franklin Gothic Heavy” (or other thick-style font style, for example Calibri with extra bold on) font style and 650pt font size, then type the word “SPRING”. Open the character menu, then highlight your text, and in the new window change the character spacing to 20.

Step 6
Now let’s prepare the grass image that will be the base of our grass effect. Open “grass_image.jpg” (in a separate document). As you see – there is a bottle in the grass. We don’t want it here (or do we? :) ). To get rid of it we simply have to select the Clone Stamp tool right-click on the document, choose round brush, adjust the diameter (250) and hardness (60%). Now you have to choose the source area to clone. To do that, simply click on some place where the grass is nice, pressing alt key at the same time. Now just cover the whole bottle with nice grass.
9 responses to “Spring Wallpaper”
-
While I appreciate this tutorial, I would have appreciated a heads-up about the amount of time it takes to mask out the tossed paint remnants. I’m in the third hour of doing that and I don’t see it finishing up very quickly. Well, I guess you get what you pay for!
-
Fix the stock file please :)
-
Finally we have images after a long wait! Thank you very much!
-
Voilà ce que ça donne http://sta.sh/01325gjin1j1
-
Voilà ce que ça donne http://sta.sh/01pcoera8h8j
-
Fix the images, please :(
-
Fixed! Thanks for letting us know about the broken images :)
-
-
why no image??!? plz fix ittttt its along time im waiting for it
-
problem on loading images… :( plz fix it


Leave a Reply