

Step 162
Make new Path with Pen tool (P) like in the photo . Right-click and select Make selection with Father 0,5 .

Step 163
Select Brush tool and set the brush size to 100px and color white , apply the color like me and set layer Blending mode to Soft Light .

Step 164
Make new Path with Pen tool (P) like in the photo .

Right-click and select Stroke path with brush and set the brush size to 10px and color white .

Step 165
Make new Path with Pen tool (P) like in the photo . Right-click and select Make selection with Father 0,5 .

Step 166
Select Brush tool and set the brush color to white and brush size to 80px apply the color like in the photo .Set the layer Blending mode to Soft Light .

Step 167
Make new Path with Pen tool (P) like in the photo . Right-click and select Make selection with Father 0,5 .

Select Brush tool and set the brush color to white and brush size to 80px apply the color like in the photo .

Step 168
Make new Path with Pen tool (P) like in the photo . Right-click and select Make selection with Father 0,5 .
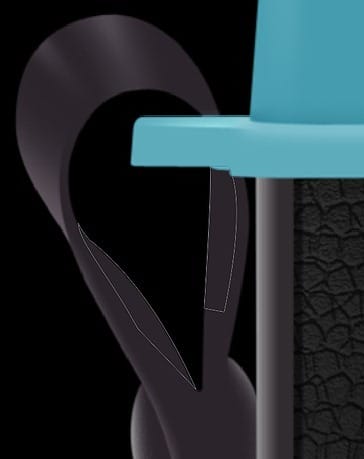
Step 169
Select Brush tool and set the brush color to white and brush size to 100px apply the color like in the photo .

Step 170
Make new Path with Pen tool (P) like in the photo .

Right-click and select Stroke path with brush and set the brush size to 11px and color white .Set layer Blending mode to Soft Light and Opacity 40%

Step 171
Make new Path with Pen tool (P) like in the photo . Right-click and select Make selection with Father 0,5

Press Shift+F5 or go to Edit-Fill and select from menu color and put the #211c21 color .

Step 172
Make new Path with Pen tool (P) like in the photo . Right-click and select Make selection with Father 0,5 .

Step 173
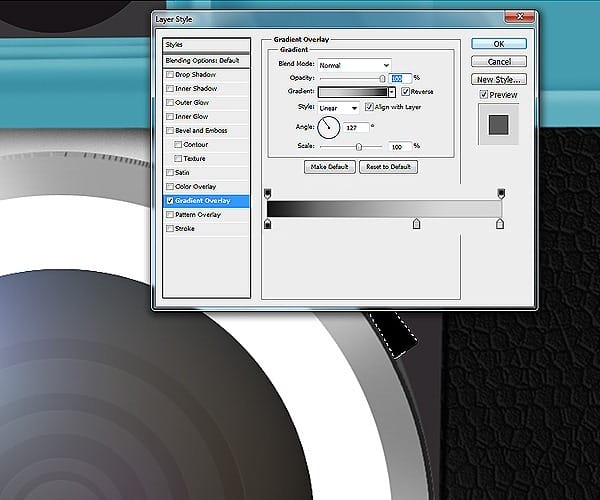
Press Shift+F5 or go to Edit-Fill and select from menu color and select the black color . Go to Layer – Layer Style – Gradient Overlay and use the setting show in the photo :
1 . Color #161616 Location 0%
2 . Color #c6c6c6 Location 64%
3 . Color #d7d7d7 Location 100%
Step 174
Make new Path with Pen tool (P) like in the photo . Right-click and select Make selection with Father 0,5

Press Shift+F5 or go to Edit-Fill and select from menu color and put the #262225 color .


Leave a Reply