Download Lightroom presets and LUTs, absolutely free. Use the presets to add creativity and style to your photos.
Create a new layer on the top of all layers and name it BIRDS. Grab the Brush Tool (B) and select one of the brushes you've just installed. Set the Master Diameter to its size fits to the rest of the image and change the Opacity on about 85%.
Press Alt to activate Eyedropper Tool (I) and pick some dark color from the picture. Then simply paint birds. That's it, as I said it's a very quick step.
Step 17 - Color Adjustment
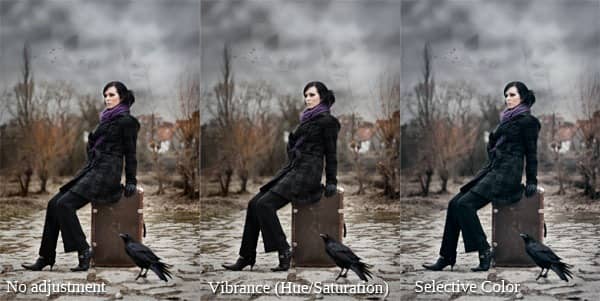
It's time to change color of the picture a little. With adjustment layer Vibrance and Selective Color you're going to make colors bit colder.
First add new adjustment layer Vibrance and set the value Vibrance on -20.
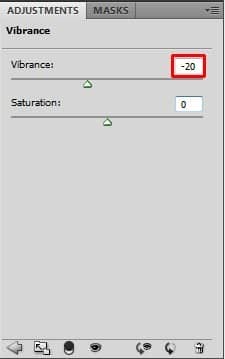
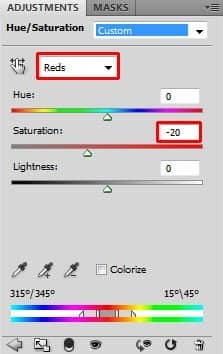
If you have some older version of Photoshop Vibrance adjustment layer may not be available there. It's in Photoshop CS3+ only I think. But don't be desperate you can do very similar adjustment if you add adjustment layer Hue/Saturation instead and set the value Saturation in Reds on -20.
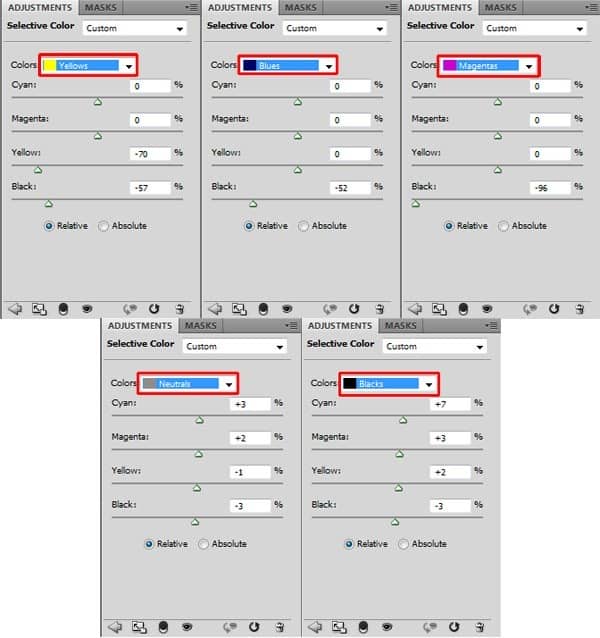
To add more colder tones to the picture add new adjustment layer Selective Color and set it as you can see on the following picture.
Let's take a look at how these two adjustments affect the image.
Step 17 - Highlights Lighter
In one of the previous steps you've already focused on making lights lighter. In this step you're going to do it again but with more attention paid to details.
This step would be easier and quicker if you can use tablet. But don't be desperate if you don't have it, it takes just little more time and practice to achieve the same effect.
Add new adjustment layer Levels on the top of all layers and set the Input Levels on 0; 3,65; 255.
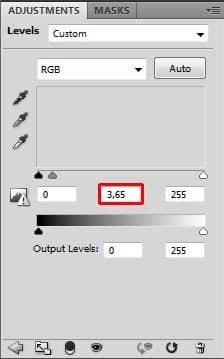
Change Blending Mode of this adjustment layer from Normal to Luminosity. This way only lightness of colors will be affected.

You want to adjust only selected parts of the image and not the rest. To hide the adjustment grab the Paint Bucket Tool (G), pick black color and fill the layer mask with it.
Then grab the Brush Tool (B), set the Master Diameter to 1 - 3 pixels, lower the Opacity on about 10% and pick white color. Start painting over areas with lights to make them even lighter.


9 comments on “How to Use Light and Shadow to Create a Dramatic Photo Effect with Photoshop”
Thank you so much for this tutorial. I've read many tutorials about all of the tools you mentioned in this article, but I was never able to really grasp or truly understand the concept behind the tool. You have explained them in a way that really make sense to me!! And that is very much appreciated!
thanks a lot
thanks very nice.
Woow! I am very very impressed about your tutorial. With all your stuffs, i have no doubt am gonna be a pro in photoshop!
thats a wonderfull tutorial....thank u....
thanks wow nice
plz post a video tutorial....
Yes girl, nice job. Thanx
What a fantastic tutorial, covering so many aspects of photoshop. I'm now even more excited to learn the program. . Thank you! thank you! thank you!