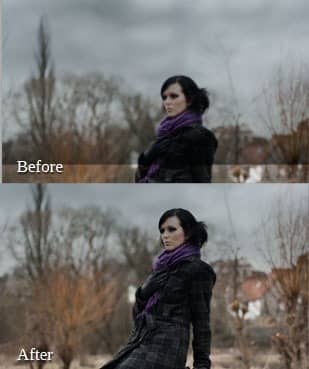
Turn any photo into a dot grid artwork with these Photoshop actions. You'll get great results with dots that change size. They get larger in brighter areas and smaller in darker areas. Free download available.

If you're not familiar with how you can work with layer masks let me explain it to you. It's similar to what can the Eraser Tool (E) do - you can hide some parts with it. But in compare to the Eraser Tool (E) you can let these parts reappear whenever you want. If you want to have some part hidden you simply paint with black on layer mask, if you want to see it again you paint white on that area. You can't do this with the Eraser Tool (E), you can go back few steps (depends on your History settings) but you always loose also the progress you did so far.
But back to the tutorial...
Grab the Brush Tool (B), pick black color and paint over the harsh line of the sky to make nice, soft transition. On the picture below you can get inspiration what to achieve.

Step 5 - Channels
Women's face is still darker because of the Multiply mode and if you look carefully you'll see that upper part of trees is bit darker because of that too. You need to create mask of which sky should be hidden.. To do that you'll use Channels.
First make the layer SKY invisible. To do that click on the eye icon left to the Layer thumbnail.

If you don't see this palette go to Window > Channels and it will appear. On the palette you can see four different lines - RGB, Red, Green and Blue. If you let visible only one of the Channels you'll see only values from that Channel.
Let's make visible the one where is the biggest contrast between sky and trees. In this case the biggest contrast is on the Blue Channel.

Right click on that Channel and select the option Duplicate Channel... . Make the original Blue Channel invisible.
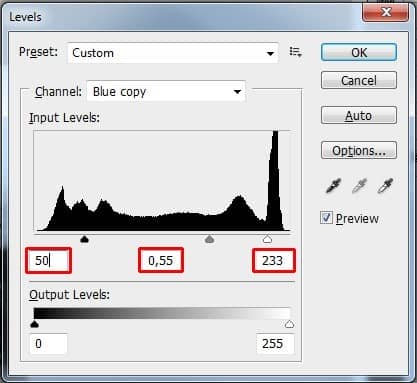
Let's adjust the Blue Channel copy to create good mask from it. Click on that channel and go to Image > Adjustments > Levels or press Ctrl + L on your keyboard. Set the Input Levels on 50; 0,55; 233 and press OK.

Make visible rest of the channels again and the one you've worked on invisible. Also make visible SKY layer on Layers palette.
Click on the layer SKY and then go to Select > Load Selection and as Channel choose Blue Copy. Press OK.


9 comments on “How to Use Light and Shadow to Create a Dramatic Photo Effect with Photoshop”
Thank you so much for this tutorial. I've read many tutorials about all of the tools you mentioned in this article, but I was never able to really grasp or truly understand the concept behind the tool. You have explained them in a way that really make sense to me!! And that is very much appreciated!
thanks a lot
thanks very nice.
Woow! I am very very impressed about your tutorial. With all your stuffs, i have no doubt am gonna be a pro in photoshop!
thats a wonderfull tutorial....thank u....
thanks wow nice
plz post a video tutorial....
Yes girl, nice job. Thanx
What a fantastic tutorial, covering so many aspects of photoshop. I'm now even more excited to learn the program. . Thank you! thank you! thank you!