Using this technique, add a Curves Adjustment Layer going to ‘Create new fill or adjustment layer’ > Curves and change the RGB line based on the image below.


We don’t want the sky to be brighter, only the ocean, so we’re going to change the layer mask of the adjustment layer. Click on the layer mask of the Curves adjustment layer, select a soft brush, and paint the sky with black to hide the adjustment layer in that area. Some quick tips:
- Press D on your keyboard to return the colors of your palette back to Black and White
- When painting a layer mask, black will hide the layer, and white will reveal it again
- If you make a mistake while painting a layer mask, you just have to paint the area where you made the mistake with white again
- You can quickly change between your background and foreground color by pressing X
- To hide a layer mask, hold the Shift key and click on the mask. Do the same thing if you want to reveal it again

You should now have something like this:

Now we’re going to change the sky a little bit. Add an Exposure Adjustment Layer non-destructively and set the Exposure to -20, the Offset to -0,15, and the Gamma Correction to 0,9.


It’s looking pretty weird, right? But that’s because it’s affecting the ocean as well, and we don’t want that. So click in the layer mask of our Exposure Adjustment Layer and paint the ocean with black this time.

Your image should be similar to this one now:

Now we’re going to add a few more non-destructive adjusts to the sky, so we’re going to have to paint the ocean part of the layer mask with black in all of them. Add a Brightness/Contrast Adjustment Layer, set the Brightness to +10, and remember to paint the ocean in the layer mask.


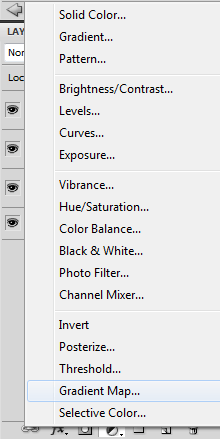
Add a Gradient Map Adjustment Layer and change the gradient colors (click on the gradient) following the image below. Set this layer blend mode to Color and the Opacity to 35%.


Add a Photo Filter adjustment layer, select the Filter Yellow, and change the blend mode of this layer to Color, lowering the opacity to around 30%. Remember to paint the ocean part of the layer mask again.


If you remembered to paint the ocean part of the layer mask in these three adjustment layers we just added, your image must be looking something like this:

Before moving to the next step let’s just clean our work area a little bit. Select all the layers we created so far and press Ctrl/Command + G to group them. Name the group Background.

Step 4: Add the turtle in the ocean
Open the turtle image in Photoshop and use the Quick Selection Tool (W) to make a quick selection around it. Don’t worry too much about the bottom part of the turtle because we will erase most of it later. Quick Tips:
32 responses to “How to Create a Surreal Scene Full of Life in Photoshop”
-
oh,I know it.
-
I like it very much.But how can i entire to see it.
-
thank! so much for that creation
-
Such a beautiful artwork!!
-
great tutorial thank you
-
this tutorial was awesome thanks
-
Really great tutorial. Very well explained step by step.
-
You’ve made a very nice and comprehensive collection of WordPress Themes. I appreciate it. Really great art work with typography. Thanks for sharing this nice post.
-
You’ve made a very nice and comprehensive collection of WordPress Themes. I appreciate it.
-
Outstanding tutorial!Clear instructions and awesome picture instructions. Very nice, thank you a bunch.
-
Beautiful image. Congratulations to the technical and thanks for the tutorial:)
-
Loved it!! Thankyou, I learnt such a lot :)
-
thanks! learn a lot of useful shortcut and tips here
-
I cant get my roots and elephants feet to lok right i need help
-
this looks awesome and easy
-
Thanks very much for this easy to follow tutorial!!
http://mrbloop.deviantart.com/art/Surreal-scene-full-of-life-346099572?q=gallery%3Amrbloop&qo=0
-
when I go to the exposure everything turns black. What do I do?
-
its -0.25 not -25. i did the same thing
-
-
I can not thank you enough, the amount of things I’ve learnt in two hours is incredible, would usually take me a week of watching and reading tutorials, but nope, you’ve used many techniques that made my life easier! Thank you is not enough!
-
Great tutorial!But the mountain photo is missing :/Some extra help…
-
just do what i did ,
download the attached PSD from up there and take the mountain photo from there :D -
@SalahKabbani Thank you for your response :)But how can I take it from the mountain layer
-
@SalahKabbani OK! Got it!I decided to replace the mountain photo with a desert one ^_^Thanks anyway :)
-
awsome tut
Thank you so much for this tutorial really great photo and great explanation love it.
but i have a problem with the mountain photo , the link of this photo doesn’t work , can you please upload it again or give me another photo that could be good for the tutorial ?
thanks
-
Never mind i took it from the downloadable project :)
I like it.
Thank you for your awesome tutorial.
Very nice Job!
Thanks a lot dear ^^.
Hi Guilherme, From the start of your tutorial you say to go to lens correction and distort the image to + 25,00, it distorts the image considerably !, is that right, ?, by the way it is a great tutorial,
regards and respect johnny
-
Its ok, all i did was after the lens correction was used the free transform tool and adjusted the image to cover my canvas again lol, My bad..
Can I use CS3 for this creative tutorail.
Can I use CS3 for this creative tutorail.


Leave a Reply